

Description
Sentry — un outil de surveillance des exceptions (exception), des erreurs dans vos applications.
Fonctionnalités principales :
- s'intègre facilement dans le projet,
- capture les erreurs à la fois dans le navigateur de l'utilisateur et sur votre serveur.
- Est gratuit,
- La liste des erreurs est mise à jour en temps réel,
- Si une erreur a été marquée comme résolue mais réapparaît, elle est de nouveau créée et est considérée dans un flux séparé,
- Les erreurs sont regroupées et affichées par ordre de fréquence d'apparition,
- Les erreurs peuvent être filtrées par statut, source de journalisation, niveau de journalisation, nom du serveur, etc.
Comparaison avec les logs ELK : la principale différence est que dans ELK chaque nouveau log identique est une entrée distincte, tandis que dans Sentry chaque nouvelle exception identique est simplement +1 au compteur de son enregistrement.
Sentry prend en charge la plupart des langages de programmation. En savoir plus .
Lancement de Sentry avec Docker et Docker Compose
Vous pouvez lancer Sentry avec Docker et Docker Compose comme décrit ici : . Mais le script exécute sur ce même serveur en mode simple (sans redondance) des services supplémentaires (pour la version Sentry 10.0.0) :
- data
- postgres
- redis
- zookeeper
- kafka
- clickhouse
- symbolicator
Si vous avez besoin de redondance, vous devrez utiliser le produit cloud de base ou installer Sentry sans ce script.
Ce post décrit le processus de construction de Sentry et de ses dépendances en RPM. Si vous devez installer Sentry là où il n'y a pas Internet, vous pouvez créer un dépôt Yum à partir des RPM obtenus.
Clarification importante sur la construction et l'installation des paquets
Certains paquets dépendent les uns des autres. C'est pourquoi le processus de construction et d'installation est divisé en plusieurs étapes.
À FAIRE :
Ce post couvre la construction et l'installation de Sentry version 9.1.2. Après la sortie de quelques versions mineures par les développeurs, vous pourrez également construire la version Sentry 10.X.Y. Beaucoup des derniers commits dans master sont des corrections.
Exigences du serveur pour construire RPM
Plus il y aura de CPU, plus la construction des paquets Semaphore et Symbolic sera rapide.
Désactivons Selinux
La communauté serait ravie si quelqu'un écrivait des politiques Selinux pour Sentry.
sudo sed -i s\/^SELINUX=.*$\/SELINUX=disabled\/ \/etc\/selinux\/config
sudo reboot
Connectons le dépôt epel-release
sudo yum install -y epel-release gitRassemblons les dépendances pip dans un RPM et installons-les. Fichier 1general_dependencies.sh
echo "Installer les dépendances"
sudo yum install -y cargo gcc gcc-c++ libffi-devel libjpeg-devel libxml2-devel
libxslt libxslt-devel make mc openssl-devel python-devel memcached
python-lxml python-nose python2-pip python34 rpm-build rpmdevtools
ruby-devel rubygems zlib-devel redis xmlsec1-openssl xmlsec1
libtool-ltdl-devel xmlsec1-devel xmlsec1-openssl-devel openldap-devel

echo "Construire les dépendances pip communes vers rpm avec fpm"
gem install --no-document fpm
echo "Pour chardet==3.0.2 besoin de setuptools>=12"
echo "Pour cryptography==2.8 besoin de setuptools>=18.5"
fpm -s python -t rpm setuptools==18.5
sudo yum install -y python-setuptools-18.5-1.noarch.rpm
fpm -s python -t rpm --name python2-pip pip==20.0.2
sudo yum install -y python2-pip-20.0.2-1.noarch.rpm
Nous installons et démarrons PostgreSQL 9.6 pour construire python-psycopg2-binary. Fichier 2psycopg2-binary.sh
Vous pouvez changer la version de PostgreSQL dans le script.
sudo yum install -y postgresql-devel
fpm -s python -t rpm psycopg2-binary==2.7.7
sudo yum install -y python-psycopg2-binary-2.7.7-1.x86_64.rpm
sudo yum remove -y postgresql-devel postgresql postgresql-libs
Construisons et installons python-dateutil rpm. Fichier 3dateutil.sh
#!/bin/bash

echo "Build and install python-dateutil rpm"
mkdir -p ~/rpmbuild/{BUILD,RPMS,SOURCES,SRPMS,SPECS}
spectool -g -R spec/python-dateutil.spec
wget https://raw.githubusercontent.com/patsevanton/sentry-rpm/master/spec/python-dateutil-system-zoneinfo.patch -P ~/rpmbuild/SOURCES
wget https://raw.githubusercontent.com/patsevanton/sentry-rpm/master/spec/python-dateutil-timelex-string.patch -P ~/rpmbuild/SOURCES
rpmbuild --bb spec/python-dateutil.spec
sudo yum install -y ~/rpmbuild/RPMS/noarch/python-dateutil-2.4.2-1.el7.noarch.rpm
Construisons et installons python-urllib3 rpm. Fichier 4urllib3.sh
Titre du spoiler
echo "Construire les dépendances pip vers rpm avec fpm pour urllib3"
fpm -s python -t rpm pycparser==2.19
sudo yum install -y python-pycparser-2.19-1.noarch.rpm
fpm -s python -t rpm cffi==1.14.0
sudo yum install -y python-cffi-1.14.0-1.x86_64.rpm
fpm -s python -t rpm cryptography==2.8
sudo yum install -y python-cryptography-2.8-1.x86_64.rpm
fpm -s python -t rpm idna==2.7
sudo yum install -y python-idna-2.7-1.noarch.rpm
sudo chmod +r /usr/lib/python2.7/site-packages/idna-2.7-py2.7.egg-info/PKG-INFO
fpm -s python -t rpm pyOpenSSL==19.1.0
sudo yum install -y python-pyopenssl-19.1.0-1.noarch.rpm
fpm -s python -t rpm pbr==5.4.4
sudo yum install -y python-pbr-5.4.4-1.noarch.rpm
fpm -s python -t rpm mock==2.0.0
sudo yum install -y python-mock-2.0.0-1.noarch.rpm
fpm -s python -t rpm py==1.8.1
sudo yum install -y python-py-1.8.1-1.noarch.rpm
fpm -s python -t rpm six==1.10.0
sudo yum install -y python-six-1.10.0-1.noarch.rpm
fpm -s python -t rpm pluggy==0.6.0
sudo yum install -y python-pluggy-0.6.0-1.noarch.rpm
fpm -s python -t rpm attrs==19.3.0
sudo yum install -y python-attrs-19.3.0-1.noarch.rpm
fpm -s python -t rpm more-itertools==5.0.0
sudo yum install -y python-more-itertools-5.0.0-1.noarch.rpm
fpm -s python -t rpm pytest==3.5.1
sudo yum install -y python-pytest-3.5.1-1.noarch.rpm

echo "Construire le rpm urllib"
spectool -g -R spec/urllib3-1.24.2.spec
sudo yum-builddep -y spec/urllib3-1.24.2.spec
rpmbuild --bb spec/urllib3-1.24.2.spec
sudo yum install -y ~/rpmbuild/RPMS/noarch/python-urllib3-1.24.2-1.el7.noarch.rpm
Construisons dans rpm les autres dépendances pip et les installons. Fichier 5other_dependencies.sh
Titre du spoiler
echo "Construire rpm avec fpm"
fpm -s python -t rpm jmespath==0.9.5
sudo yum install -y python-jmespath-0.9.5-1.noarch.rpm
fpm -s python -t rpm amqp==1.4.9
sudo yum install -y python-amqp-1.4.9-1.noarch.rpm
fpm -s python -t rpm anyjson==0.3.3
sudo yum install -y python-anyjson-0.3.3-1.noarch.rpm
fpm -s python -t rpm billiard==3.3.0.23
sudo yum install -y python-billiard-3.3.0.23-1.x86_64.rpm
fpm -s python -t rpm docutils==0.16
sudo yum install -y python-docutils-0.16-1.noarch.rpm
fpm -s python -t rpm Pillow==4.2.1
sudo yum install -y python-pillow-4.2.1-1.x86_64.rpm
fpm -s python -t rpm botocore==1.5.70
sudo yum install -y python-botocore-1.5.70-1.noarch.rpm
fpm -s python -t rpm boto3==1.4.5
sudo yum install -y python-boto3-1.4.5-1.noarch.rpm
fpm -s python -t rpm chardet==3.0.2
sudo yum install -y python-chardet-3.0.2-1.noarch.rpm
fpm -s python -t rpm croniter==0.3.31
sudo yum install -y python-croniter-0.3.31-1.noarch.rpm
fpm -s python -t rpm cssselect==1.1.0
sudo yum install -y python-cssselect-1.1.0-1.noarch.rpm
fpm -s python -t rpm cssutils==0.9.10
sudo yum install -y python-cssutils-0.9.10-1.noarch.rpm
fpm -s python -t rpm django-crispy-forms==1.4.0
sudo yum install -y python-django-crispy-forms-1.4.0-1.noarch.rpm
fpm -s python -t rpm django-jsonfield==0.9.13
sudo yum install -y python-django-jsonfield-0.9.13-1.noarch.rpm
fpm -s python -t rpm django-picklefield==0.3.2
sudo yum install -y python-django-picklefield-0.3.2-1.noarch.rpm
fpm -s python -t rpm django-sudo==2.1.0
sudo yum install -y python-django-sudo-2.1.0-1.noarch.rpm
fpm -s python -t rpm django-templatetag-sugar==1.0
sudo yum install -y python-django-templatetag-sugar-1.0-1.noarch.rpm
fpm -s python -t rpm djangorestframework==2.4.8
sudo yum install -y python-djangorestframework-2.4.8-1.noarch.rpm
fpm -s python -t rpm email-reply-parser==0.2.0
sudo yum install -y python-email_reply_parser-0.2.0-1.noarch.rpm
fpm -s python -t rpm enum34==1.1.9
sudo yum install -y python-enum34-1.1.9-1.noarch.rpm
fpm -s python -t rpm functools32==3.2.3.post2
sudo yum install -y python-functools32-3.2.3_2-1.noarch.rpm
fpm -s python -t rpm futures==3.3.0
sudo yum install -y python-futures-3.3.0-1.noarch.rpm
fpm -s python -t rpm hiredis==0.1.6
sudo yum install -y python-hiredis-0.1.6-1.x86_64.rpm
fpm -s python -t rpm honcho==1.0.1
sudo yum install -y python-honcho-1.0.1-1.noarch.rpm
fpm -s python -t rpm httplib2==0.17.0
sudo yum install -y python-httplib2-0.17.0-1.noarch.rpm
fpm -s python -t rpm jsonschema==2.6.0
sudo yum install -y python-jsonschema-2.6.0-1.noarch.rpm
fpm -s python -t rpm kombu==3.0.35
sudo yum install -y python-kombu-3.0.35-1.noarch.rpm
fpm -s python -t rpm celery==3.1.18
sudo yum install -y python-celery-3.1.18-1.noarch.rpm
fpm -s python -t rpm loremipsum==1.0.5
sudo yum install -y python-loremipsum-1.0.5-1.noarch.rpm
fpm -s python -t rpm lxml==4.5.0
sudo yum install -y python-lxml-4.5.0-1.x86_64.rpm
fpm -s python -t rpm milksnake==0.1.5
sudo yum install -y python-milksnake-0.1.5-1.noarch.rpm
fpm -s python -t rpm mistune==0.8.4
sudo yum install -y python-mistune-0.8.4-1.noarch.rpm
fpm -s python -t rpm mmh3==2.3.1
sudo yum install -y python-mmh3-2.3.1-1.x86_64.rpm
fpm -s python -t rpm exam==0.10.6
sudo yum install -y python-exam-0.10.6-1.noarch.rpm
fpm -s python -t rpm msgpack==0.6.2
sudo yum install -y python-msgpack-0.6.2-1.x86_64.rpm
fpm -s python -t rpm oauth2==1.9.0.post1
sudo yum install -y python-oauth2-1.9.0.post1-1.noarch.rpm
fpm -s python -t rpm oauthlib==3.1.0
sudo yum install -y python-oauthlib-3.1.0-1.noarch.rpm
fpm -s python -t rpm parsimonious==0.8.0
sudo yum install -y python-parsimonious-0.8.0-1.noarch.rpm
fpm -s python -t rpm requests==2.20.1
sudo yum install -y python-requests-2.20.1-1.noarch.rpm
fpm -s python -t rpm petname==2.0
sudo yum install -y python-petname-2.0-1.noarch.rpm
fpm -s python -t rpm python-utils==2.3.0
sudo yum install -y python-utils-2.3.0-1.noarch.rpm
fpm -s python -t rpm progressbar2==3.10.1
sudo yum install -y python-progressbar2-3.10.1-1.noarch.rpm
fpm -s python -t rpm pytest-django==2.9.1
sudo yum install -y python-pytest-django-2.9.1-1.noarch.rpm
fpm -s python -t rpm pytest-html==1.9.0
sudo yum install -y python-pytest-html-1.9.0-1.noarch.rpm
fpm -s python -t rpm python-memcached==1.59
sudo yum install -y python-memcached-1.59-1.noarch.rpm
fpm -s python -t rpm python-openid==2.2.5
sudo yum install -y python-openid-2.2.5-1.noarch.rpm
fpm -s python -t rpm python-u2flib-server==4.0.1
sudo yum install -y python-u2flib-server-4.0.1-1.noarch.rpm
fpm -s python -t rpm qrcode==5.3
sudo yum install -y python-qrcode-5.3-1.noarch.rpm
fpm -s python -t rpm querystring-parser==1.2.4
sudo yum install -y python-querystring_parser-1.2.4-1.noarch.rpm
fpm -s python -t rpm redis==2.10.5
sudo yum install -y python-redis-2.10.5-1.noarch.rpm
fpm -s python -t rpm rb==1.7
sudo yum install -y python-rb-1.7-1.noarch.rpm
fpm -s python -t rpm redis-py-cluster==1.3.4
sudo yum install -y python-redis-py-cluster-1.3.4-1.noarch.rpm
fpm -s python -t rpm requests-oauthlib==0.3.3
sudo yum install -y python-requests-oauthlib-0.3.3-1.noarch.rpm
fpm -s python -t rpm percy==2.0.2
sudo yum install -y python-percy-2.0.2-1.noarch.rpm
fpm -s python -t rpm selenium==3.141.0
sudo yum install -y python-selenium-3.141.0-1.noarch.rpm
fpm -s python -t rpm semaphore==0.4.65
sudo yum install -y python-semaphore-0.4.65-1.x86_64.rpm
fpm -s python -t rpm sentry-sdk==0.14.1
sudo yum install -y python-sentry-sdk-0.14.1-1.noarch.rpm
fpm -s python -t rpm setproctitle==1.1.10
sudo yum install -y python-setproctitle-1.1.10-1.x86_64.rpm
fpm -s python -t rpm simplejson==3.8.2
sudo yum install -y python-simplejson-3.8.2-1.x86_64.rpm
fpm -s python -t rpm sqlparse==0.1.19
sudo yum install -y python-sqlparse-0.1.19-1.noarch.rpm
fpm -s python -t rpm statsd==3.1
sudo yum install -y python-statsd-3.1-1.noarch.rpm
fpm -s python -t rpm strict-rfc3339==0.7
sudo yum install -y python-strict-rfc3339-0.7-1.noarch.rpm
fpm -s python -t rpm structlog==16.1.0
sudo yum install -y python-structlog-16.1.0-1.noarch.rpm
fpm -s python -t rpm symbolic==6.1.4
sudo yum install -y python-symbolic-6.1.4-1.x86_64.rpm
fpm -s python -t rpm toronado==0.0.11
sudo yum install -y python-toronado-0.0.11-1.noarch.rpm
fpm -s python -t rpm ua-parser==0.7.3
sudo yum install -y python-ua-parser-0.7.3-1.noarch.rpm
fpm -s python -t rpm uwsgi==2.0.18
sudo yum install -y python-uwsgi-2.0.18-1.noarch.rpm
fpm -s python -t rpm -n PyYAML pyyaml==3.11
sudo yum install -y PyYAML-3.11-1.x86_64.rpm
fpm -s python -t rpm django-auth-ldap==1.2.17
sudo yum install -y python-django-auth-ldap-1.2.17-1.noarch.rpm
Nous préparons rpm sentry et l'installons. Fichier 6sentry.sh
echo "Installer nodejs et yarn"
curl -sL https://rpm.nodesource.com/setup_10.x | sudo bash -
sudo yum install -y nodejs
sudo sed -e '/nodesource-source/+6d' -i /etc/yum.repos.d/nodesource-el7.repo
curl -sL https://dl.yarnpkg.com/rpm/yarn.repo | sudo tee /etc/yum.repos.d/yarn.repo
sudo yum install -y yarn

cp spec/config.yml spec/sentry.conf.py ~/rpmbuild/SOURCES
cp spec/sentry-cron.service spec/sentry-web.service spec/sentry-worker.service ~/rpmbuild/SOURCES
spectool -g spec/sentry-9.1.2.spec
sudo yum-builddep -y spec/sentry-9.1.2.spec
rpmbuild -bb spec/sentry-9.1.2.spec
sudo yum install -y ~/rpmbuild/RPMS/noarch/python-sentry-9.1.2-1.el7.noarch.rpm
Installation de sentry rpm avec les dépendances sur un autre serveur
Désactivons Selinux
sudo sed -i s/^SELINUX=.*$/SELINUX=disabled/ /etc/selinux/config
#### sudo reboot
Connectons le dépôt epel-release
sudo yum install -y epel-release git libjpeg-turbo redis
sudo systemctl start redis
Nous installons et démarrons PostgreSQL 9.6. Fichier 7postgresql.sh
sudo yum install -y https://download.postgresql.org/pub/repos/yum/reporpms/EL-7-x86_64/pgdg-redhat-repo-latest.noarch.rpm
sudo yum install -y postgresql96 postgresql96-server postgresql96-contrib
sudo /usr/pgsql-9.6/bin/postgresql96-setup initdb
sudo systemctl start postgresql-9.6
sudo -i -u postgres psql -c "create user sentry with password 'password';"
sudo -i -u postgres psql -c "create database sentry with owner sentry;"
sudo -i -u postgres psql -c "alter role sentry superuser;"

# TODO: Vérifier sans droits superuser pour le rôle sentry
#sudo -i -u postgres psql -c "alter role sentry nosuperuser;"
#sudo -i -u postgres psql -c "CREATE SCHEMA main AUTHORIZATION sentry;"
Nous lançons la migration (création du schéma de la base de données) et démarrons les services. Fichier 8start_sentry.sh
sudo systemctl start redis
sudo -i -u sentry /usr/bin/sentry --config /etc/sentry/ upgrade
sudo systemctl start sentry-worker
sudo systemctl start sentry-cron
sudo systemctl start sentry-web
Créons un administrateur interne Sentry
sudo -i -u sentry /usr/bin/sentry --config /etc/sentry/ createuser Compilation de sentry en rpm, installation, configuration pour les paresseux
Désactivons Selinux
sudo sed -i s\/^SELINUX=.*$\/SELINUX=disabled\/ \/etc\/selinux\/config
sudo reboot
Nous exécutons les scripts pour la compilation et l'installation de sentry
sudo yum install -y epel-release git
git clone https://github.com/patsevanton/sentry-rpm.git
cd sentry-rpm
./1general_dependencies.sh
./2psycopg2-binary.sh
./3dateutil.sh
./4urllib3.sh
./5other_dependencies.sh
./6sentry.sh
Copiez les rpm de rpmbuild/RPMS et de la racine sentry-rpm sur le serveur cible. Créons un dépôt yum. Installons tous les paquets rpm compilés.
./7postgresql.sh
./8start_sentry.sh
Créons un administrateur interne Sentry
sudo -i -u sentry /usr/bin/sentry --config /etc/sentry/ createuser Test d'envoi d'exception
Nous allons tester sur un projet java. Téléchargeons java et maven.
sudo yum install -y java-1.8.0-openjdk-devel git
sudo wget http://repos.fedorapeople.org/repos/dchen/apache-maven/epel-apache-maven.repo -O /etc/yum.repos.d/epel-apache-maven.repo
sudo yum -y install apache-maven
git clone https://github.com/getsentry/examples.git
cd examples/java/basic
mvn compile exec:java
Nous devons maintenant exécuter java en lui passant SENTRY_DSN
SENTRY_DSN=https://public:private@host:port/1 mvn exec:javaNous devons maintenant trouver le SENTRY_DSN généré par défaut.
Connectons-nous à Sentry. Accédons au projet par défaut interne.
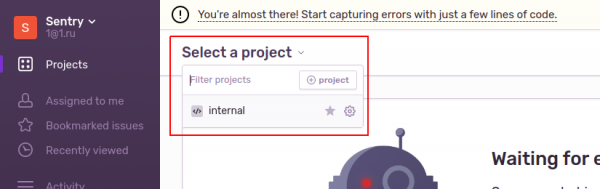
ou
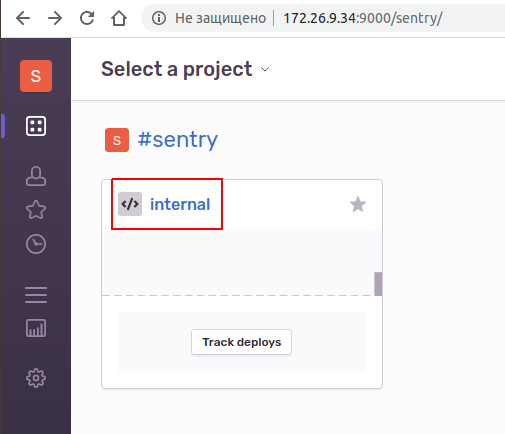
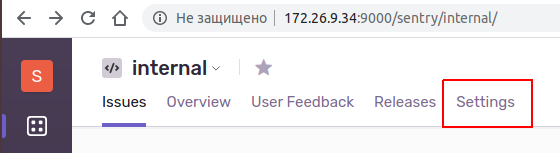
Accédons aux paramètres du projet.
Allons dans les Clés Client (DSN).
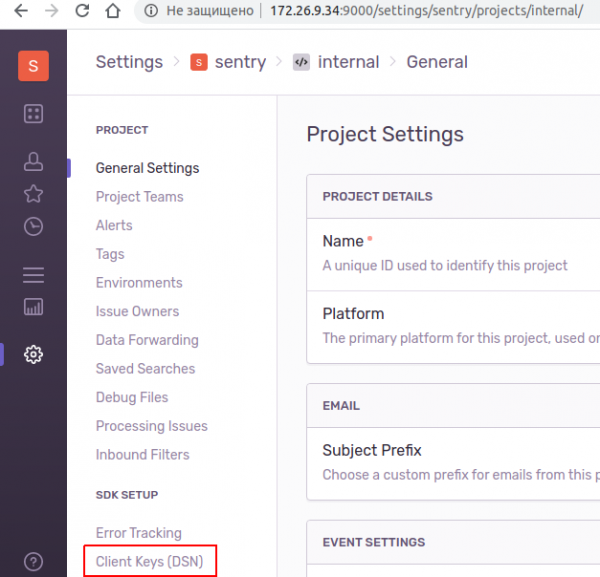
Copions le DSN. C'est le SENTRY_DSN.
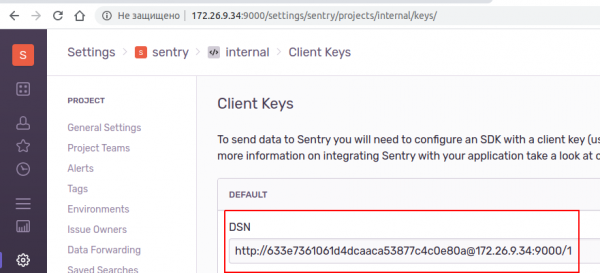
Exécutons java avec ce paramètre.
SENTRY_DSN=http://633e7361061d4dcaaca53877c4c0e80a@172.26.9.34:9000/1 mvn exec:javaNous voyons une telle image.
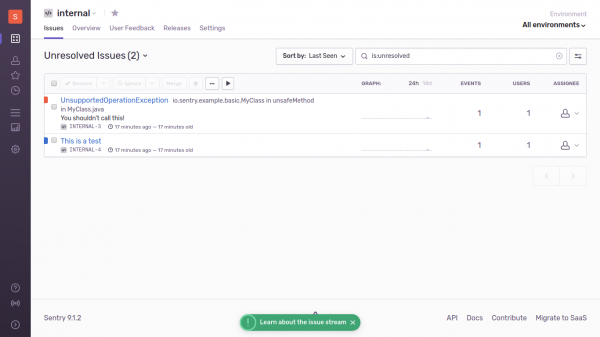
Si nous allons dans UnsupportedOperationException, nous verrons des informations détaillées.
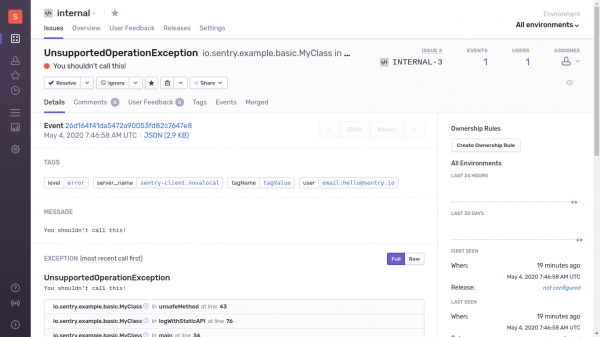
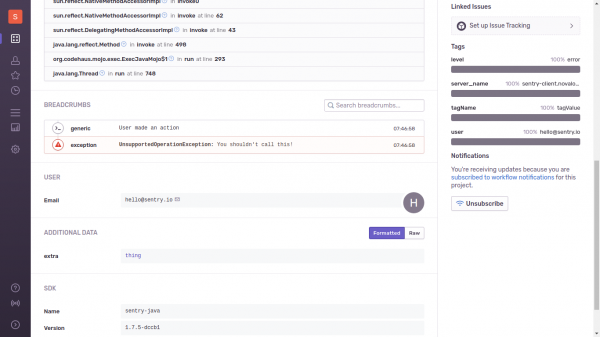
J'ai créé un chat Telegram pour Sentry.
Dans les prochains épisodes :
- Tester LDAP. J'ai déjà préparé le script.
9sentry-ldap-auth.sh - Tester la version 10.0.X de Sentry après la sortie de quelques mises à jour mineures.
Dépôt avec les scripts :
Source : habr.com
