

Questo è il terzo articolo della serie "Scrivere un bot di telegram in linguaggio R". Negli articoli precedenti abbiamo imparato a creare un bot di telegram, inviare messaggi tramite esso, e abbiamo aggiunto comandi e filtri per i messaggi. Pertanto, prima di iniziare la lettura di questo articolo, vi consiglio vivamente di consultare le , poiché qui non mi soffermerò sulle basi già descritte nella costruzione di bot.
In questo articolo miglioreremo l'usabilità del nostro bot aggiungendo una tastiera che renderà l'interfaccia del bot intuitiva e facile da usare.

Tutti gli articoli della serie "Scriviamo un bot di Telegram in R"
Contenuto
Se siete interessati all'analisi dei dati, potrebbero interessarvi i miei e canali. Gran parte del contenuto è dedicato al linguaggio R.
3.1.
3.2.
3.3.
Quali tipi di tastiere supporta il bot di telegram
Al momento della scrittura dell'articolo telegram.bot ti permette di creare tastiere di due tipi:
- Reply — La tastiera principale e standard che si trova sotto il pannello di immissione del testo del messaggio. Questa tastiera invia semplicemente al bot un messaggio di testo, riportando come testo quello scritto sul pulsante.
- Inline — Tastiera collegata a un messaggio specifico del bot. Questa tastiera invia al bot dati associati al pulsante premuto, e questi dati possono differire dal testo scritto sul pulsante stesso. E le funzionalità di queste bottoni sono gestite tramite CallbackQueryHandler.
Per fare in modo che il bot apra la tastiera, è necessario inviare un messaggio tramite il metodo sendMessage(), passando la tastiera precedentemente creata come argomento reply_markup.
Di seguito analizzeremo alcuni esempi.
Tastiera di risposta
Come già scritto sopra, questa è la tastiera principale per il controllo del bot.
Esempio di creazione di una tastiera Reply dalla documentazione ufficiale
bot <- Bot(token = "TOKEN")
chat_id <- "CHAT_ID"

# Crea Tastiera Personalizzata
text <- "Non sono forse quelle tastiere personalizzate fantastiche?"
RKM <- ReplyKeyboardMarkup(
  keyboard = list(
    list(KeyboardButton("Sì, certamente lo sono!")),
    list(KeyboardButton("Non sono sicuro")),
    list(KeyboardButton("No..."))
  ),
  resize_keyboard = FALSE,
  one_time_keyboard = TRUE
)

# Invia Tastiera Personalizzata
bot$sendMessage(chat_id, text, reply_markup = RKM)
Il sopra è un esempio dalla documentazione ufficiale del pacchetto telegram.bot. Per creare la tastiera si utilizza la funzione ReplyKeyboardMarkup(), che a sua volta accetta un elenco di elenchi di pulsanti, creati dalla funzione KeyboardButton().
Perché in ReplyKeyboardMarkup() è necessario passare non solo un elenco, ma un elenco di elenchi? Il motivo è che si passa l'elenco principale, e in esso si definiscono separatamente ogni riga di pulsanti, poiché in una riga possono essere posizionati più pulsanti.
Argomento resize_keyboard consente di adattare automaticamente la dimensione ottimale dei pulsanti della tastiera, mentre l'argomento one_time_keyboard consente di nascondere la tastiera dopo ogni pressione del pulsante.
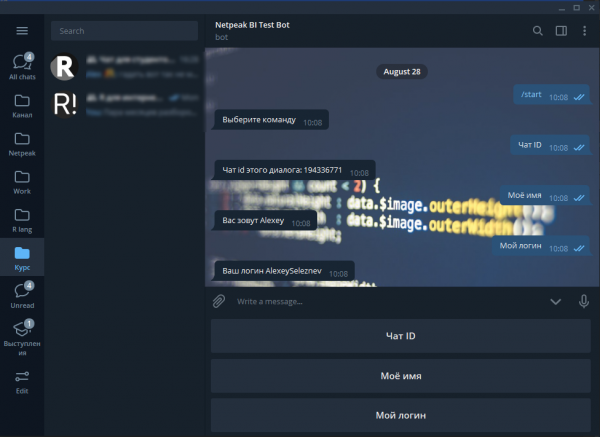
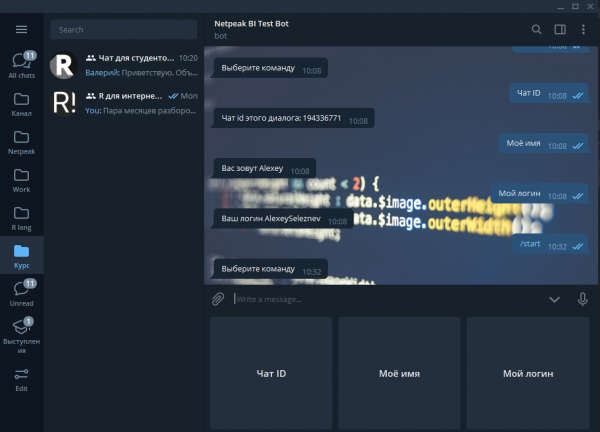
Scriviamo un bot semplice, che avrà 3 pulsanti:
- ID chat — Richiedi l'ID chat del dialogo con il bot
- Il mio nome — Richiedi il tuo nome
- Il mio username — Richiedi il tuo nome utente su Telegram
Codice 1: Bot semplice con tastiera Reply
library(telegram.bot)

# creiamo un'istanza della classe Updater
updater <- Updater('TOKEN DEL TUO BOT')

# creiamo i metodi
## metodo per avviare la tastiera
start <- function(bot, update) {

  # creiamo la tastiera
  RKM <- ReplyKeyboardMarkup(
    keyboard = list(
      list(KeyboardButton("ID Chat")),
      list(KeyboardButton("Il mio nome")),
      list(KeyboardButton("Il mio username"))
    ),
    resize_keyboard = FALSE,
    one_time_keyboard = TRUE
  )

  # inviamo la tastiera
  bot$sendMessage(update$message$chat_id,
                  text = 'Scegli un comando',
                  reply_markup = RKM)

}

## metodo che restituisce l'id della chat
chat_id <- function(bot, update) {

  bot$sendMessage(update$message$chat_id,
                  text = paste0("ID chat di questo dialogo: ", update$message$chat_id),
                  parse_mode = "Markdown")

}

## metodo che restituisce il nome
my_name <- function(bot, update) {

  bot$sendMessage(update$message$chat_id,
                  text = paste0("Ti chiami ", update$message$from$first_name),
                  parse_mode = "Markdown")

}

## metodo che restituisce lo username
my_username <- function(bot, update) {

  bot$sendMessage(update$message$chat_id,
                  text = paste0("Il tuo username ", update$message$from$username),
                  parse_mode = "Markdown")

}

# creiamo i filtri
## messaggi con il testo ID Chat
MessageFilters$chat_id <- BaseFilter(function(message) {

  # controlliamo il testo del messaggio
  message$text == "ID Chat"

}
)

## messaggi con il testo Il mio nome
MessageFilters$name <- BaseFilter(function(message) {

  # controlliamo il testo del messaggio
  message$text == "Il mio nome"

}
)

## messaggi con il testo Il mio username
MessageFilters$username <- BaseFilter(function(message) {

  # controlliamo il testo del messaggio
  message$text == "Il mio username"
)

# creiamo i gestori
h_start    <- CommandHandler('start', start)
h_chat_id  <- MessageHandler(chat_id, filters = MessageFilters$chat_id)
h_name     <- MessageHandler(my_name, filters = MessageFilters$name)
h_username <- MessageHandler(my_username, filters = MessageFilters$username)

# aggiungiamo i gestori al dispatcher
updater <- updater +
            h_start +
            h_chat_id +
            h_name +
            h_username

# avviamo il bot
updater$start_polling()
Esegui l'esempio di codice fornito sopra, sostituendo ‘IL TOKEN DEL VOSTRO BOT’ con il token reale che hai ricevuto durante la creazione del bot tramite BotFather (ho parlato della creazione del bot in ).
Dopo l'avvio, invia al bot il comando /start, poiché è questo che abbiamo definito per avviare la tastiera.
Se attualmente hai difficoltà a comprendere l'esempio di codice fornito, che riguarda la creazione di metodi, filtri e gestori, dovresti tornare alla precedente , in cui ho descritto tutto in dettaglio.
Abbiamo creato 4 metodi:
- start — Avvio della tastiera
- chat_id — Richiesta dell'identificativo della chat
- my_name — Richiesta del proprio nome
- my_username — Richiesta del proprio nickname
Nell'oggetto MessageFilters abbiamo aggiunto 3 filtri per i messaggi, basati sul loro testo:
- chat_id — Messaggi con il testo
"Chat ID" - name — Messaggi con il testo
"Il mio nome" - username — Messaggi con il testo
"Il mio nickname"
E abbiamo creato 4 gestori che eseguiranno i metodi specificati in base ai comandi e ai filtri assegnati.
# создаём обработчики
h_start    <- CommandHandler('start', start)
h_chat_id  <- MessageHandler(chat_id, filters = MessageFilters$chat_id)
h_name     <- MessageHandler(my_name, filters = MessageFilters$name)
h_username <- MessageHandler(my_username, filters = MessageFilters$username)
La tastiera stessa viene creata all'interno del metodo start() comando ReplyKeyboardMarkup().
RKM <- ReplyKeyboardMarkup(
    keyboard = list(
      list(KeyboardButton("Chat ID")),
      list(KeyboardButton("Il mio nome")),
      list(KeyboardButton("Il mio nickname"))
    ),
    resize_keyboard = FALSE,
    one_time_keyboard = TRUE
)
Nel nostro caso, abbiamo disposto tutti i pulsanti uno sotto l'altro, ma possiamo anche organizzarli in un'unica fila modificando la lista dei pulsanti. Poiché una fila all'interno della tastiera viene creata tramite una lista annidata di pulsanti, per visualizzare i nostri pulsanti in un'unica fila, dobbiamo riscrivere parte del codice per costruire la tastiera in questo modo:
RKM <- ReplyKeyboardMarkup(
    keyboard = list(
      list(
          KeyboardButton("Chat ID"),
          KeyboardButton("Il mio nome"),
          KeyboardButton("Il mio login")
     )
    ),
    resize_keyboard = FALSE,
    one_time_keyboard = TRUE
)
La tastiera viene inviata nella chat tramite il metodo sendMessage(), nell'argomento reply_markup.
  bot$sendMessage(update$message$chat_id,
                  text = 'Seleziona un comando',
                  reply_markup = RKM)
Tastiera in linea
Come ho già scritto sopra, la tastiera Inline è associata a un messaggio specifico. Lavorare con essa è un po' più complesso rispetto alla tastiera principale.
Inizialmente, è necessario aggiungere al bot un metodo per richiamare la tastiera Inline.
Per rispondere alla pressione del pulsante Inline, è possibile utilizzare anche il metodo del bot answerCallbackQuery(), che può visualizzare una notifica nell'interfaccia di Telegram per l'utente che ha premuto il pulsante Inline.
I dati inviati con il pulsante Inline non sono testo, quindi è necessario creare un gestore speciale per elaborarli utilizzando il comando CallbackQueryHandler().
Il codice per costruire la tastiera Inline fornito nella documentazione ufficiale del pacchetto telegram.bot.
Il codice per costruire la tastiera Inline dalla documentazione ufficiale
# Initialize bot
bot <- Bot(token = "TOKEN")
chat_id <- "CHAT_ID"

# Create Inline Keyboard
text <- "Could you type their phone number, please?"
IKM <- InlineKeyboardMarkup(
  inline_keyboard = list(
    list(
      InlineKeyboardButton(1),
      InlineKeyboardButton(2),
      InlineKeyboardButton(3)
    ),
    list(
      InlineKeyboardButton(4),
      InlineKeyboardButton(5),
      InlineKeyboardButton(6)
    ),
    list(
      InlineKeyboardButton(7),
      InlineKeyboardButton(8),
      InlineKeyboardButton(9)
    ),
    list(
      InlineKeyboardButton("*"),
      InlineKeyboardButton(0),
      InlineKeyboardButton("#")
    )
  )
)

# Send Inline Keyboard
bot$sendMessage(chat_id, text, reply_markup = IKM)
Per costruire la tastiera Inline è necessario utilizzare il comando InlineKeyboardMarkup(), seguendo lo stesso principio della tastiera Reply. In InlineKeyboardMarkup() è necessario passare un elenco di liste di pulsanti Inline, ogni singolo pulsante è creato dalla funzione InlineKeyboardButton().
Il pulsante Inline può sia inviare dati al bot utilizzando l'argomento callback_data, sia aprire una pagina HTML specificata dall'argomento url.
Il risultato sarà un elenco in cui ogni elemento è a sua volta un elenco di pulsanti Inline, che devono essere uniti in una sola fila.
Successivamente, esamineremo alcuni esempi di bot con pulsanti Inline.
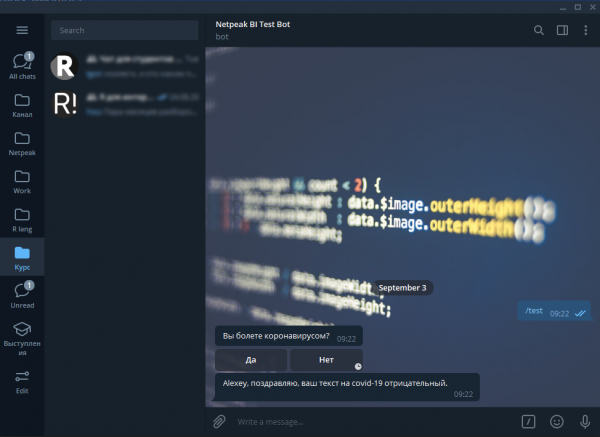
Esempio di un semplice bot con supporto per i pulsanti in linea
Per iniziare, scriveremo un bot per il test rapido del covid-19. Con il comando /test, invierà una tastiera con due pulsanti; a seconda del pulsante premuto, ti invierà un messaggio con i risultati del tuo test.
Codice 2: Un semplice bot con tastiera inline
library(telegram.bot)

# creiamo un'istanza della classe Updater
updater <- Updater('IL TOKEN DEL TUO BOT')

# metodo per inviare una tastiera InLine
test <- function(bot, update) {

  # creiamo la tastiera InLine
  IKM <- InlineKeyboardMarkup(
    inline_keyboard = list(
      list(
        InlineKeyboardButton("Sì", callback_data = 'yes'),
        InlineKeyboardButton("No", callback_data = 'no')
      )
    )
  )

  # Inviamo la tastiera nella chat
  bot$sendMessage(update$message$chat_id,
                  text = "Hai il coronavirus?",
                  reply_markup = IKM)
}

# metodo per gestire la pressione del pulsante
answer_cb <- function(bot, update) {

  # dati ricevuti dal pulsante
  data <- update$callback_query$data

  # otteniamo il nome utente della persona che ha premuto il pulsante
  uname <- update$effective_user()$first_name

  # elaborazione del risultato
  if ( data == 'no' ) {

    msg <- paste0(uname, ", congratulazioni, il tuo test per covid-19 è negativo.")

  } else {

    msg <- paste0(uname, ", sfortunatamente il tuo test per covid-19 è positivo.")

  }

  # Invio del messaggio
  bot$sendMessage(chat_id = update$from_chat_id(),
                  text = msg)

  # informiamo il bot che la richiesta dal pulsante è stata ricevuta
  bot$answerCallbackQuery(callback_query_id = update$callback_query$id)
}

# creiamo i gestori
inline_h      <- CommandHandler('test', test)
query_handler <- CallbackQueryHandler(answer_cb)

# aggiungiamo i gestori al dispatcher
updater <- updater + inline_h + query_handler

# avviamo il bot
updater$start_polling()
Esegui l'esempio di codice fornito sopra, sostituendo ‘IL TOKEN DEL VOSTRO BOT’ con il token reale che hai ricevuto durante la creazione del bot tramite BotFather (ho parlato della creazione del bot in ).
Risultato:
Abbiamo creato due metodi:
- test — Per inviare nel chat della Tastiera Inline
- answer_cb — Per elaborare i dati inviati dalla tastiera.
I dati che saranno inviati con ogni pulsante sono impostati nell'argomento callback_data, quando si crea il pulsante. I dati inviati dal pulsante possono essere ottenuti tramite la costruzione update$callback_query$data, all'interno del metodo answer_cb.
Affinché il bot reagisca alla Tastiera Inline, il metodo answer_cb viene trattato da un gestore speciale: CallbackQueryHandler(answer_cb). Che attiva il metodo specificato al click del pulsante Inline. Il gestore CallbackQueryHandler accetta due argomenti:
callback— Il metodo che deve essere attivatopattern— Filtro per i dati che sono legati al pulsante tramite l'argomentocallback_data.
Pertanto, tramite l'argomento pattern possiamo scrivere un metodo separato per ogni pulsante cliccato:
Codice 3: Separiamo i metodi per ogni pulsante Inline
library(telegram.bot)

# creiamo un'istanza della classe Updater
updater <- Updater('IL TOKEN DEL TUO BOT')

# metodo per inviare una tastiera InLine
test <- function(bot, update) {

  # creiamo la tastiera InLine
  IKM <- InlineKeyboardMarkup(
    inline_keyboard = list(
      list(
        InlineKeyboardButton("Sì", callback_data = 'yes'),
        InlineKeyboardButton("No", callback_data = 'no')
      )
    )
  )

  # Inviamo la tastiera alla chat
  bot$sendMessage(update$message$chat_id,
                  text = "Hai il coronavirus?",
                  reply_markup = IKM)
}

# metodo per gestire la pressione del pulsante Sì
answer_cb_yes <- function(bot, update) {

  # otteniamo il nome utente che ha premuto il pulsante
  uname <- update$effective_user()$first_name

  # elaborazione del risultato
  msg <- paste0(uname, ", sfortunatamente il tuo test per covid-19 è positivo.")

  # Invio del messaggio
  bot$sendMessage(chat_id = update$from_chat_id(),
                  text = msg)

  # informiamo il bot che la richiesta dal pulsante è stata ricevuta
  bot$answerCallbackQuery(callback_query_id = update$callback_query$id)
}

# metodo per gestire la pressione del pulsante No
answer_cb_no <- function(bot, update) {

  # otteniamo il nome utente che ha premuto il pulsante
  uname <- update$effective_user()$first_name

  msg <- paste0(uname, ", congratulazioni, il tuo test per covid-19 è negativo.")

  # Invio del messaggio
  bot$sendMessage(chat_id = update$from_chat_id(),
                  text = msg)

  # informiamo il bot che la richiesta dal pulsante è stata ricevuta
  bot$answerCallbackQuery(callback_query_id = update$callback_query$id)
}

# creiamo i gestori
inline_h          <- CommandHandler('test', test)
query_handler_yes <- CallbackQueryHandler(answer_cb_yes, pattern = 'yes')
query_handler_no  <- CallbackQueryHandler(answer_cb_no, pattern = 'no')

# aggiungiamo i gestori al dispatcher
updater <- updater +
            inline_h +
            query_handler_yes +
            query_handler_no

# avviamo il bot
updater$start_polling()
Esegui l'esempio di codice fornito sopra, sostituendo ‘IL TOKEN DEL VOSTRO BOT’ con il token reale che hai ricevuto durante la creazione del bot tramite BotFather (ho parlato della creazione del bot in ).
Ora abbiamo scritto 2 metodi separati, ovvero un metodo per ciascun pulsante, e utilizzato l'argomento pattern, durante la creazione dei loro gestori:
query_handler_yes <- CallbackQueryHandler(answer_cb_yes, pattern = 'yes')
query_handler_no <- CallbackQueryHandler(answer_cb_no, pattern = 'no')
Il codice del metodo termina answer_cb comando bot$answerCallbackQuery(callback_query_id = update$callback_query$id), che informa il bot che i dati dall'interfaccia della tastiera inline sono stati ricevuti.
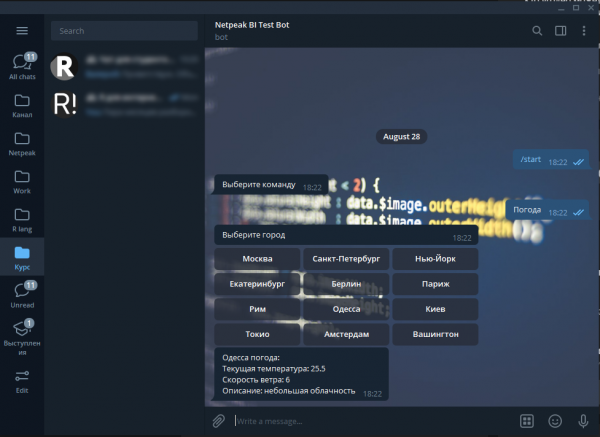
Esempio di bot che fornisce il meteo attuale per la città selezionata
Proviamo a scrivere un bot che richieda dati sul meteo.
La logica del suo funzionamento sarà la seguente. Inizialmente, con il comando /start richiamate la tastiera principale, nella quale è presente solo un pulsante "Meteo". Cliccando su questo pulsante, riceverete un messaggio con una tastiera inline per selezionare la città di cui desiderate conoscere il meteo attuale. Selezionate una delle città e riceverete il meteo attuale.
In questo esempio di codice utilizzeremo alcuni pacchetti aggiuntivi:
httr— un pacchetto per lavorare con richieste HTTP, sulla base del quale si costruisce il lavoro con qualsiasi API. Nel nostro caso utilizzeremo l'API gratuita .stringr— un pacchetto per lavorare con il testo, nel nostro caso lo utilizzeremo per formulare il messaggio sul meteo nella città selezionata.
Codice 4: Un bot che fornisce le previsioni del tempo attuale per la città selezionata
library(telegram.bot)
library(httr)
library(stringr)

# creiamo un'istanza della classe Updater
updater <- Updater('IL TOKEN DEL TUO BOT')

# definiamo i metodi
## metodo per avviare la tastiera principale
start <- function(bot, update) {

  # creiamo la tastiera
  RKM <- ReplyKeyboardMarkup(
    keyboard = list(
      list(
        KeyboardButton("Metereologia")
      )
    ),
    resize_keyboard = TRUE,
    one_time_keyboard = TRUE
  )

  # inviamo la tastiera
  bot$sendMessage(update$message$chat_id,
                  text = 'Scegli un comando',
                  reply_markup = RKM)

}

## Metodo per attivare la tastiera Inine
weather <- function(bot, update) {

  IKM <- InlineKeyboardMarkup(
    inline_keyboard = list(
      list(
        InlineKeyboardButton(text = 'Mosca', callback_data = 'New York,us'),
        InlineKeyboardButton(text = 'San Pietroburgo', callback_data = 'Saint Petersburg'),
        InlineKeyboardButton(text = 'New York', callback_data = 'New York')
      ),
      list(
        InlineKeyboardButton(text = 'Ekaterinburg', callback_data = 'Yekaterinburg,ru'),
        InlineKeyboardButton(text = 'Berlino', callback_data = 'Berlin,de'),
        InlineKeyboardButton(text = 'Parigi', callback_data = 'Paris,fr')
      ),
      list(
        InlineKeyboardButton(text = 'Roma', callback_data = 'Rome,it'),
        InlineKeyboardButton(text = 'Odessa', callback_data = 'Odessa,ua'),
        InlineKeyboardButton(text = 'Kyiv', callback_data = 'Kyiv,fr')
      ),
      list(
        InlineKeyboardButton(text = 'Tokyo', callback_data = 'Tokyo'),
        InlineKeyboardButton(text = 'Amsterdam', callback_data = 'Amsterdam,nl'),
        InlineKeyboardButton(text = 'Washington', callback_data = 'Washington,us')
      )
    )
  )

  # Invia la tastiera Inline
  bot$sendMessage(chat_id = update$message$chat_id,
                  text = "Seleziona una città",
                  reply_markup = IKM)
}

# metodo per il messaggio del tempo
answer_cb <- function(bot, update) {

  # otteniamo dalla richiesta il nome della città
  city <- update$callback_query$data

  # inviamo la richiesta
  ans <- GET('https://api.openweathermap.org/data/2.5/weather',
             query = list(q     = city,
                          lang  = 'it',
                          units = 'metric',
                          appid = '4776568ccea136ffe4cda9f1969af340'))

  # analizzando la risposta
  result <- content(ans)

  # formiamo il messaggio
  msg <- str_glue("{result$name} meteo:n",
                  "Temperatura attuale: {result$main$temp}n",
                  "Velocità del vento: {result$wind$speed}n",
                  "Descrizione: {result$weather[[1]]$description}")

  # inviamo informazioni sul meteo
  bot$sendMessage(chat_id = update$from_chat_id(),
                  text    = msg)

  bot$answerCallbackQuery(callback_query_id = update$callback_query$id)
}

# definiamo i filtri
## messaggi con il testo Meteo
MessageFilters$weather <- BaseFilter(function(message) {

  # controlliamo il testo del messaggio
  message$text == "Metereologia"

}
)

# definiamo i gestori
h_start         <- CommandHandler('start', start)
h_weather       <- MessageHandler(weather, filters = MessageFilters$weather)
h_query_handler <- CallbackQueryHandler(answer_cb)

# aggiungiamo i gestori al dispatcher
updater <- updater +
              h_start +
              h_weather +
              h_query_handler

# avviamo il bot
updater$start_polling()
Esegui l'esempio di codice fornito sopra, sostituendo ‘IL TOKEN DEL VOSTRO BOT’ con il token reale che hai ricevuto durante la creazione del bot tramite BotFather (ho parlato della creazione del bot in ).
Di conseguenza, il nostro bot funzionerà più o meno così:
Questo è un schema di come può essere progettato questo bot:
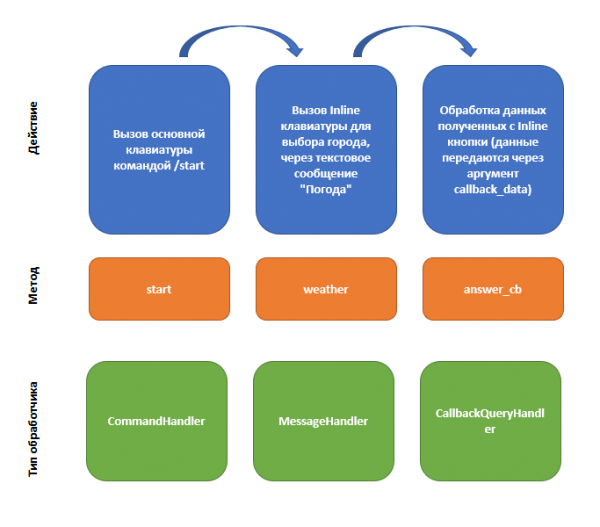
Abbiamo creato 3 metodi disponibili all'interno del nostro bot meteorologico:
- start — Avvio della tastiera principale del bot
- weather — Avvio della tastiera Inline per la selezione della città
- answer_cb — Metodo principale che secondo la città fornita richiede le informazioni meteorologiche dall'API e le invia in chat.
Metodo start viene avviato con il comando /start, implementato dal gestore CommandHandler('start', start).
Per eseguire il metodo weather abbiamo creato un filtro omonimo:
# создаём фильтры
## сообщения с текстом Погода
MessageFilters$weather <- BaseFilter(function(message) {

  # проверяем текст сообщения
  message$text == "Погода"

}
)
E chiamiamo questo metodo con il seguente gestore messaggi: MessageHandler(weather, filters = MessageFilters$weather).
E infine, il nostro metodo principale answer_cb reagisce al tocco dei pulsanti Inline, cosa implementata da un gestore speciale: CallbackQueryHandler(answer_cb).
All'interno del metodo answer_cb, leggiamo i dati inviati dalla tastiera e li memorizziamo nella variabile city: city <- update$callback_query$data. Dopodiché richiediamo all'API i dati meteorologici, formiamo e inviamo un messaggio, e infine utilizziamo il metodo answerCallbackQuery per informare il bot che abbiamo elaborato la pressione del pulsante Inline.
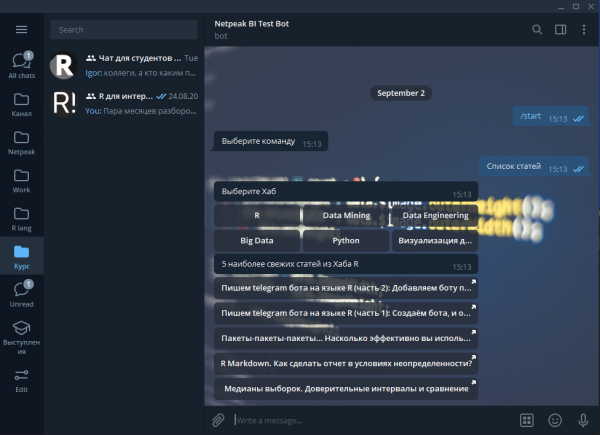
Un esempio di bot che mostra un elenco degli articoli più recenti con i link per il Hub specificato da .
Questo bot lo presento per mostrarvi come generare pulsanti inline che rimandano a pagine web.
La logica di questo bot è simile alla precedente; inizialmente, avviamo la tastiera principale con il comando /start. Successivamente, il bot ci offre un elenco di 6 hub, scegliamo l'hub che ci interessa e riceviamo 5 delle pubblicazioni più recenti dall'hub selezionato.
Come potete capire, in questo caso dobbiamo ottenere un elenco di articoli, e per questo utilizzeremo un pacchetto speciale habR, che permette di richiedere articoli da Habr e alcune statistiche su di essi in R.
Il pacchetto habR può essere installato solo da github, per cui avrete bisogno di un pacchetto aggiuntivo devtools. Per l'installazione, utilizzate il codice fornito di seguito.
install.packages('devtools')
devtools::install_github('selesnow/habR')
Ora consideriamo il codice per costruire il bot descritto sopra:
Codice 5: Bot che mostra l'elenco degli articoli più recenti per l'hub selezionato.
library(telegram.bot)
library(habR)

# creiamo un'istanza della classe Updater
updater <- Updater('IL TOKEN DEL TUO BOT')

# creiamo i metodi
## metodo per avviare la tastiera principale
start <- function(bot, update) {

  # creiamo la tastiera
  RKM <- ReplyKeyboardMarkup(
    keyboard = list(
      list(
        KeyboardButton("Elenco articoli")
      )
    ),
    resize_keyboard = TRUE,
    one_time_keyboard = TRUE
  )

  # inviamo la tastiera
  bot$sendMessage(update$message$chat_id,
                  text = 'Seleziona un comando',
                  reply_markup = RKM)

}

## Metodo per invocare la tastiera Inline
habs <- function(bot, update) {

  IKM <- InlineKeyboardMarkup(
    inline_keyboard = list(
      list(
        InlineKeyboardButton(text = 'R', callback_data = 'R'),
        InlineKeyboardButton(text = 'Data Mining', callback_data = 'data_mining'),
        InlineKeyboardButton(text = 'Data Engineering', callback_data = 'data_engineering')
      ),
      list(
        InlineKeyboardButton(text = 'Big Data', callback_data = 'bigdata'),
        InlineKeyboardButton(text = 'Python', callback_data = 'python'),
        InlineKeyboardButton(text = 'Visualizzazione dati', callback_data = 'data_visualization')
      )
    )
  )

  # Invia la tastiera Inline
  bot$sendMessage(chat_id = update$message$chat_id,
                  text = "Seleziona Hub",
                  reply_markup = IKM)
}

# metodo per il messaggio meteo
answer_cb <- function(bot, update) {

  # otteniamo dalla messaggio la città
  hub <- update$callback_query$data

  # messaggio che indica che i dati sono stati ricevuti dal pulsante
  bot$answerCallbackQuery(callback_query_id = update$callback_query$id,
                          text = 'Attendi alcuni minuti, la richiesta è in elaborazione')

  # messaggio che chiede di attendere mentre il bot recupera i dati
  mid <- bot$sendMessage(chat_id = update$from_chat_id(),
                         text    = "Attendi alcuni minuti mentre raccolgo i dati dall'Hub selezionato")

  # parse dell'Habr
  posts <- head(habr_hub_posts(hub, 1), 5)

  # rimuoviamo il messaggio di attesa
  bot$deleteMessage(update$from_chat_id(), mid$message_id)

  # formiamo l'elenco dei pulsanti
  keys <- lapply(1:5, function(x) list(InlineKeyboardButton(posts$title[x], url = posts$link[x])))

  # formiamo la tastiera
  IKM <- InlineKeyboardMarkup(
    inline_keyboard =  keys
    )

  # inviamo le informazioni sul meteo
  bot$sendMessage(chat_id = update$from_chat_id(),
                  text    = paste0("I 5 articoli più recenti dall'Hub ", hub),
                  reply_markup = IKM)

}

# creiamo i filtri
## messaggi con testo Meteo
MessageFilters$hubs <- BaseFilter(function(message) {

  # verifichiamo il testo del messaggio
  message$text == "Elenco articoli"

}
)

# creiamo i gestori
h_start         <- CommandHandler('start', start)
h_hubs          <- MessageHandler(habs, filters = MessageFilters$hubs)
h_query_handler <- CallbackQueryHandler(answer_cb)

# aggiungiamo i gestori al dispatcher
updater <- updater +
  h_start +
  h_hubs  +
  h_query_handler

# avviamo il bot
updater$start_polling()
Esegui l'esempio di codice fornito sopra, sostituendo ‘IL TOKEN DEL VOSTRO BOT’ con il token reale che hai ricevuto durante la creazione del bot tramite BotFather (ho parlato della creazione del bot in ).
Alla fine otterremo questo risultato:
L'elenco dei Hub disponibili per la selezione è stato inserito hardcoded nel metodo habs:
## Метод вызова Inine клавиатуры
habs <- function(bot, update) {

  IKM <- InlineKeyboardMarkup(
    inline_keyboard = list(
      list(
        InlineKeyboardButton(text = 'R', callback_data = 'r'),
        InlineKeyboardButton(text = 'Data Mining', callback_data = 'data_mining'),
        InlineKeyboardButton(text = 'Data Engineering', callback_data = 'data_engineering')
      ),
      list(
        InlineKeyboardButton(text = 'Big Data', callback_data = 'bigdata'),
        InlineKeyboardButton(text = 'Python', callback_data = 'python'),
        InlineKeyboardButton(text = 'Визуализация данных', callback_data = 'data_visualization')
      )
    )
  )

  # Send Inline Keyboard
  bot$sendMessage(chat_id = update$message$chat_id,
                  text = "Выберите Хаб",
                  reply_markup = IKM)
}
Otteniamo l'elenco degli articoli dall'Hub specificato con il comando habr_hub_posts(), dal pacchetto habR. Indichiamo che non abbiamo bisogno dell'elenco degli articoli per tutto il tempo, ma solo della prima pagina su cui si trovano 20 articoli. Dalla tabella ottenuta, usando il comando head() teniamo solo i 5 più in alto, che sono gli articoli più recenti.
  # парсим Хабр
  posts <- head(habr_hub_posts(hub, 1), 5)
La logica è molto simile a quella del bot precedente, ma in questo caso generiamo dinamicamente la tastiera inline con l'elenco degli articoli usando la funzione lapply().
  # формируем список кнопок
  keys <- lapply(1:5, function(x) list(InlineKeyboardButton(posts$title[x], url = posts$link[x])))

  # формируем клавиатуру
  IKM <- InlineKeyboardMarkup(
    inline_keyboard =  keys
    )
Nel testo del pulsante inseriamo il titolo dell'articolo posts$title[x], e nell'argomento url il collegamento all'articolo: url = posts$link[x].
Successivamente, creiamo un filtro, i gestori e avviamo il nostro bot.
Conclusione
Ora i bot che hai scritto saranno molto più facili da usare, grazie al fatto che il loro controllo avverrà tramite tastiera e non tramite l'immissione di comandi. Almeno nell'interazione con il bot tramite smartphone, la tastiera semplificherà notevolmente il processo di utilizzo.
Nel prossimo articolo vedremo come costruire un dialogo logico con il bot e lavorare con i database.
Fonte: habr.com
