

Het updateproces voor uw Kubernetes-cluster
Op een gegeven moment bij het gebruik van een Kubernetes-cluster ontstaat de noodzaak om de actieve nodes bij te werken. Dit kan het bijwerken van pakketten, het bijwerken van de kernel of het implementeren van nieuwe afbeeldingen van virtuele machines omvatten. In Kubernetes-terminologie wordt dit .
Dit bericht maakt deel uit van een serie van 4 berichten:
- Dit bericht.
- Correct afsluiten van pods in een Kubernetes-cluster
- Uitgestelde beëindiging van een pod bij verwijdering
- Hoe downtime in een Kubernetes-cluster te vermijden met behulp van PodDisruptionBudgets
(opm. vert. vertalingen van de overige artikelen in de serie worden binnenkort verwacht)
In dit artikel beschrijven we alle hulpmiddelen die Kubernetes biedt om nul downtime te bereiken voor de nodes in uw cluster.
Probleemdefinitie
In eerste instantie zullen we een naïeve benadering volgen, waarbij we problemen identificeren en de potentiële risico's van deze aanpak evalueren, en we kennis opbouwen om elk van de problemen waarmee we tijdens de cyclus worden geconfronteerd op te lossen. Uiteindelijk zullen we een configuratie hebben die lifecycle hooks, readiness probes en Pod disruption budgets gebruikt om onze nul downtime te bereiken.
Om onze reis te beginnen, laten we een concreet voorbeeld nemen. Stel dat we een Kubernetes-cluster met twee nodes hebben, waarin een applicatie draait met twee pods die zich achter Service:
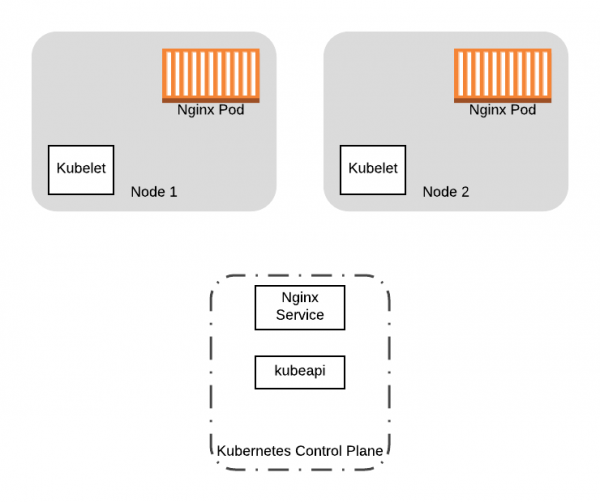
We beginnen met twee pods met Nginx en Service die draaien op onze twee nodes van het Kubernetes-cluster.
We willen de kernelversie van de twee werkende nodes in ons cluster bijwerken. Hoe doen we dat? Een eenvoudige oplossing zou zijn om nieuwe nodes met een bijgewerkte configuratie op te starten en vervolgens de oude nodes uit te schakelen, terwijl we tegelijkertijd de nieuwe nodes in gebruik nemen. Hoewel dit zou werken, zijn er enkele problemen met deze aanpak:
- Wanneer u de oude nodes uitschakelt, worden ook de pods die daarop draaien uitgeschakeld. Wat als de pods moeten worden gewist voor een correcte uitschakeling? Het virtualisatiesysteem dat u gebruikt, wacht misschien niet op de afronding van het wisproces.
- Wat als u alle nodes tegelijkertijd uitschakelt? U krijgt aanzienlijke downtime terwijl de pods naar de nieuwe nodes verhuizen.
We need a way to correctly migrate pods from old nodes while ensuring that none of our workflows are running while we make changes to the node. Or when we perform a complete replacement of the cluster, as in the example (i.e., replacing VM images), we want to move the running applications from the old nodes to the new ones. In both cases, we want to prevent scheduling new pods on the old nodes and then evict all running pods from them. To achieve these goals, we can use the command kubectl drain.
Redistributing all pods from the node
The drain operation allows redistributing all pods from the node. During the execution of drain, the node is marked as unschedulable (flag NoSchedule). This prevents new pods from being scheduled on it. Then drain begins to evict pods from the node, terminating containers that are currently running on the node by sending a signal TERM to the containers in the pod.
Although kubectl drain it handles evicting pods well, there are still two factors that can cause the drain operation to fail:
- Your application must be able to terminate gracefully upon receiving
TERMthe signal. When pods are evicted, Kubernetes sends a signalTERMto the containers and waits for them to stop for a specified amount of time, after which, if they haven't stopped, it terminates them forcefully. In any case, if your container does not respond to the signal correctly, you may still have issues stopping the pods if they are currently running (e.g., if a transaction is ongoing in the database). - You lose all pods that contain your application. It may be unavailable when new containers are launched on the new nodes or, if your pods are deployed without controllers, they may not restart at all.
Avoiding downtime
To minimize downtime from voluntary disruption, such as from the drain operation for a node, Kubernetes provides the following failure handling options:
In the other parts of the cycle, we will use these Kubernetes functions to mitigate the impact of moving pods. To make it easier to follow the main idea, we will use our example above with the following resource configuration:
---
apiVersion: apps/v1
kind: Deployment
metadata:
 name: nginx-deployment
 labels:
   app: nginx
spec:
 replicas: 2
 selector:
   matchLabels:
     app: nginx
 template:
   metadata:
     labels:
       app: nginx
   spec:
     containers:
     - name: nginx
       image: nginx:1.15
       ports:
       - containerPort: 80
---
kind: Service
apiVersion: v1
metadata:
 name: nginx-service
spec:
 selector:
   app: nginx
 ports:
 - protocol: TCP
   targetPort: 80
   port: 80
Deze configuratie is een minimaal voorbeeld Deployment, dat de nginx-pods in het cluster beheert. Daarnaast beschrijft de configuratie een bron Service, die kan worden gebruikt om toegang te krijgen tot de nginx-pods in het cluster.
Gedurende de hele cyclus zullen we deze configuratie iteratief uitbreiden, zodat deze uiteindelijk alle mogelijkheden van Kubernetes bevat voor minimale downtime.
Voor een volledig geïmplementeerde en getest versie van de updates van het Kubernetes-cluster voor zero downtime op AWS en andere bronnen, bezoek .
Lees ook andere artikelen op onze blog:
Bron: habr.com
