

In We explained how to launch a stable version of Suricata on Ubuntu 18.04 LTS. Setting up an IDS on a single node and connecting free rule sets is quite straightforward. Today, we will explore how to protect a corporate network from the most common types of attacks using Suricata installed on a virtual server. For this, we will need a VDS on Linux with two computing cores. The amount of RAM depends on the load: some may manage with 2 GB, while for more serious tasks, 4 or even 6 GB might be required. The advantage of a virtual machine is the ability to experiment: you can start with a minimal configuration and increase resources as needed.
Photo: Reuters
Merging Networks
Deploying the IDS on a virtual machine may primarily be needed for testing. If you have never dealt with such solutions before, it's not wise to rush into ordering physical hardware and changing the network architecture. It’s better to safely trial the system without unnecessary costs to determine the computational resource requirements. It's important to understand that all corporate traffic will have to pass through a single external node: to connect the local network (or several networks) to the VDS with the installed IDS Suricata, you can use — an easy-to-configure cross-platform VPN server that provides reliable encryption. Office internet connections may not have a real IP, so it’s better to set it up on a VPS. There are no ready-to-use packages in the Ubuntu repository, so the software will have to be downloaded either from , or from an external repository on the service (if you trust it):
sudo add-apt-repository ppa:paskal-07/softethervpn
sudo apt-get update
You can view the list of available packages with the following command:
apt-cache search softether 
We will need softether-vpnserver (the server in a test configuration is running on VDS), as well as softether-vpncmd — the command-line utilities for its configuration.
sudo apt-get install softether-vpnserver softether-vpncmdFor server configuration, a special command-line utility is used:
sudo vpncmd 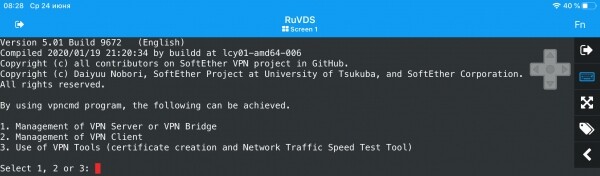
We won't go into detail about the configuration: the procedure is fairly straightforward, and it's well documented in numerous publications, not directly related to the topic of this article. In short, after launching vpncmd, you need to select option 1 to access the server management console. For this, you have to enter the name localhost and press enter instead of entering the hub name. In the console, the administrator password is set with the command serverpasswordset, the virtual hub DEFAULT is deleted (command hubdelete), and a new one named Suricata_VPN is created along with setting its password (command hubcreate). Next, you need to switch to the management console of the new hub using the command hub Suricata_VPN to create a group and a user using the commands groupcreate and usercreate. The user password is set with userpasswordset.
SoftEther supports two traffic transmission modes: SecureNAT and Local Bridge. The first is a proprietary technology for building a virtual private network with its own NAT and DHCP. SecureNAT does not require TUN/TAP or setting up Netfilter or any other firewall. The routing does not affect the system core, and all processes are virtualized and operate on any VPS/VDS, regardless of the hypervisor being used. This leads to increased load on the CPU and a decrease in speed compared to the Local Bridge mode, which connects the SoftEther virtual hub to a physical network adapter or TAP device.
Configuration in this case gets complicated, as routing occurs at the kernel level using Netfilter. Our VDS are built on Hyper-V, so at the last step, we create a local bridge and activate the TAP device with the command bridgecreate Suricate_VPN -device:suricate_vpn -tap:yes. After exiting the hub management console, we will see a new network interface in the system that has not yet been assigned an IP:
ifconfig 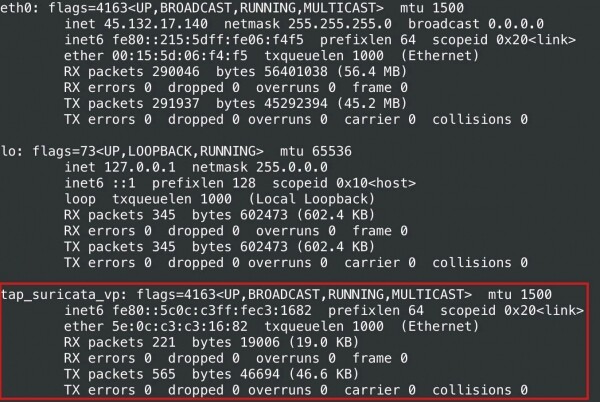
Next, we have to enable packet forwarding between interfaces (ip forward) if it is not active:
sudo nano /etc/sysctl.confUncomment the following line:
net.ipv4.ip_forward = 1Save changes in the file, exit the editor, and apply them with the following command:
sudo sysctl -pNext, we need to define a subnet with dummy IPs for the virtual network (for example, 10.0.10.0/24) and assign the address to the interface:
sudo ifconfig tap_suricata_vp 10.0.10.1/24Then you will need to specify Netfilter rules.
1. Sta inkomende pakketten toe voor de beluisterde poorten (het SoftEther-protocol maakt gebruik van HTTPS en poort 443)
sudo iptables -A INPUT -p tcp -m tcp --dport 443 -j ACCEPT
sudo iptables -A INPUT -p tcp -m tcp --dport 992 -j ACCEPT
sudo iptables -A INPUT -p tcp -m tcp --dport 1194 -j ACCEPT
sudo iptables -A INPUT -p udp -m udp --dport 1194 -j ACCEPT
sudo iptables -A INPUT -p tcp -m tcp --dport 5555 -j ACCEPT
2. Stel NAT in van het subnet 10.0.10.0/24 naar het primaire IP van de server
sudo iptables -t nat -A POSTROUTING -s 10.0.10.0/24 -j SNAT --to-source 45.132.17.1403. Sta doorgang van pakketten toe vanuit het subnet 10.0.10.0/24
sudo iptables -A FORWARD -s 10.0.10.0/24 -j ACCEPT4. Sta doorgang van pakketten toe voor reeds gevestigde verbindingen
sudo iptables -A FORWARD -p all -m state --state ESTABLISHED,RELATED -j ACCEPTDe automatisering van het proces bij het opnieuw opstarten van het systeem met behulp van initialisatiescripts laten we aan de lezers als huiswerk.
Als je IP-adressen automatisch aan klanten wilt toewijzen, moet je ook een DHCP-service voor de lokale brug installeren. Hiermee is de serverconfiguratie voltooid en kunnen we naar de clients gaan. SoftEther ondersteunt verschillende protocollen, waarvan het gebruik afhankelijk is van de mogelijkheden van de lokale netwerkinfrastructuur.
netstat -ap | grep vpnserver 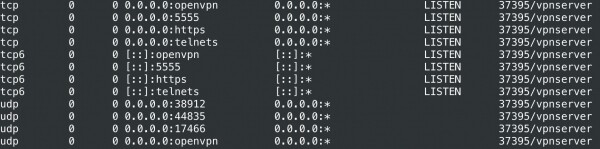
Aangezien onze testrouter ook op Ubuntu draait, installeren we de SoftEther-pakketten softether-vpnclient en softether-vpncmd vanuit een externe repository om gebruik te maken van het eigen protocol. We moeten de client starten:
sudo vpnclient startVoor de configuratie gebruiken we de utility vpncmd, waarbij we localhost kiezen als de machine waarop vpnclient draait. Alle commando's worden in de console uitgevoerd: we zullen een virtuele interface (NicCreate) en een account (AccountCreate) moeten aanmaken.
In sommige gevallen moet de authenticatiemethode worden ingesteld met de commando's AccountAnonymousSet, AccountPasswordSet, AccountCertSet en AccountSecureCertSet. Aangezien we geen DHCP gebruiken, wordt het adres voor de virtuele adapter handmatig ingesteld.
Daarnaast moeten we ip forwarding inschakelen (parameter net.ipv4.ip_forward=1 in het bestand /etc/sysctl.conf) en statische routes configureren. Indien nodig kan op de VDS met Suricata poorten worden doorgezet voor het gebruik van geïnstalleerde services in het lokale netwerk. Hiermee is de netwerkintegratie voltooid.
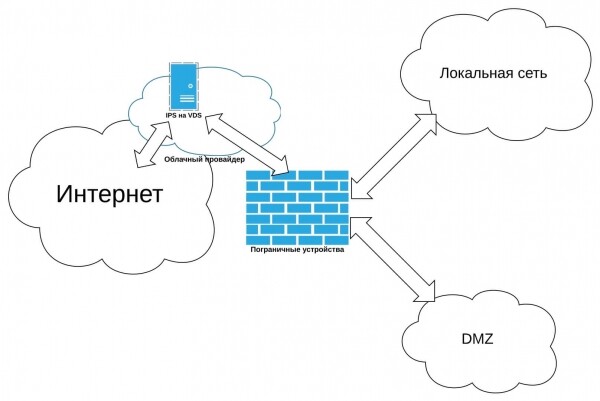
De door ons voorgestelde configuratie zal er ongeveer zo uitzien:
Configureren van Suricata
In We discussed two modes of operation for IDS: through the NFQUEUE queue (NFQ mode) and through zero copy (AF_PACKET mode). The second requires two interfaces, but provides higher performance — we will use this one. The parameter is set by default in /etc/default/suricata. We will also need to edit the vars section in /etc/suricata/suricata.yaml, specifying the virtual subnet as the home network.
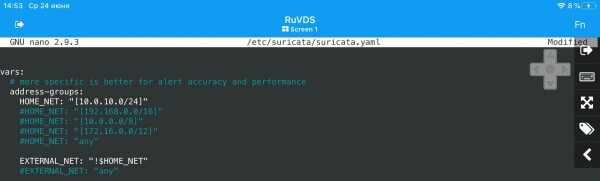
To restart the IDS, use the command:
systemctl restart suricataThe solution is ready; you may now need to test its resilience against malicious actions.
Simulating attacks
There can be several scenarios for the operational application of external IDS services:
Protection against DDoS attacks (primary purpose)
Implementing such an option within a corporate network is challenging, as packets for analysis must pass through the internet-facing interface of the system. Even if the IDS blocks them, parasitic traffic can overwhelm the data transmission channel. To avoid this, it is advisable to order a VPS with a sufficiently powerful internet connection capable of handling all local network traffic as well as all external traffic. Often, this is easier and cheaper than expanding the office channel. As an alternative, one should mention specialized services for DDoS protection. Their service costs are comparable to those of a virtual server, without the need for labor-intensive configuration, but there are drawbacks — for the price paid, the client only receives DDoS protection, whereas their own IDS can be configured in any way.
Protection against other types of external attacks
Suricata is capable of handling attempts to exploit various vulnerabilities in internet-accessible corporate network services (email servers, web servers, web applications, etc.). Usually, IDS is installed within the local network after boundary devices, but external deployment is also a viable option.
Protection against internal threats
Ondanks alle inspanningen van de systeembeheerder kunnen de computers in het bedrijfsnetwerk worden besmet met malware. Bovendien verschijnen er soms pestkoppen in het lokale netwerk die proberen onrechtmatige acties uit te voeren. Suricata kan helpen dergelijke pogingen te blokkeren, hoewel het beter is om deze binnen het perimeter te installeren voor de bescherming van het interne netwerk, en deze te gebruiken in combinatie met een beheerde switch die het verkeer naar één poort kan spiegelen. Een externe IDS is in dit geval ook niet nutteloos – in ieder geval kan deze pogingen tegenhouden van malware die in het LAN leeft om verbinding te maken met een externe server.
Laten we beginnen met het creëren van nog een test aanvallende VPS, terwijl we op de router van het lokale netwerk Apache opzetten met de standaardconfiguratie. Vervolgens zullen we poort 80 van de IDS-server naar hem doorsturen. Vervolgens zullen we een DDoS-aanval imiteren vanuit de aanvallende node. Hiervoor downloaden we een klein programma genaamd xerxes van GitHub, compileren het en starten het op de aanvallende node (mogelijk is de installatie van het gcc-pakket vereist):
git clone https://github.com/Soldie/xerxes-DDos-zanyarjamal-C.git
cd xerxes-DDos-zanyarjamal-C/
gcc xerxes.c -o xerxes
./xerxes 45.132.17.140 80
De uitkomst van zijn werk was als volgt:
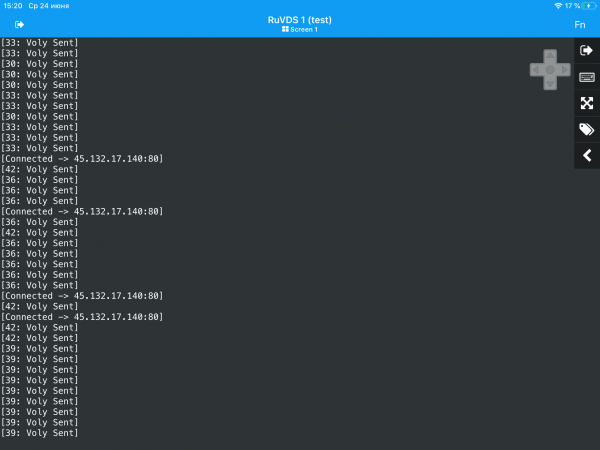
Suricata blokkeert de boosdoener, en de standaard Apache-pagina opent, ondanks onze geïmproviseerde aanval en de vrij trage verbinding van het 'kantoor' (in werkelijkheid thuisnetwerk). Voor serieuzere taken is het de moeite waard om . Dit is bedoeld voor penetratietests en stelt in staat om verschillende aanvallen te imiteren. De installatie-instructies zijn te vinden op de projectwebsite. Na installatie moet er een update worden uitgevoerd:
sudo msfupdateVoor testing starten we msfconsole.
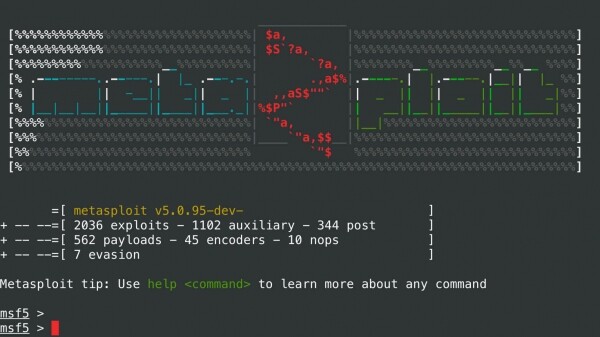
Helaas ontbreekt in de laatste versies van het framework de mogelijkheid om automatisch te hacken, dus zullen exploits handmatig moeten worden doorlopen en gestart met het commando use. Eerst moeten we de open poorten op de aanvallende machine identificeren, bijvoorbeeld met nmap (in ons geval kan netstat op de aanvallende node dit prima vervangen), en daarna geschikte .
Er zijn ook andere middelen om de weerbaarheid van IDS tegen aanvallen te testen, inclusief online diensten. Voor de nieuwsgierigen kan men een stresstest uitvoeren met de proefversie van . Om de reacties op de acties van interne kwaadwillenden te controleren, is het raadzaam om speciale tools op een van de machines in het lokale netwerk te installeren. Er zijn talloze opties en het is periodiek aan te raden om deze niet alleen op een experimenteel terrein, maar ook op werk systemen toe te passen. Maar dat is weer een heel ander verhaal.
Bron: habr.com
