


For full-fledged work with a project on Docker in WSL, WSL 2 needs to be installed. At the time of writing this note, its use is only possible within the Windows Insider Program (WSL 2 is available in builds 18932 and higher). It is also worth mentioning that Windows 10 Pro is required for the installation and configuration of Docker Desktop.
Første skritt
After joining the Windows Insider Program and installing the updates, it is necessary to install a Linux distribution (in this example, Ubuntu 18.04 is used) and Docker Desktop with WSL 2 Tech Preview:
In both cases, follow all the installation and configuration instructions.
Installing the Ubuntu 18.04 distribution
Before starting Ubuntu 18.04, you need to enable Windows WSL and Windows Virtual Machine Platform by executing two commands in PowerShell:
Enable-WindowsOptionalFeature -Online -FeatureName Microsoft-Windows-Subsystem-Linux(will require a computer restart)Enable-WindowsOptionalFeature -Online -FeatureName VirtualMachinePlatform
Next, you need to make sure that we are going to use WSL v2. To do this, sequentially execute the commands in the WSL terminal or PowerShell:
wsl -l -v— check which version is currently installed. If it is 1, then proceed to the next items on the list.wsl --set-version ubuntu 18.04 2— to update to version 2.wsl -s ubuntu 18.04— set Ubuntu 18.04 as the default distribution.
Now you can start Ubuntu 18.04 and complete the setup (specify the username and password).
Installing Docker Desktop
During the installation process, follow the prompts. The computer will require a restart after the installation and on the first run to enable Hyper-V (which is required for Windows 10 Pro).
Viktig! If Docker Desktop reports a firewall block, go to the antivirus settings and make the following changes to the network firewall rules (in this example, Kaspersky Total Security is used as the antivirus):
- Navigate to Settings -> Protection -> Firewall -> Configure Network Rules -> Local Service (TCP) -> Edit
- From the list of local ports, remove port 445.
- Save
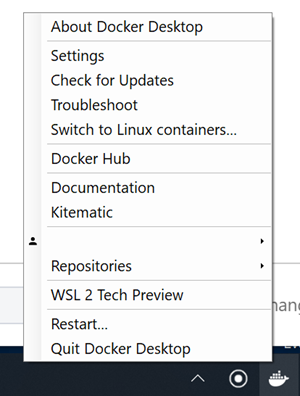
After starting Docker Desktop, select the WSL 2 Tech Preview option from its context menu.
In the opened window, click the Start button.
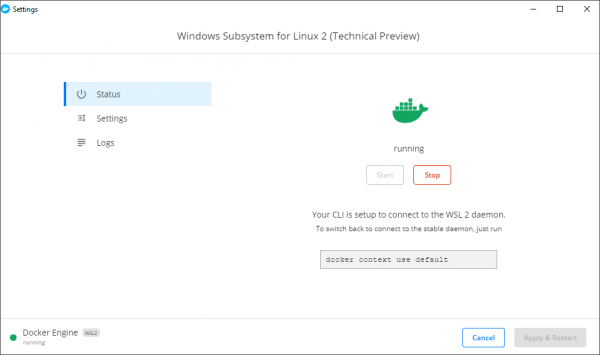
Now Docker and docker-compose are available within the WSL distribution.
Viktig! In the updated Docker Desktop, there is now a tab with WSL inside the settings window. There, WSL support can be enabled.
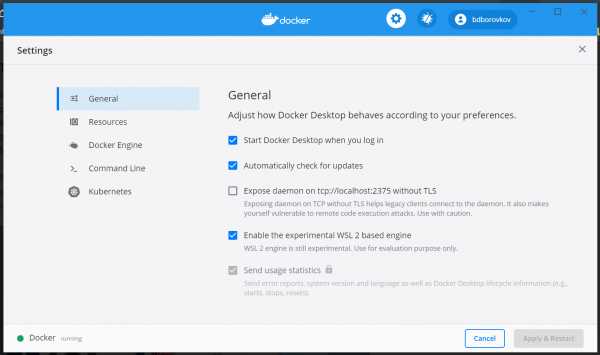
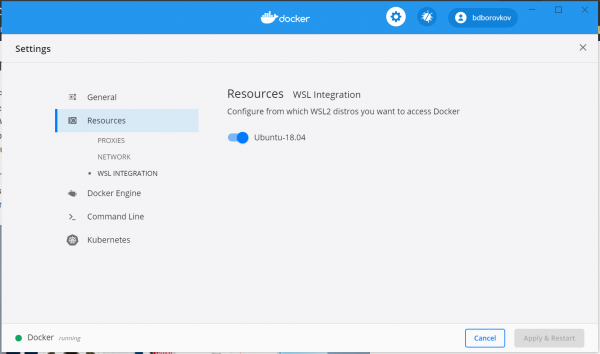
Viktig! I tillegg til å aktivere WSL-flagget må du også aktivere WSL-distribusjonen din i fanen Resources->WSL Integration.
Start
Mange problemer oppsto overraskende nok da jeg prøvde å heve containerne til prosjekter som ligger i brukerens Windows-katalog.
Ulike feil relatert til kjøring av bash-skript (som vanligvis starter ved bygging av containere for å installere nødvendige biblioteker og distribusjoner) og andre vanlige utviklingsoppgaver for Linux fikk meg til å vurdere å plassere prosjektene direkte i brukerens katalog for Ubuntu 18.04.
.
Fra løsningen på det forrige problemet følger det neste: hvordan jobbe med prosjektfiler gjennom en IDE installert på Windows. Som 'beste praksis' fant jeg kun én løsning — å jobbe via VSCode (selv om jeg er fan av PhpStorm).
Etter nedlasting og installasjon av VSCode, installer nødvendigvis utvidelsen .
Etter installasjonen av den nevnte utvidelsen er det bare å utføre kommandoen code . i prosjektkatalogen når VSCode er åpnet.
I dette eksempelet er nginx nødvendig for å få tilgang til containerne gjennom nettleseren. Installer det ved å bruke sudo apt-get install nginx var ikke så enkelt. Først måtte jeg oppdatere WSL-distribusjonen ved å kjøre sudo apt update && sudo apt dist-upgrade, og først etter det kunne jeg starte installasjonen av nginx.
Viktig! Alle lokale domener skrives ikke i filen /etc/hosts til Linux-distribusjonen (den finnes ikke engang), men i hosts-filen (vanligvis plassert i C:WindowsSystem32driversetchosts) på Windows 10.
Kilder
En mer detaljert beskrivelse av hvert steg kan finnes her:
Kilde: habr.com

 Russian
 Italian
 German
 Polish
 Estonian
 Albanian
 Bulgarian
 Croatian
 Czech
 Danish
 Dutch
 English
 French
 Hungarian
 Latvian
 Norwegian
 Portuguese
 Romanian
 Slovak
 Slovenian
 Spanish
 Swedish