

I denne artikkelen ønsker jeg å gi en trinnvis instruksjon om hvordan man raskt kan implementere den mest skalerbare løsningen tilgjengelig for øyeblikket. Remote-Access VPN tilgang basert på AnyConnect og Cisco ASA – VPN Load Balancing Cluster.
Introduksjon: Mange selskaper over hele verden, på grunn av den nåværende situasjonen med COVID-19, gjør tiltak for å overføre sine ansatte til fjernarbeid. På grunn av det store antallet som går over til fjernarbeid, øker belastningen på de eksisterende VPN-gatewayene betydelig, og det er behov for en rask mulighet for skalering. På den annen side er mange selskaper tvunget til å raskt lære seg hva fjernarbeid innebærer.
For å hjelpe bedrifter med å implementere en praktisk, sikker og skalerbar VPN-tilgang for ansatte på kort tid, tilbyr Cisco lisenser for den multifunksjonelle SSL-VPN-klienten AnyConnect i inntil 13 uker. .
.
Jeg har forberedt en trinnvis instruksjon for en enkel implementering av VPN Load-Balancing-klyngen, da dette er den mest skalerbare VPN-teknologien.
Det følgende eksempelet vil være ganske enkelt med hensyn til de anvendte autentiserings- og autorisasjonsprosessene, men det vil være et godt alternativ for en rask oppstart (noe mange nå mangler), med mulighet for dypere tilpasning etter behov under implementeringen.
Korte fakta: Teknologien VPN Load Balancing Cluster er ikke failover og ikke en funksjon av klyngedrift i sin opprinnelige betydning; denne teknologien kan kombinere helt forskjellige ASA-modeller (med visse begrensninger) med det formål å balansere belastningen av Remote-Access VPN-tilkoblinger. Synkronisering av økter og konfigurasjoner mellom nodene i en slik klynge er fraværende, men automatisk balanse av VPN-tilkoblinger er mulig, samt sikring av redundans så lenge minst én aktiv node finnes i klyngen. Belastningen i klyngen balanseres automatisk avhengig av hvor mye hver node er belastet i antall VPN-økter.
For high availability of specific nodes in the cluster (if required), a file balancer can be utilized, thus the active connection will be handled by the Primary node of the file balancer. A file balancer is not a mandatory condition for ensuring high availability within a Load-Balancing cluster; the cluster itself will transfer the user session to another live node in case of a node failure, though without preserving the connection status, which is exactly ensured by the file balancer. Accordingly, these two technologies can be combined if necessary.
A VPN Load-Balancing cluster can contain more than two nodes.
VPN Load-Balancing cluster is supported on ASA 5512-X and above.
Since each ASA within the VPN Load-Balancing cluster is an independent unit in terms of configurations made, all stages of configuration are carried out individually on each separate device.
Logical topology of the given example:
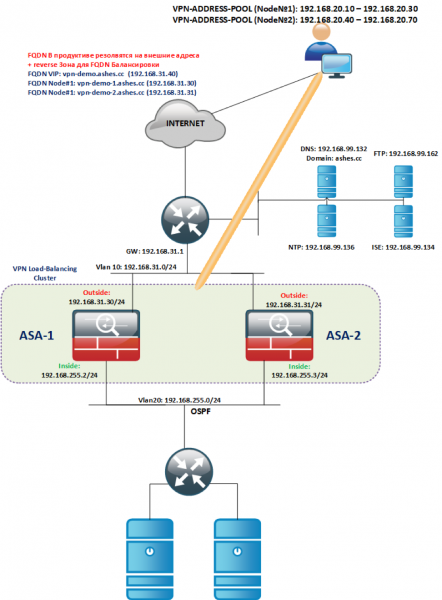
Initial deployment:
We deploy instances of ASAv from the required templates (ASAv5/10/30/50).
We assign INSIDE/OUTSIDE interfaces to the same VLANs (Outside in its VLAN, INSIDE in its own but common one within the cluster, see topology), ensuring that interfaces of the same type are in the same L2 segment.
Licenses:
- At the time of installation, ASAv will not have any licenses and will be limited to a throughput of 100 kbit/sec.
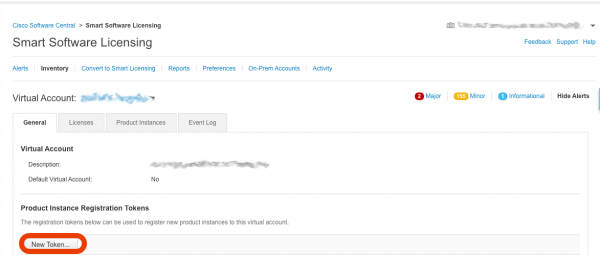
- To install the license, you need to generate a token in your Smart Account dashboard: -> Smart Software Licensing
- In the opened window, click the button New Token

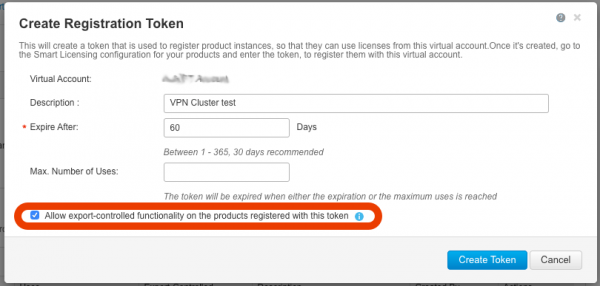
- Make sure there is an active field in the opened window and the checkbox is set Allow export-controlled functionality… Without this active field, you will not be able to use strong encryption features and thus VPN. If this field is not active, please contact your account team with a request for activation.

- After clicking the button Opprett token, a token will be created, which we will use to obtain the license for ASAv; we will copy it:

- Repeat steps C, D, E for each deployed ASAv.
- To make it easier to copy the token, we will temporarily allow telnet. We will configure each ASA (the example below illustrates the settings on ASA-1). telnet from outside does not work; if absolutely necessary, change the security level to 100 on outside, then revert it back.
! ciscoasa(config)# int gi0/0 ciscoasa(config)# nameif outside ciscoasa(config)# ip address 192.168.31.30 255.255.255.0 ciscoasa(config)# no shut ! ciscoasa(config)# int gi0/1 ciscoasa(config)# nameif inside ciscoasa(config)# ip address 192.168.255.2 255.255.255.0 ciscoasa(config)# no shut ! ciscoasa(config)# telnet 0 0 inside ciscoasa(config)# username admin password cisco priv 15 ciscoasa(config)# ena password cisco ciscoasa(config)# aaa authentication telnet console LOCAL ! ciscoasa(config)# route outside 0 0 192.168.31.1 ! ciscoasa(config)# wr !- For registering a token in the Smart-Account cloud, internet access must be provided for ASA. .
In short, ASA needs:
- HTTPS access to the internet;
- time synchronization (preferably via NTP);
- configured DNS server;
- We will access our ASA via telnet and perform the settings to activate the license through Smart-Account.
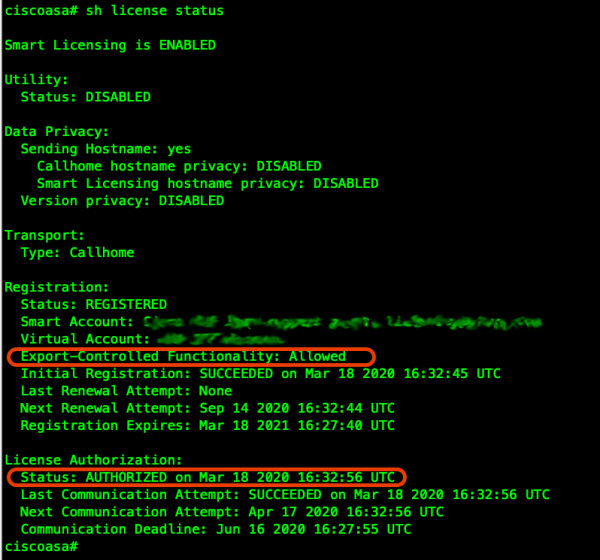
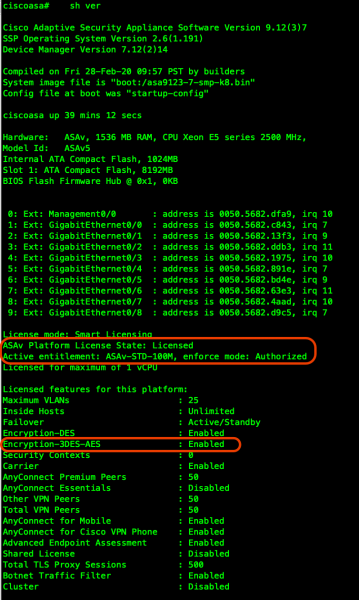
! ciscoasa(config)# clock set 19:21:00 Mar 18 2020 ciscoasa(config)# clock timezone MSK 3 ciscoasa(config)# ntp server 192.168.99.136 ! ciscoasa(config)# dns domain-lookup outside ciscoasa(config)# DNS server-group DefaultDNS ciscoasa(config-dns-server-group)# name-server 192.168.99.132 ! ! Let's check the DNS functionality: ! ciscoasa(config-dns-server-group)# ping ya.ru Type escape sequence to abort. Sending 5, 100-byte ICMP Echos to 87.250.250.242, timeout is 2 seconds: !!!!! ! ! Let's check NTP synchronization: ! ciscoasa(config)# show ntp associations address ref clock st when poll reach delay offset disp *~192.168.99.136 91.189.94.4 3 63 64 1 36.7 1.85 17.5 * master (synced), # master (unsynced), + selected, - candidate, ~ configured ! ! Let's set the configuration of our ASAv for Smart-Licensing (according to your profile, in my case 100M for example) ! ciscoasa(config)# license smart ciscoasa(config-smart-lic)# feature tier standard ciscoasa(config-smart-lic)# throughput level 100M ! ! If necessary, you can configure internet access through a proxy using the following command block: !call-home ! http-proxy ip_address port port ! ! Next, we paste the token copied from the Smart-Account portal (<token>) and register the license ! ciscoasa(config)# end ciscoasa# license smart register idtoken <token>- We check that the device successfully registered the license and the encryption options are available:


Setting up basic SSL-VPN on each gateway.
- Next, let's configure access via SSH and ASDM:
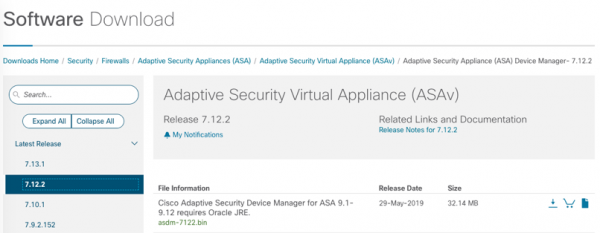
ciscoasa(config)# ssh ver 2 ciscoasa(config)# aaa authentication ssh console LOCAL ciscoasa(config)# aaa authentication http console LOCAL ciscoasa(config)# hostname vpn-demo-1 vpn-demo-1(config)# domain-name ashes.cc vpn-demo-1(config)# cry key gen rsa general-keys modulus 4096 vpn-demo-1(config)# ssh 0 0 inside vpn-demo-1(config)# http 0 0 inside ! ! Let's start the HTTPS server for ASDM on port 445 to avoid interfering with the SSL-VPN portal ! vpn-demo-1(config)# http server enable 445 !- To use ASDM, you must first download it from the cisco.com site; in my case, this is the following file:

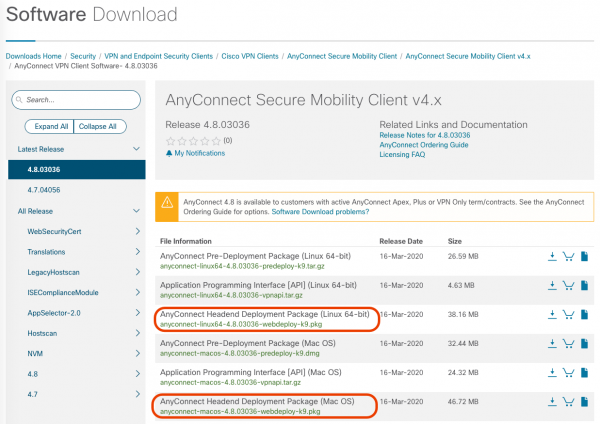
- For the operation of the AnyConnect client, it is necessary to upload an image for each desktop OS client (planned for use Linux/Windows/MAC) to each ASA, requiring a file with Headend Deployment Package in the name:

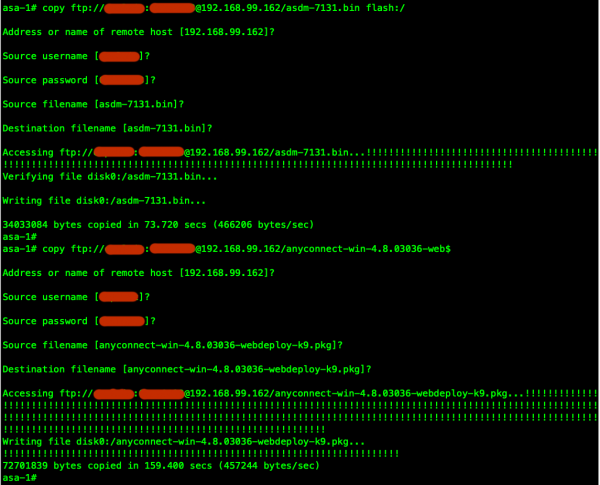
- The downloaded files can be uploaded, for example, to an FTP server and then downloaded to each separate ASA:

- We configure ASDM and a Self-Signed certificate for SSL-VPN (in production, it is recommended to use a trusted certificate). The installed FQDN of the Virtual cluster address (vpn-demo.ashes.cc), as well as each FQDN associated with the external address of each node of the cluster, must resolve in the external DNS zone to the IP address of the OUTSIDE interface (or to the mapped address if port forwarding udp/443 (DTLS) and tcp/443 (TLS) is used). Detailed information on certificate requirements is specified in the section Certificate Verification of the documentation.
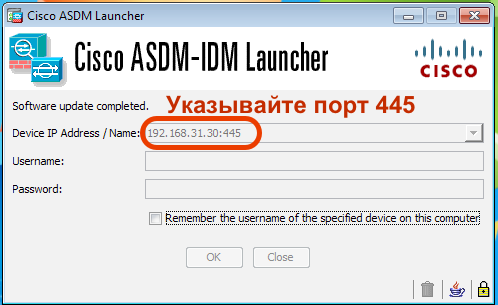
! vpn-demo-1(config)# crypto ca trustpoint SELF vpn-demo-1(config-ca-trustpoint)# enrollment self vpn-demo-1(config-ca-trustpoint)# fqdn vpn-demo.ashes.cc vpn-demo-1(config-ca-trustpoint)# subject-name cn=*.ashes.cc, ou=ashes-lab, o=ashes, c=ru vpn-demo-1(config-ca-trustpoint)# serial-number vpn-demo-1(config-ca-trustpoint)# crl configure vpn-demo-1(config-ca-crl)# cry ca enroll SELF % The fully-qualified domain name in the certificate will be: vpn-demo.ashes.cc Generate Self-Signed Certificate? [yes/no]: yes vpn-demo-1(config)# ! vpn-demo-1(config)# sh cry ca certificates Certificate Status: Available Certificate Serial Number: 4d43725e Certificate Usage: General Purpose Public Key Type: RSA (4096 bits) Signature Algorithm: SHA256 with RSA Encryption Issuer Name: serialNumber=9A439T02F95 hostname=vpn-demo.ashes.cc cn=*.ashes.cc ou=ashes-lab o=ashes c=ru Subject Name: serialNumber=9A439T02F95 hostname=vpn-demo.ashes.cc cn=*.ashes.cc ou=ashes-lab o=ashes c=ru Validity Date: start date: 00:16:17 MSK Mar 19 2020 end date: 00:16:17 MSK Mar 17 2030 Storage: config Associated Trustpoints: SELF CA Certificate Status: Available Certificate Serial Number: 0509 Certificate Usage: General Purpose Public Key Type: RSA (4096 bits) Signature Algorithm: SHA1 with RSA Encryption Issuer Name: cn=QuoVadis Root CA 2 o=QuoVadis Limited c=BM Subject Name: cn=QuoVadis Root CA 2 o=QuoVadis Limited c=BM Validity Date: start date: 21:27:00 MSK Nov 24 2006 end date: 21:23:33 MSK Nov 24 2031 Storage: config Associated Trustpoints: _SmartCallHome_ServerCA- To check the operation of ASDM, do not forget to specify the port, for example:

- Let's conduct basic settings for the tunnel:
- We will make the corporate network accessible through the tunnel while directing internet traffic directly (not the safest method if there are no protective measures on the connecting host, as compromised hosts may infiltrate and extract corporate data, the option split-tunnel-policy tunnelall will send all host traffic into the tunnel. Nevertheless, Split-Tunnel allows to unload the VPN gateway and not process the host's Internet traffic)
- We will issue addresses from the 192.168.20.0/24 subnet to the hosts in the tunnel (pool from 10 to 30 addresses (for node #1)). Hver nod i VPN-klyngen må ha sin egen pool.
- Vi skal gjennomføre grunnleggende autentisering med en lokalt opprettet bruker på ASA (Dette anbefales ikke, da det er den enkleste metoden), det er bedre å autentisere via LDAP/RADIUS, og enda bedre å knytte Multi-Factor Authentication (MFA), for eksempel Cisco DUO.
! vpn-demo-1(config)# ip lokal pool vpn-pool 192.168.20.10-192.168.20.30 mask 255.255.255.0 ! vpn-demo-1(config)# access-list split-tunnel standard tillat 192.168.0.0 255.255.0.0 ! vpn-demo-1(config)# gruppe-policy SSL-VPN-GROUP-POLICY intern vpn-demo-1(config)# gruppe-policy SSL-VPN-GROUP-POLICY attributter vpn-demo-1(config-group-policy)# vpn-tunnel-protocol ssl-client vpn-demo-1(config-group-policy)# split-tunnel-policy tunnelspecified vpn-demo-1(config-group-policy)# split-tunnel-network-list verdi split-tunnel vpn-demo-1(config-group-policy)# dns-server verdi 192.168.99.132 vpn-demo-1(config-group-policy)# standard-domene verdi ashes.cc vpn-demo-1(config)# tunnel-gruppe DefaultWEBVPNGroup generelle attributter vpn-demo-1(config-tunnel-general)# standard-gruppe-policy SSL-VPN-GROUP-POLICY vpn-demo-1(config-tunnel-general)# adresse-pool vpn-pool ! vpn-demo-1(config)# brukernavn dkazakov passord cisco vpn-demo-1(config)# brukernavn dkazakov attributter vpn-demo-1(config-username)# tjeneste-type remote-access ! vpn-demo-1(config)# ssl tillitspunkt SELV vpn-demo-1(config)# webvpn vpn-demo-1(config-webvpn)# aktiver utenfor vpn-demo-1(config-webvpn)# anyconnect bilde disk0:/anyconnect-win-4.8.03036-webdeploy-k9.pkg vpn-demo-1(config-webvpn)# anyconnect aktivere !- (VALGFRITT): I eksempelet ovenfor brukte vi en lokal bruker på MSE for autentisering av eksterne brukere, noe som selvfølgelig, bortsett fra i laboratorium, har begrenset anvendelse. Jeg skal gi et eksempel på hvordan man raskt kan tilpasse innstillingen for autentisering på RADIUS server, som i dette tilfellet er Cisco Identity Services Engine:
vpn-demo-1(config-aaa-server-group)# dynamisk-autorisering
vpn-demo-1(config-aaa-server-group)# interim-regnskapsoppdatering
vpn-demo-1(config-aaa-server-group)# aaa-server RADIUS (utenfor) vert 192.168.99.134
vpn-demo-1(config-aaa-server-host)# nøkkel cisco
vpn-demo-1(config-aaa-server-host)# exit
vpn-demo-1(config)# tunnel-gruppe DefaultWEBVPNGroup generelle attributter
vpn-demo-1(config-tunnel-general)# autentisering-server-gruppe  RADIUS
!
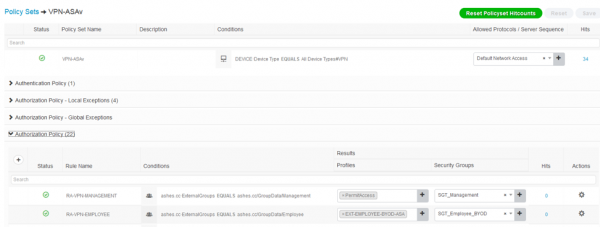
Denne integrasjonen ga mulighet til ikke bare å raskt integrere autentiseringsprosedyren med katalogtjenesten AD, men også å skille tilhørighet av den tilkoblede datamaskinen til AD, forstå om enheten er corporate eller personlig og vurdere tilstanden til den tilkoblede enheten.


- Vi vil gjøre innstillingen Transparent NAT for at trafikken mellom klienten og ressursene i det bedriftsnettverket ikke skal bli oversatt:
vpn-demo-1(config-network-object)# subnet 192.168.20.0 255.255.255.0 ! vpn-demo-1(config)# nat (inside,outside) kilde statisk hvilken som helst hvilken som helst destinasjon statisk vpn-brukere vpn-brukere no-proxy-arp- (VALGFRITT): For å slippe våre kunder ut på Internett via ASA (ved bruk av tunnelall Når du bruker PAT, og koblingen går gjennom samme OUTSIDE-grensesnitt, må du gjøre følgende innstillinger
vpn-demo-1(config-network-object)# nat (outside,outside) source dynamic vpn-users interface vpn-demo-1(config)# nat (inside,outside) source dynamic any interface vpn-demo-1(config)# same-security-traffic permit intra-interface !- Det er ekstremt viktig ved bruk av klynger å la det interne nettverket vite hvilken ASA som skal rute tilbaketrafikken til brukerne; for dette må ruteomfordeling av /32 adresser som tildeles kundene gjøres.
Vi har ennå ikke konfigurert klyngen, men vi har allerede fungerende VPN-gatewayer som kan kobles til individuelt via FQDN eller IP.

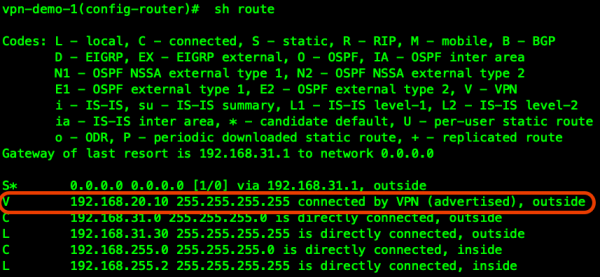
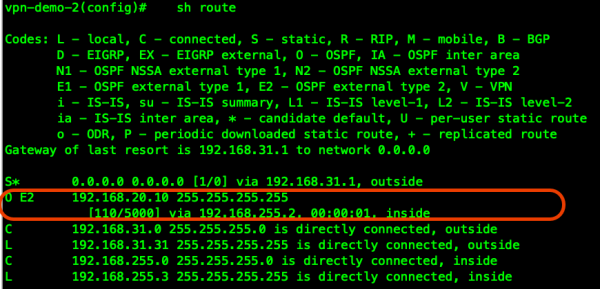
Vi ser den tilkoblede kunden i rute-tabellen til den første ASA-en:

For at hele VPN-klyngen og hele bedriftsnettet skal vite ruten til kunden vår, skal vi utføre ruteomfordeling av kunde-prefikset til dynamisk rutingsprotokoll, for eksempel OSPF:
!
vpn-demo-1(config)# route-map RMAP-VPN-REDISTRIBUTE permit 1
vpn-demo-1(config-route-map)# match ip address VPN-REDISTRIBUTE
!
vpn-demo-1(config)# router ospf 1
vpn-demo-1(config-router)# network 192.168.255.0 255.255.255.0 area 0
vpn-demo-1(config-router)# log-adj-changes
vpn-demo-1(config-router)# redistribute static metric 5000 subnets route-map RMAP-VPN-REDISTRIBUTE
Nå har vi ruten til kunden fra den andre gatewayen ASA-2, og brukere tilkoblet til forskjellige VPN-gatewayer innen klyngen kan for eksempel kommunisere direkte via bedriftsprogramvaren, akkurat som tilbaketrafikken fra ressursene som etterspørres av brukeren, vil komme til den nødvendige VPN-gatewayen:

Vi går videre til konfigurasjonen av lastbalansering av klyngen.
Adressen 192.168.31.40 vil bli brukt som Virtual IP (VIP — alle VPN-kunder vil først koble seg til den), fra denne adressen vil Master av klyngen gjøre REDIRECT til en mindre belastet node i klyngen. Ikke glem å spesifisere både direkte og omvendt DNS-post for hver ekstern adresse / FQDN for hver node i klyngen, så vel som for VIP.
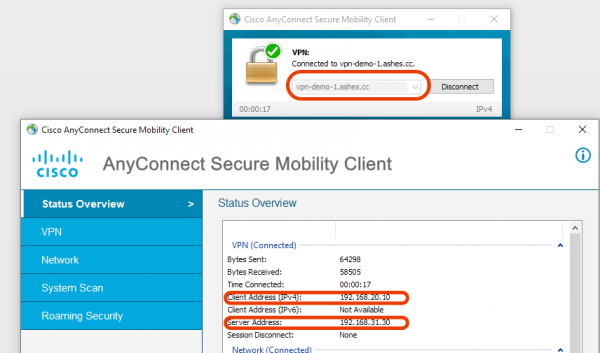
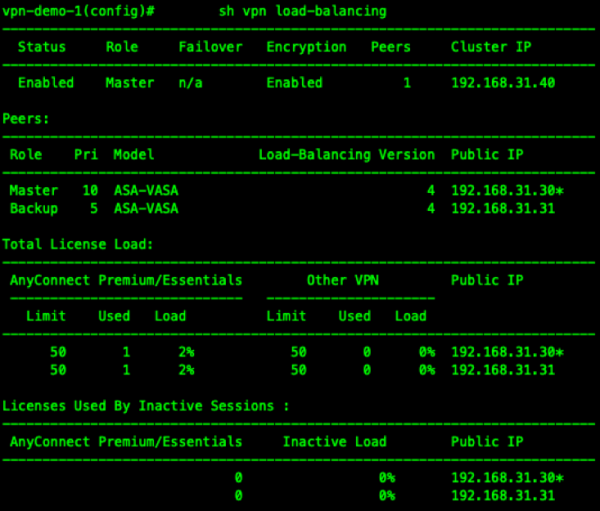
vpn-demo-1(config)# vpn load-balancing vpn-demo-1(config-load-balancing)# interface lbpublic outside vpn-demo-1(config-load-balancing)# interface lbprivate inside vpn-demo-1(config-load-balancing)# priority 10 vpn-demo-1(config-load-balancing)# cluster ip address 192.168.31.40 vpn-demo-1(config-load-balancing)# cluster port 4000 vpn-demo-1(config-load-balancing)# redirect-fqdn enable vpn-demo-1(config-load-balancing)# cluster key cisco vpn-demo-1(config-load-balancing)# cluster encryption vpn-demo-1(config-load-balancing)# cluster port 9023 vpn-demo-1(config-load-balancing)# participate vpn-demo-1(config-load-balancing)#- Vi sjekker klyngens drift med to tilkoblede kunder:

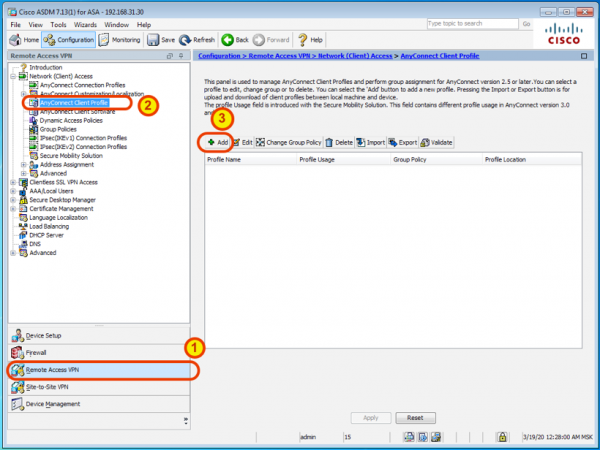
- Vi vil gjøre kundeopplevelsen mer praktisk med automatisk nedlastet AnyConnect-profil gjennom ASDM.

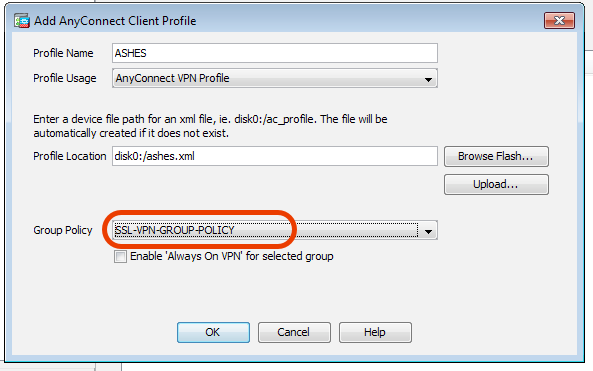
Vi gir profilen et praktisk navn og assosierer vår gruppepolicy med den:

Etter den neste tilkoblingen til klienten vil denne profilen bli automatisk lastet ned og installert i AnyConnect-klienten, slik at det bare er å velge den fra listen ved behov:
Siden vi med ASDM har opprettet denne profilen bare på én ASA, ikke glem å gjenta handlingene på de andre ASA i klyngen.


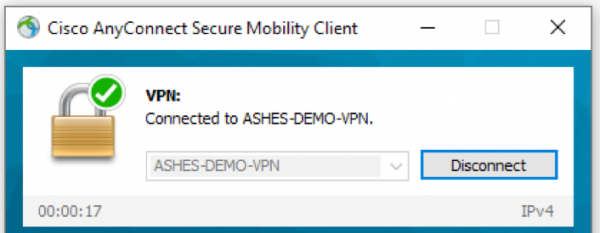
Konklusjon: Dermed har vi raskt rullet ut en klynge av flere VPN-gatewayer med automatisk lastbalansering. Å legge til nye noder i klyngen er enkelt, ved å oppnå enkel horisontal skalering gjennom distribusjon av nye virtuelle maskiner ASAv eller ved å bruke maskinvare-ASA. Den multiforskjellige AnyConnect-klienten kan sterkt utvide mulighetene for sikker ekstern tilkobling ved å bruke funksjonen Posture (tilstandsvurdering), mest effektivt brukt sammen med et sentralt system for kontroll og overvåking av tilgang Identity Services Engine.
Kilde: habr.com

 Russian
 Italian
 German
 Polish
 Estonian
 Albanian
 Bulgarian
 Croatian
 Czech
 Danish
 Dutch
 English
 French
 Hungarian
 Latvian
 Norwegian
 Portuguese
 Romanian
 Slovak
 Slovenian
 Spanish
 Swedish