

Çfarë të bëni nëse dëshironi dyfish autentikim, por nuk keni para për tokene harduerike, dhe gjithsesi iu propozohet të qëndroni optimistë.
Ky zgjidhje nuk është diçka super origjinale, përkundrazi - një miks nga zgjidhje të ndryshme që janë gjetur në hapësirën e internetit.
Kështu, i dhëna është
Domaini Active Directory.
Përdoruesit e domainit që punojnë përmes VPN-së, si shumë sot.
Rol që vepron si portë VPN është Fortigate.
Ruajtja e fjalëkalimit për klientin VPN e ndalon politika e sigurisë.
Politika Fortinet për tokenët e saj nuk mund të quhet ndryshe pos jo koprrace - ka 10 tokene falas, ndërsa të tjerat me një çmim shumë të papërshtatshëm. RSASecureID, Duo dhe të ngjashmit nuk u shqyrtuan, sepse dëshirohet open source.
Kërkesat paraprake: server *nix me freeradius, sssd - është futur në domain, përdoruesit e domainit mund të autentikohen pa probleme në të.
Paketa shtesë: shellinabox, figlet, freeeradius-ldap, shkrimi rebel.tlf nga repozitori .
Në shembullin tim - CentOS 7.8.
Logjika e funksionimit parashikohet kështu: gjatë lidhjes me VPN, përdoruesi duhet të japë emrin e domainit dhe OTP në vend të fjalëkalimit.
Konfigurimi i shërbimeve
Në /etc/raddb/radiusd.conf ndryshon vetëm përdoruesin dhe grupin nga emri i të cilëve fillon freeradius, pasi shërbimi radiusd duhet të dijë të lexojë skedarët në të gjitha nëndrejtat /home/.
user = root
group = root
Për të përdorur grupet në configurimet Fortigate, duhet të dërgohet Vendor Specific Attribute. Për këtë, në direktorinë raddb/policy.d krijoj një skedar me përmbajtjen e mëposhtme:
group_authorization {
    if (&LDAP-Group[*] == "CN=vpn_admins,OU=vpn-groups,DC=domain,DC=local") {
            update reply {
                &Fortinet-Group-Name = "vpn_admins" }
            update control {
                &Auth-Type := PAM
                &Reply-Message := "Mirë se vini Admin"
                }
        }
    else {
        update reply {
        &Reply-Message := "Nuk jeni të autorizuar për vpn"
            }
        reject
        }
}
Pas instalimit freeradius-ldap në drejtorinë raddb/mods-available krijohet një skedar ldap.
Duhet të krijoni një lidhje simbolike në katalogun raddb/mods-enabled.
ln -s /etc/raddb/mods-available/ldap /etc/raddb/mods-enabled/ldapI jap përmbajtjen e tij një pamje të tillë:
ldap {
        server = 'domain.local'
        identity = 'CN=freerad_user,OU=users,DC=domain,DC=local'
        password = "SupeSecretP@ssword"
        base_dn = 'dc=domain,dc=local'
        sasl {
        }
        user {
                base_dn = "${..base_dn}"
                filter = "(sAMAccountname=%{%{Stripped-User-Name}:-%{User-Name}})"
                sasl {
                }
                scope = 'sub'
        }
        group {
                base_dn = "${..base_dn}"
                filter = '(objectClass=Group)'
                scope = 'sub'
                name_attribute = cn
                membership_filter = "(|(member=%{control:Ldap-UserDn})(memberUid=%{%{Stripped-User-Name}:-%{User-Name}}))"
                membership_attribute = 'memberOf'
        }
}
Në skedarët raddb/sites-enabled/default dhe raddb/sites-enabled/inner-tunnel në seksionin authorize po shtoj emrin e politikës që do të përdoret — group_authorization. Një pikë e rëndësishme — emri i politikës përcaktohet jo nga emri i skedarit në drejtorinë policy.d, por nga direktiva brenda skedarit para kopështit.
Në seksionin authenticate në këto skedarë duhet të çkomentojmë rreshtin pam.
Në skedar clients.conf shkruajmë parametrat me të cilat do të lidhemi Fortigate:
client fortigate {
    ipaddr = 192.168.1.200
    secret = testing123
    require_message_authenticator = no
    nas_type = other
}
Konfigurimi i modulit pam.d/radiusd:
#%PAM-1.0
auth       sufficient   pam_google_authenticator.so
auth       include      password-auth
account    required     pam_nologin.so
account    include      password-auth
password   include      password-auth
session    include      password-auth
Opsionet e paracaktuara për integrimin freeradius me google authenticator parashikojnë futjen e të dhënave nga përdoruesi në formatin: username/password+OTP.
Duke përfytyruar numrin e mallkimeve që do të bien mbi kokë, nëse përdoret kombinimi i paracaktuar freeradius me Google Authenticator, u mor vendimi për të përdorur konfigurimin e modulit pam në një mënyrë që kontrollon vetëm tokenin Google Authenticator.
Kur përdoruesi lidhet, ndodh si më poshtë:
- Freeradius kontrollon nëse përdoruesi është në domen dhe në një grup të caktuar dhe, në rast suksesi, kryhet kontrolli i tokenit OTP.
Gjëja dukej mjaft e arrirë deri në momentin që mendoja "Si të regjistroj OTP për 300+ përdorues?"
Përdoruesi duhet të hyjë në server me freeradius dhe nga llogaria e tij dhe të aktivizojë aplikacionin Google authenticator, i cili do të gjenerojë për përdoruesin një kod QR për aplikacionin. Këtu ndihmon shellinabox në kombinim me .bash_profile.
[root@freeradius ~]# yum install -y shellinabox
Skedari konfigurues i demonit ndodhet në /etc/sysconfig/shellinabox.
Specifikoj atje portin 443 dhe mund të specifikoj certifikatën time.
[root@freeradius ~]#systemctl enable --now shellinaboxdPërdoruesi mbetet vetëm të hyjë në lidhjen, të futë kredencialet e domenit dhe të marrë kodin QR për aplikacionin.
Algoritmi është si më poshtë:
- Përdoruesi hyn në makinë përmes shfletuesit.
- Kontrollohet nëse përdoruesi është në domen. Nëse jo, atëherë nuk ndërmerren veprime.
- Nëse përdoruesi është domain, kontrollohet anëtarësia në grupin e administratorëve.
- Nëse nuk është admin, kontrollohet nëse është konfigurimi i Google Authenticator. Nëse jo, krijohet një kod QR dhe përdoruesi del jashtë.
- Nëse nuk është admin dhe Google Authenticator është konfiguruar, thjesht del jashtë.
- Nëse është admin, përsëri kontrollohet Google Authenticator. Nëse nuk është konfiguruar, krijohet një kod QR.
E gjithë logjika kryhet duke përdorur /etc/skel/.bash_profile.
cat /etc/skel/.bash_profile
# .bash_profile

# Get the aliases and functions
if [ -f ~/.bashrc ]; then
        . ~/.bashrc
fi

# User specific environment and startup programs
# Make several commands available from user shell

if [[ -z $(id $USER | grep "admins") || -z $(cat /etc/passwd | grep $USER) ]]
  then
    [[ ! -d $HOME/bin ]] && mkdir $HOME/bin
    [[ ! -f $HOME/bin/id ]] && ln -s /usr/bin/id $HOME/bin/id
    [[ ! -f $HOME/bin/google-auth ]] && ln -s /usr/bin/google-authenticator $HOME/bin/google-auth
    [[ ! -f $HOME/bin/grep ]] && ln -s /usr/bin/grep $HOME/bin/grep
    [[ ! -f $HOME/bin/figlet ]] && ln -s /usr/bin/figlet $HOME/bin/figlet
    [[ ! -f $HOME/bin/rebel.tlf ]] && ln -s /usr/share/figlet/rebel.tlf $HOME/bin/rebel.tlf
    [[ ! -f $HOME/bin/sleep ]] && ln -s /usr/bin/sleep $HOME/bin/sleep
  # Set PATH env to <home user directory>/bin
    PATH=$HOME/bin
    export PATH
  else
    PATH=PATH=$PATH:$HOME/.local/bin:$HOME/bin
    export PATH
fi


if [[ -n $(id $USER | grep "domain users") ]]
  then
    if [[ ! -e $HOME/.google_authenticator ]]
      then
        if [[ -n $(id $USER | grep "admins") ]]
          then
            figlet -t -f $HOME/bin/rebel.tlf "Welcome to Company GAuth setup portal"
            sleep 1.5
            echo "Please, run any of these software on your device, where you would like to setup OTP:
Google Autheticator:
AppStore - https://apps.apple.com/us/app/google-authenticator/id388497605
Play Market - https://play.google.com/stor/apps/details?id=com.google.android.apps.authenticator2&hl=en
FreeOTP:
AppStore - https://apps.apple.com/us/app/freeotp-authenticator/id872559395
Play Market - https://play.google.com/store/apps/details?id=org.fedorahosted.freeotp&hl=en

And prepare to scan QR code.

"
            sleep 5
            google-auth -f -t -w 3 -r 3 -R 30 -d -e 1
            echo "Congratulations, now you can use an OTP token from application as a password connecting to VPN."
          else
            figlet -t -f $HOME/bin/rebel.tlf "Welcome to Company GAuth setup portal"
            sleep 1.5
            echo "Please, run any of these software on your device, where you would like to setup OTP:
Google Autheticator:
AppStore - https://apps.apple.com/us/app/google-authenticator/id388497605
Play Market - https://play.google.com/store/apps/details?id=com.google.android.apps.authenticator2&hl=en
FreeOTP:
AppStore - https://apps.apple.com/us/app/freeotp-authenticator/id872559395
Play Market - https://play.google.com/store/apps/details?id=org.fedorahosted.freeotp&hl=en

And prepare to scan QR code.

"
            sleep 5
            google-auth -f -t -w 3 -r 3 -R 30 -d -e 1
            echo "Congratulations, now you can use an OTP token from application as a password to VPN."
            logout
        fi
      else
        echo "You have already setup a Google Authenticator"
        if [[ -z $(id $USER | grep "admins") ]]
          then
          logout
        fi
    fi
  else
    echo "You don't need to set up a Google Authenticator"
fi
Konfigurimi Fortigate:
- Krijojmë Radius-server

- Krijojmë grupet e nevojshme, në rast se është e nevojshme ndarjen e qasjes sipas grupeve. Emri i grupit në Fortigate duhet të përputhet me grupin që kalon në Vendor Specific Attribute Fortinet-Group-Name.

- Redaktojmë portalet e nevojshme. SSLShtojmë grupet në politikat.

- Përfitimet e këtij zgjidhjeje:

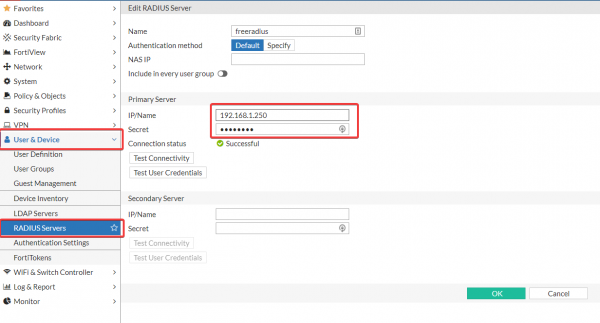
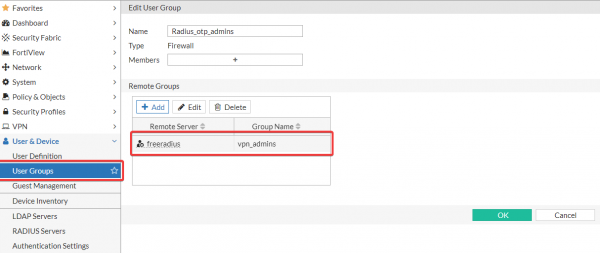
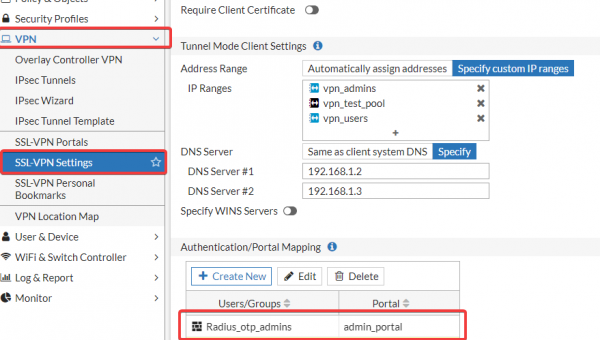
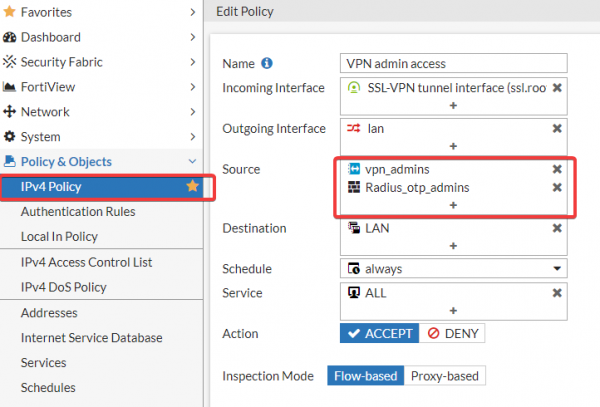
Ka mundësinë e autentikimit përmes OTP në
- zgjidhje open-source. Fortigate Përjashtohet futja e fjalëkalimit të domenit nga përdoruesi gjatë lidhjes përmes VPN, gjë që e thjeshton procesin e lidhjes. Një fjalëkalim 6-shifror është më i lehtë për t’u futur se ai që parashikohet nga politika e sigurisë. Si pasojë, reduktohet numri i biletave me temën: “Nuk mund të lidhem në VPN.”
- P.S. Në planet është përmirësimi i këtij zgjidhjeje në një autentifikim të dyfishtë të plotë me challenge-response.
Siç premtova, e përmirësova në një variant me challenge-response.
Përditësim:
seksioni
Pra:
Në skedar /etc/raddb/sites-enabled/default duket si më poshtë: authorize authorize { filter_username preprocess auth_log chap mschap suffix eap { ok = return } files -sql #-ldap expiration logintime if (!State) { if (&User-Password) { # Nëse !State dhe Password-i i Përdoruesit (PAP), atëherë detyro LDAP: update control { Ldap-UserDN := "%{User-Name}" Auth-Type := LDAP } } else { reject } } else { # Nëse State, atëherë proxy request: group_authorization } pap }
tani ka pamjen e mëposhtme:
Seksioni authenticate authenticate { Auth-Type PAP { pap } Auth-Type CHAP { chap } Auth-Type MS-CHAP { mschap } mschap digest # Provoni autentikimin me një lidhje të drejtpërdrejtë LDAP: Auth-Type LDAP { ldap if (ok) { update reply { # Krijoni një atribut të rastësishëm State: State := "%{randstr:aaaaaaaaaaaaaaaa}" Reply-Message := "Ju lutemi futni OTP" } # Kthe Access-Challenge: challenge } } pam eap }
Tani verifikimi i përdoruesit ndodh sipas algoritmit të mëposhtëm:
Përdoruesi fut kredencialet e domenit në klientin VPN.
- Freeradius kontrollon validitetin e llogarisë dhe fjalëkalimin
- Nëse fjalëkalimi është i saktë, dërgohet një kërkesë për token.
- Kontrollohet tokeni.
- Profit).
- )
Burimi: habr.com
