

Hyrje
Kohë më parë, gjatë punës mbi diplomën, u ndesha me nevojën për të krijuar një imazh të Ubuntu për një kompjuter të vetëm me ROS të instaluar (Sistemi i Operimit të Robotëve – një sistem operativ për robotët). Në thelb, diploma i kushtohet menaxhimit të një grupi robotësh. Robotët janë të pajisur me dy rrota dhe tre skanerë. Të gjitha këto drejtohen nga ROS, i cili funksionon në bordin ODROID-C2.
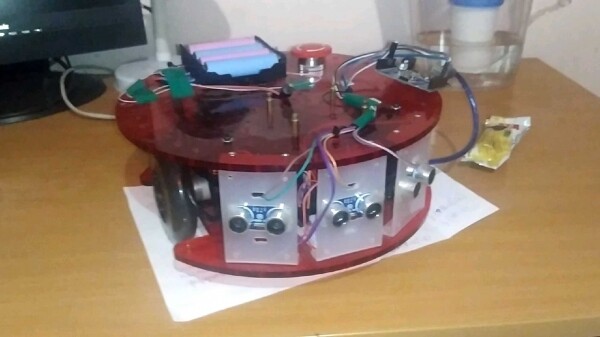
Robot Ladybug. Më falni për cilësinë e dobët të fotos
Nuk kishte as kohë, as dëshirë për të instaluar ROS në secilin robot veçmas, prandaj lindi nevoja për një imazh të sistemit me ROS të instaluar tashmë. Pas një shëtitjeje në hapësirën e internetit, gjeta disa qasje për të realizuar këtë.
Në përgjithësi, të gjitha zgjidhjet e gjetura mund të ndahen në grupe të mëposhtme.
- Programet që krijojnë një imazh nga një sistem i gatshëm dhe i konfiguruar (, , , systemback etj.)
- Projektet që lejojnë ndërtimin e imazhit tuaj (, )
- Ndërtimi manual i imazhit ( dhe , plus )
Përdorimi i zgjidhjeve nga grupi i parë dukej opsioni më i thjeshtë dhe më tërheqës, megjithatë nuk mund të krijoja një imazh të sistemit live për ODROID. Zgjidhjet nga grupa e dytë gjithashtu nuk më përshtatën për shkak të një kese të lartë hyrëse. Ndërtimi manual sipas tutoraleve të disponueshme gjithashtu nuk funksionoi, pasi nuk kishte një sistem të compressuar të skedarëve në imazhin tim.
Si rezultat, pasi pashë një video mbi chroot (chroot — ndrysho root, lidhja në video në fund të postit) dhe mundësitë e tij, u vendos të përdoret. Më pas do të përshkruaj rastin tim të veçantë të personalizimit të Ubuntu për zhvilluesit e robotikës.
Të dhënat e origjinës:
- I gjithë procesi i modifikimit të imazhit (përveç shkrimit në kartën SD duke përdorur balenaEtcher) u krye në sistemin operativ Ubuntu 18.04.
- Sistemi operativ, të cilin e modifikova – Ubuntu 18.04.3 me versionin mate desktop.
- Makinë, në të cilën duhet të funksionojë sistemi i mbledhur – ODROID-C2.
Përgatitja e imazhit
Shkarkoni imazhin e Ubuntu për ODROID nga
Zhbllokoni arkivin
unxz –kvKrijoni direktorinë, në të cilën do të montoni imazhin
mkdir mntPërcaktoni ndarjen, në të cilën ndodhet sistemi dosjeve
fileKërkoni ndarjen me sistem dosjesh në formatin ext2, ext3 ose ext4. Na nevojitet adresa e fillimit të ndarjes (e shënuar me të kuqe në skrin):

Shënim. Pozicioni i sistemit të skedarëve mund të shikohet gjithashtu me anë të utilitarit parted.Muntimi i imazhit
sudo mount -o loop,offset=$((264192*512)) mnt/Pjesa që na nevojitet fillon nga blloku 264192 (numrat tuaj mund të ndryshojnë), madhësia e një blloku është 512 byte, i shumëzojmë për të marrë offsetin në byte.
Shkoni në dosjen me sistemin e montuar dhe hyni brenda saj
cd mnt/
sudo chroot ~/livecd/mnt/ bin/sh
~/livecd/mnt — rruga e plotë deri në direktorinë me sistemin e montuar
bin/sh — shell (mund ta zëvendësoni gjithashtu me bin/bash)
Tani mund të filloni me instalimin e pakove dhe aplikacioneve të nevojshme.

Instalimi i ROS
Unë kam instaluar ROS versionin më të fundit (ROS Melodic) sipas .
Përditësoni listën e pakove
sudo apt-get updateKëtu kam hasur një gabim:
Err:6 http://deb.odroid.in/c2 bionic InRelease
The following signatures were invalid: EXPKEYSIG 5360FB9DAB19BAC9 Mauro Ribeiro (mdrjr)
Ky është i lidhur me skadimin e çelësit për nënshkrimin e pakove. Për të përditësuar çelësat shkruani:
sudo apt-key adv --keyserver keyserver.ubuntu.com --recv-keys AB19BAC9Përgatisim sistemin për instalimin e ROS
sudo sh -c 'echo "deb http://packages.ros.org/ros/ubuntu $(lsb_release -sc) main" > /etc/apt/sources.list.d/ros-latest.list'sudo apt-key adv --keyserver 'hkp://keyserver.ubuntu.com:80' --recv-key C1CF6E31E6BADE8868B172B4F42ED6FBAB17C654sudo apt updateInstalojmë ROS
Fatkeqësisht, nuk mund të instaloj versionin desktop të ROS, prandaj kam instaluar vetëm paketat bazë:sudo apt install ros-melodic-ros-base apt search ros-melodicShënim 1. Në procesin e instalimit ndonjëherë ka ndodhur një gabim:
dpkg: error: failed to write status database record about 'iputils-ping' to '/var/lib/dpkg/status': No space left on deviceKorrje me anë të pastrimit të caches nga utilitari apt:
sudo apt-get clean; sudo apt-get autocleanShënim 2. Pas instalimit duhet të përmblidhet (source) me komandën:
source /opt/ros/melodic/setup.bashnuk do të funksionojë, pasi nuk kemi ekzekutuar bash, prandaj nuk duhet ta shkruani në terminal.
Instalojmë varësitë e nevojshme
sudo apt install python-rosdep python-rosinstall python-rosinstall-generator python-wstool build-essentialsudo apt install python-rosdepsudo rosdep init rosdep updateKonfigurojmë të drejtat e aksesit
Pasi jemi brenda sistemit dhe, në fakt, po kryejmë të gjitha veprimet si root i sistemit të ndërtuar, po ashtu ROS do të ekzekutohet vetëm me të drejtat e super përdoruesit.
Kur përpiqemi të ekzekutojmë roscore pa sudo ndodh një gabim:Traceback (most recent call last): File "/opt/ros/melodic/lib/python2.7/dist-packages/roslaunch/__init__.py", line 230, in main write_pid_file(options.pid_fn, options.core, options.port) File "/opt/ros/melodic/lib/python2.7/dist-packages/roslaunch/__init__.py", line 106, in write_pid_file with open(pid_fn, "w") as f: IOError: [Errno 13] Permission denied: '/home/user/.ros/roscore-11311.pid'Për të parandaluar që gabimi të ndodhë, do të ndryshojmë në mënyrë rekursive të drejtat e aksesit në katalogun e shtëpisë së përdoruesit ROS. Për këtë, shkruajmë:
sudo rosdep fix-permissionsInstalojmë paketat rviz dhe rqt
sudo apt-get install ros-melodic-rqt ros-melodic-rviz
Prekjet përfundimtare
- Dalim nga chroot:
exit - Zbrazim imazhin
cd .. sudo umount mnt/ - Paketojmë imazhin e sistemit në arkiv
xz –ckv1
E gjitha! Tani me ndihmën e mund të shkruani imazhin e sistemit në kartën SD, ta vendosni në ODROID-C2, dhe do keni Ubuntu me ROS të instaluar!
Lidhjet:
- Me atë si të chroot në linux dhe për çfarë është e nevojshme, ky video më ka ndihmuar shumë:
Burimi: habr.com
