


Aktualisht, REST API është bërë standardi për zhvillimin e aplikacioneve web, duke mundësuar ndarjen e zhvillimit në pjesë të pavarura. Për UI, aktualisht përdoren shumë framework-e të njohura si Angular, React, Vue dhe të tjera. Ndërsa zhvilluesit e backend-it mund të zgjedhin nga një gamë të gjerë gjuhësh dhe framework-esh. Sot do të doja të flisja për një framework si . Ne në aktivisht e përdorim atë për projektet tona të brendshme. Duke përdorur nest dhe paketën , ne do të krijojmë një aplikacion të thjeshtë CRUD.
Pse NestJS
Së fundmi, në komunitetin JavaScript janë shfaqur shumë framework-e për backend. Edhe nëse në aspektin e funksionalitetit ato ofrojnë mundësi të ngjashme me ato të Nest, një tipar në të cilin ai sigurisht dominon është arkitektura. Mundësitë e mëposhtme të NestJS lejojnë krijimin e aplikacioneve industriale dhe skalimin e zhvillimit për ekipet e mëdhaja:
- përdorimi i TypeScript si gjuha kryesore e zhvillimit. Edhe pse NestJS mbështet JavaScript, disa funksionalitete mund të mos funksionojnë, veçanërisht nëse bëhet fjalë për paketa të trefishta;
- prania e kontejnerit DI, që lejon krijimin e komponentëve të lidhur lehtë;
- funksionaliteti i vetë framework-ut është i ndarë në komponentë të pavarur dhe të ndërrueshëm. Për shembull, nën kapakun e tij, mund të përdoret si , ashtu edhe , për të punuar me bazat e të dhënave, nest ofron lidhje të gatshme me , , ;
- NestJS nuk është i varur nga një platformë dhe mbështet REST, GraphQL, Websockets, gRPC etj.
Vetë framework-u është frymëzuar nga framework-u frontend Angular dhe konceptualisht ka shumë të përbashkëta me të.
Instalimi i NestJS dhe krijimi i projektit
Nest përmban paketën /cli, который позволяет быстро развернуть базовый каркас приложения. Установим глобально данный пакет:
npm install --global @nest/cliPas instalimit, le të krijojmë skeleton-in bazë të aplikacionit tonë me emrin nest-res. Kjo bëhet duke përdorur komandën nest new nest-rest.
nest new nest-rest
dmitrii@dmitrii-HP-ZBook-17-G3:~/projects $ nest new nest-rest
  Ne do ta skafdojmë aplikacionin tuaj në pak sekonda..

KREO /nest-rest/.prettierrc (51 bytes)
KREO /nest-rest/README.md (3370 bytes)
KREO /nest-rest/nest-cli.json (84 bytes)
KREO /nest-rest/nodemon-debug.json (163 bytes)
KREO /nest-rest/nodemon.json (67 bytes)
KREO /nest-rest/package.json (1805 bytes)
KREO /nest-rest/tsconfig.build.json (97 bytes)
KREO /nest-rest/tsconfig.json (325 bytes)
KREO /nest-rest/tslint.json (426 bytes)
KREO /nest-rest/src/app.controller.spec.ts (617 bytes)
KREO /nest-rest/src/app.controller.ts (274 bytes)
KREO /nest-rest/src/app.module.ts (249 bytes)
KREO /nest-rest/src/app.service.ts (142 bytes)
KREO /nest-rest/src/main.ts (208 bytes)
KREO /nest-rest/test/app.e2e-spec.ts (561 bytes)
KREO /nest-rest/test/jest-e2e.json (183 bytes)

? Cilin menaxher të paketave dëshiron ️ të përdorosh? yarn
 Instalimi është duke u zhvilluar...

  Projekti nest-rest u krijua me sukses
  Filloni me komandat e mëposhtme:

$ cd nest-rest
$ yarn run start

                          Faleminderit që instalove Nest
                 Të lutem dëgjoj që të dhurosh në kolektivin tonë të hapur
                        për të na ndihmuar ta mbajmë këtë paketë.

                 Dhuro: https://opencollective.com/nest
Si menaxher të paketave do të zgjedhim yarn.
Aktualisht mund të përfshijmë serverin me komandën npm start dhe duke kaluar në adresën mund të shohim faqen kryesore. Megjithatë, nuk jemi këtu për këtë dhe po vazhdojmë më tej.
Konfigurimi i punës me bazën e të dhënave
Si DBMS për këtë artikull kam zgjedhur PostgreSQL. Nuk debatohet për preferencat, mendoj se kjo është DBMS më e pjekur, që ka të gjitha mundësitë e nevojshme. Siç u përmend, për punë me bazat e të dhënave Nest ofron integrimin me paketa të ndryshme. Duke qenë se zgjedhja ime ra në PostgreSQL, do të ishte logjike të zgjedh TypeORM si ORM. Le të instalojmë paketat e nevojshme për integrimin me bazën e të dhënave:
yarn add typeorm @nestjs/typeorm pg
Për rendin, për çfarë është secila paketë:
- typeorm — paketa e vetme me ORM-in;
- @nestjs/typeorm — paketa TypeORM për NestJS. Shton modul të importueshëm në modulet e projektit si dhe një grup dekoratorësh ndihmës;
- pg — drejtues për të punuar me PostgreSQL.
Epo, paketat janë instaluar, tani duhet të aktivizojmë vetë bazën. Për ta instaluar bazën do të përdor docker-compose.yml me përmbajtjen e mëposhtme:
docker-compose.yml
version: '3.1'

services:
  db:
    image: postgres:11.2
    restart: always
    environment:
      POSTGRES_PASSWORD: example
    volumes:
      - ../db:/var/lib/postgresql/data
      - ./postgresql.conf:/etc/postgresql/postgresql.conf
    ports:
      - 5432:5432
  adminer:
    image: adminer
    restart: always
    ports:
      - 8080:8080
Siç mund të shihet, ky skedar konfigurimi lançon 2 kontejnerë:
- db — është kontejneri i bazës së të dhënave. Në rastin tonë përdoret PostgreSQL versioni 11.2;
- adminer — menaxher i punës me bazën e të dhënave. Ofron një ndërfaqe web për shikimin dhe menaxhimin e bazës.
Për të punuar me lidhjet nëpërmjet tcp, kam shtuar konfigurin e mëposhtëm.
postgresql.conf
# -----------------------------
# PostgreSQL configuration file
# -----------------------------
#
# This file consists of lines of the form:
#
# name = value
#
# (The "=" is optional.) Whitespace may be used. Comments are introduced with
# "#" anywhere on a line. The complete list of parameter names and allowed
# values can be found in the PostgreSQL documentation.
#
# The commented-out settings shown in this file represent the default values.
# Re-commenting a setting is NOT sufficient to revert it to the default value;
# you need to reload the server.
#
# This file is read on server startup and when the server receives a SIGHUP
# signal. If you edit the file on a running system, you have to SIGHUP the
# server for the changes to take effect, run "pg_ctl reload", or execute
# "SELECT pg_reload_conf()". Some parameters, which are marked below,
# require a server shutdown and restart to take effect.
#
# Any parameter can also be given as a command-line option to the server, e.g.,
# "postgres -c log_connections=on". Some parameters can be changed at run time
# with the "SET" SQL command.
#
# Memory units: kB = kilobytes Time units: ms = milliseconds
# MB = megabytes s = seconds
# GB = gigabytes min = minutes
# TB = terabytes h = hours
# d = days
#------------------------------------------------------------------------------
# FILE LOCATIONS
#------------------------------------------------------------------------------
# The default values of these variables are driven from the -D command-line
# option or PGDATA environment variable, represented here as ConfigDir.
#data_directory = 'ConfigDir' # use data in another directory
# (change requires restart)
#hba_file = 'ConfigDir/pg_hba.conf' # host-based authentication file
# (change requires restart)
#ident_file = 'ConfigDir/pg_ident.conf' # ident configuration file
# (change requires restart)
# If external_pid_file is not explicitly set, no extra PID file is written.
#external_pid_file = '' # write an extra PID file
# (change requires restart)
#------------------------------------------------------------------------------
# CONNECTIONS AND AUTHENTICATION
#------------------------------------------------------------------------------
# - Connection Settings -
listen_addresses = '*'
#listen_addresses = 'localhost' # what IP address(es) to listen on;
# comma-separated list of addresses;
# defaults to 'localhost'; use '*' for all
# (change requires restart)
#port = 5432 # (change requires restart)
#max_connections = 100 # (change requires restart)
#superuser_reserved_connections = 3 # (change requires restart)
#unix_socket_directories = '/tmp' # comma-separated list of directories
# (change requires restart)
#unix_socket_group = '' # (change requires restart)
#unix_socket_permissions = 0777 # begin with 0 to use octal notation
# (change requires restart)
#bonjour = off # advertise server via Bonjour
# (change requires restart)
#bonjour_name = '' # defaults to the computer name
# (change requires restart)
# - TCP Keepalives -
# see "man 7 tcp" for details
#tcp_keepalives_idle = 0 # TCP_KEEPIDLE, in seconds;
# 0 selects the system default
#tcp_keepalives_interval = 0 # TCP_KEEPINTVL, in seconds;
# 0 selects the system default
#tcp_keepalives_count = 0 # TCP_KEEPCNT;
# 0 selects the system default
# - Authentication -
#authentication_timeout = 1min # 1s-600s
#password_encryption = md5 # md5 or scram-sha-256
#db_user_namespace = off
# GSSAPI using Kerberos
#krb_server_keyfile = ''
#krb_caseins_users = off
# - SSL -
#ssl = off
#ssl_ca_file = ''
#ssl_cert_file = 'server.crt'
#ssl_crl_file = ''
#ssl_key_file = 'server.key'
#ssl_ciphers = 'HIGH:MEDIUM:+3DES:!aNULL' # allowed SSL ciphers
#ssl_prefer_server_ciphers = on
#ssl_ecdh_curve = 'prime256v1'
#ssl_min_protocol_version = 'TLSv1'
#ssl_max_protocol_version = ''
#ssl_dh_params_file = ''
#ssl_passphrase_command = ''
#ssl_passphrase_command_supports_reload = off
#------------------------------------------------------------------------------
# RESOURCE USAGE (except WAL)
#------------------------------------------------------------------------------
# - Memory -
#shared_buffers = 32MB # min 128kB
# (change requires restart)
#huge_pages = try # on, off, or try
# (change requires restart)
#temp_buffers = 8MB # min 800kB
#max_prepared_transactions = 0 # zero disables the feature
# (change requires restart)
# Caution: it is not advisable to set max_prepared_transactions nonzero unless
# you actively intend to use prepared transactions.
#work_mem = 4MB # min 64kB
#maintenance_work_mem = 64MB # min 1MB
#autovacuum_work_mem = -1 # min 1MB, or -1 to use maintenance_work_mem
#max_stack_depth = 2MB # min 100kB
#shared_memory_type = mmap # the default is the first option
# supported by the operating system:
# mmap
# sysv
# windows
# (change requires restart)
#dynamic_shared_memory_type = posix # the default is the first option
# supported by the operating system:
# posix
# sysv
# windows
# mmap
# (change requires restart)
# - Disk -
#temp_file_limit = -1 # limits per-process temp file space
# in kB, or -1 for no limit
# - Kernel Resources -
#max_files_per_process = 1000 # min 25
# (change requires restart)
# - Cost-Based Vacuum Delay -
#vacuum_cost_delay = 0 # 0-100 milliseconds (0 disables)
#vacuum_cost_page_hit = 1 # 0-10000 credits
#vacuum_cost_page_miss = 10 # 0-10000 credits
#vacuum_cost_page_dirty = 20 # 0-10000 credits
#vacuum_cost_limit = 200 # 1-10000 credits
# - Background Writer -
#bgwriter_delay = 200ms # 10-10000ms between rounds
#bgwriter_lru_maxpages = 100 # max buffers written/round, 0 disables
#bgwriter_lru_multiplier = 2.0 # 0-10.0 multiplier on buffers scanned/round
#bgwriter_flush_after = 0 # measured in pages, 0 disables
# - Asynchronous Behavior -
#effective_io_concurrency = 1 # 1-1000; 0 disables prefetching
#max_worker_processes = 8 # (change requires restart)
#max_parallel_maintenance_workers = 2 # taken from max_parallel_workers
#max_parallel_workers_per_gather = 2 # taken from max_parallel_workers
#parallel_leader_participation = on
#max_parallel_workers = 8 # maximum number of max_worker_processes that
# can be used in parallel operations
#old_snapshot_threshold = -1 # 1min-60d; -1 disables; 0 is immediate
# (change requires restart)
#backend_flush_after = 0 # measured in pages, 0 disables
#------------------------------------------------------------------------------
# WRITE-AHEAD LOG
#------------------------------------------------------------------------------
# - Settings -
#wal_level = replica # minimal, replica, or logical
# (change requires restart)
#fsync = on # flush data to disk for crash safety
# (turning this off can cause
# unrecoverable data corruption)
#synchronous_commit = on # synchronization level;
# off, local, remote_write, remote_apply, or on
#wal_sync_method = fsync # the default is the first option
# supported by the operating system:
# open_datasync
# fdatasync (default on Linux)
# fsync
# fsync_writethrough
# open_sync
#full_page_writes = on # recover from partial page writes
#wal_compression = off # enable compression of full-page writes
#wal_log_hints = off # also do full page writes of non-critical updates
# (change requires restart)
#wal_buffers = -1 # min 32kB, -1 sets based on shared_buffers
# (change requires restart)
#wal_writer_delay = 200ms # 1-10000 milliseconds
#wal_writer_flush_after = 1MB # measured in pages, 0 disables
#commit_delay = 0 # range 0-100000, in microseconds
#commit_siblings = 5 # range 1-1000
# - Checkpoints -
#checkpoint_timeout = 5min # range 30s-1d
#max_wal_size = 1GB
#min_wal_size = 80MB
#checkpoint_completion_target = 0.5 # checkpoint target duration, 0.0 - 1.0
#checkpoint_flush_after = 0 # measured in pages, 0 disables
#checkpoint_warning = 30s # 0 disables
# - Archiving -
#archive_mode = off # enables archiving; off, on, or always
# (change requires restart)
#archive_command = '' # command to use to archive a logfile segment
# placeholders: %p = path of file to archive
# %f = file name only
# e.g. 'test ! -f /mnt/server/archivedir/%f && cp %p /mnt/server/archivedir/%f'
#archive_timeout = 0 # force a logfile segment switch after this
# number of seconds; 0 disables
# - Archive Recovery -
# These are only used in recovery mode.
#restore_command = '' # command to use to restore an archived logfile segment
# placeholders: %p = path of file to restore
# %f = file name only
# e.g. 'cp /mnt/server/archivedir/%f %p'
# (change requires restart)
#archive_cleanup_command = '' # command to execute at every restartpoint
#recovery_end_command = '' # command to execute at completion of recovery
# - Recovery Target -
# Set these only when performing a targeted recovery.
#recovery_target = '' # 'immediate' to end recovery as soon as a
# consistent state is reached
# (change requires restart)
#recovery_target_name = '' # the named restore point to which recovery will proceed
# (change requires restart)
#recovery_target_time = '' # the time stamp up to which recovery will proceed
# (change requires restart)
#recovery_target_xid = '' # the transaction ID up to which recovery will proceed
# (change requires restart)
#recovery_target_lsn = '' # the WAL LSN up to which recovery will proceed
# (change requires restart)
#recovery_target_inclusive = on # Specifies whether to stop:
# just after the specified recovery target (on)
# just before the recovery target (off)
# (change requires restart)
#recovery_target_timeline = 'latest' # 'current', 'latest', or timeline ID
# (change requires restart)
#recovery_target_action = 'pause' # 'pause', 'promote', 'shutdown'
# (change requires restart)
#------------------------------------------------------------------------------
# REPLICATION
#------------------------------------------------------------------------------
# - Sending Servers -
# Set these on the master and on any standby that will send replication data.
#max_wal_senders = 10 # max number of walsender processes
# (change requires restart)
#wal_keep_segments = 0 # in logfile segments; 0 disables
#wal_sender_timeout = 60s # in milliseconds; 0 disables
#max_replication_slots = 10 # max number of replication slots
# (change requires restart)
#track_commit_timestamp = off # collect timestamp of transaction commit
# (change requires restart)
# - Master Server -
# These settings are ignored on a standby server.
#synchronous_standby_names = '' # standby servers that provide sync rep
# method to choose sync standbys, number of sync standbys,
# and comma-separated list of application_name
# from standby(s); '*' = all
#vacuum_defer_cleanup_age = 0 # number of xacts by which cleanup is delayed
# - Standby Servers -
# These settings are ignored on a master server.
#primary_conninfo = '' # connection string to sending server
# (change requires restart)
#primary_slot_name = '' # replication slot on sending server
# (change requires restart)
#promote_trigger_file = '' # file name whose presence ends recovery
#hot_standby = on # "off" disallows queries during recovery
# (change requires restart)
#max_standby_archive_delay = 30s # max delay before canceling queries
# when reading WAL from archive;
# -1 allows indefinite delay
#max_standby_streaming_delay = 30s # max delay before canceling queries
# when reading streaming WAL;
# -1 allows indefinite delay
#wal_receiver_status_interval = 10s # send replies at least this often
# 0 disables
#hot_standby_feedback = off # send info from standby to prevent
# query conflicts
#wal_receiver_timeout = 60s # time that receiver waits for
# communication from master
# in milliseconds; 0 disables
#wal_retrieve_retry_interval = 5s # time to wait before retrying to
# retrieve WAL after a failed attempt
#recovery_min_apply_delay = 0 # minimum delay for applying changes during recovery
# - Subscribers -
# These settings are ignored on a publisher.
#max_logical_replication_workers = 4 # taken from max_worker_processes
# (change requires restart)
#max_sync_workers_per_subscription = 2 # taken from max_logical_replication_workers
#------------------------------------------------------------------------------
# QUERY TUNING
#------------------------------------------------------------------------------
# - Planner Method Configuration -
#enable_bitmapscan = on
#enable_hashagg = on
#enable_hashjoin = on
#enable_indexscan = on
#enable_indexonlyscan = on
#enable_material = on
#enable_mergejoin = on
#enable_nestloop = on
#enable_parallel_append = on
#enable_seqscan = on
#enable_sort = on
#enable_tidscan = on
#enable_partitionwise_join = off
#enable_partitionwise_aggregate = off
#enable_parallel_hash = on
#enable_partition_pruning = on
# - Planner Cost Constants -
#seq_page_cost = 1.0 # measured on an arbitrary scale
#random_page_cost = 4.0 # same scale as above
#cpu_tuple_cost = 0.01 # same scale as above
#cpu_index_tuple_cost = 0.005 # same scale as above
#cpu_operator_cost = 0.0025 # same scale as above
#parallel_tuple_cost = 0.1 # same scale as above
#parallel_setup_cost = 1000.0 # same scale as above
#jit_above_cost = 100000 # perform JIT compilation if available
# and query more expensive than this;
# -1 disables
#jit_inline_above_cost = 500000 # inline small functions if query is
# more expensive than this; -1 disables
#jit_optimize_above_cost = 500000 # use expensive JIT optimizations if
# query is more expensive than this;
# -1 disables
#min_parallel_table_scan_size = 8MB
#min_parallel_index_scan_size = 512kB
#effective_cache_size = 4GB
# - Genetic Query Optimizer -
#geqo = on
#geqo_threshold = 12
#geqo_effort = 5 # range 1-10
#geqo_pool_size = 0 # selects default based on effort
#geqo_generations = 0 # selects default based on effort
#geqo_selection_bias = 2.0 # range 1.5-2.0
#geqo_seed = 0.0 # range 0.0-1.0
# - Other Planner Options -
#default_statistics_target = 100 # range 1-10000
#constraint_exclusion = partition # on, off, or partition
#cursor_tuple_fraction = 0.1 # range 0.0-1.0
#from_collapse_limit = 8
#join_collapse_limit = 8 # 1 disables collapsing of explicit
# JOIN clauses
#force_parallel_mode = off
#jit = on # allow JIT compilation
#plan_cache_mode = auto # auto, force_generic_plan or
# force_custom_plan
#------------------------------------------------------------------------------
# REPORTING AND LOGGING
#------------------------------------------------------------------------------
# - Where to Log -
#log_destination = 'stderr' # Valid values are combinations of
# stderr, csvlog, syslog, and eventlog,
# depending on platform. csvlog
# requires logging_collector to be on.
# This is used when logging to stderr:
#logging_collector = off # Enable capturing of stderr and csvlog
# into log files. Required to be on for
# csvlogs.
# (change requires restart)
# These are only used if logging_collector is on:
#log_directory = 'log' # directory where log files are written,
# can be absolute or relative to PGDATA
#log_filename = 'postgresql-%Y-%m-%d_%H%M%S.log' # log file name pattern,
# can include strftime() escapes
#log_file_mode = 0600 # creation mode for log files,
# begin with 0 to use octal notation
#log_truncate_on_rotation = off # If on, an existing log file with the
# same name as the new log file will be
# truncated rather than appended to.
# But such truncation only occurs on
# time-driven rotation, not on restarts
# or size-driven rotation. Default is
# off, meaning append to existing files
# in all cases.
#log_rotation_age = 1d # Automatic rotation of logfiles will
# happen after that time. 0 disables.
#log_rotation_size = 10MB # Automatic rotation of logfiles will
# happen after that much log output.
# 0 disables.
# These are relevant when logging to syslog:
#syslog_facility = 'LOCAL0'
#syslog_ident = 'postgres'
#syslog_sequence_numbers = on
#syslog_split_messages = on
# This is only relevant when logging to eventlog (win32):
# (change requires restart)
#event_source = 'PostgreSQL'
# - When to Log -
#log_min_messages = warning # values in order of decreasing detail:
# debug5
# debug4
# debug3
# debug2
# debug1
# info
# notice
# warning
# error
# log
# fatal
# panic
#log_min_error_statement = error # values in order of decreasing detail:
# debug5
# debug4
# debug3
# debug2
# debug1
# info
# notice
# warning
# error
# log
# fatal
# panic (effectively off)
#log_min_duration_statement = -1 # logs statements and their durations
# according to log_statement_sample_rate. -1 is disabled,
# 0 logs all statement, > 0 logs only statements running at
# least this number of milliseconds.
#log_statement_sample_rate = 1 # Fraction of logged statements over
# log_min_duration_statement. 1.0 logs all statements,
# 0 never logs.
# - What to Log -
#debug_print_parse = off
#debug_print_rewritten = off
#debug_print_plan = off
#debug_pretty_print = on
#log_checkpoints = off
#log_connections = off
#log_disconnections = off
#log_duration = off
#log_error_verbosity = default # terse, default, or verbose messages
#log_hostname = off
#log_line_prefix = '%m [%p] ' # special values:
# %a = application name
# %u = user name
# %d = database name
# %r = remote host and port
# %h = remote host
# %p = process ID
# %t = timestamp without milliseconds
# %m = timestamp with milliseconds
# %n = timestamp with milliseconds (as a Unix epoch)
# %i = command tag
# %e = SQL state
# %c = session ID
# %l = session line number
# %s = session start timestamp
# %v = virtual transaction ID
# %x = transaction ID (0 if none)
# %q = stop here in non-session
# processes
# %% = '%'
# e.g. '<%u%%%d> '
#log_lock_waits = off # log lock waits >= deadlock_timeout
#log_statement = 'none' # none, ddl, mod, all
#log_replication_commands = off
#log_temp_files = -1 # log temporary files equal or larger
# than the specified size in kilobytes;
# -1 disables, 0 logs all temp files
#log_timezone = 'GMT'
#------------------------------------------------------------------------------
# PROCESS TITLE
#------------------------------------------------------------------------------
#cluster_name = '' # added to process titles if nonempty
# (change requires restart)
#update_process_title = on
#------------------------------------------------------------------------------
# STATISTICS
#------------------------------------------------------------------------------
# - Query and Index Statistics Collector -
#track_activities = on
#track_counts = on
#track_io_timing = off
#track_functions = none # none, pl, all
#track_activity_query_size = 1024 # (change requires restart)
#stats_temp_directory = 'pg_stat_tmp'
# - Monitoring -
#log_parser_stats = off
#log_planner_stats = off
#log_executor_stats = off
#log_statement_stats = off
#------------------------------------------------------------------------------
# AUTOVACUUM
#------------------------------------------------------------------------------
#autovacuum = on # Enable autovacuum subprocess? 'on'
# requires track_counts to also be on.
#log_autovacuum_min_duration = -1 # -1 disables, 0 logs all actions and
# their durations, > 0 logs only
# actions running at least this number
# of milliseconds.
#autovacuum_max_workers = 3 # max number of autovacuum subprocesses
# (change requires restart)
#autovacuum_naptime = 1min # time between autovacuum runs
#autovacuum_vacuum_threshold = 50 # min number of row updates before
# vacuum
#autovacuum_analyze_threshold = 50 # min number of row updates before
# analyze
#autovacuum_vacuum_scale_factor = 0.2 # fraction of table size before vacuum
#autovacuum_analyze_scale_factor = 0.1 # fraction of table size before analyze
#autovacuum_freeze_max_age = 200000000 # maximum XID age before forced vacuum
# (change requires restart)
#autovacuum_multixact_freeze_max_age = 400000000 # maximum multixact age
# before forced vacuum
# (change requires restart)
#autovacuum_vacuum_cost_delay = 2ms # default vacuum cost delay for
# autovacuum, in milliseconds;
# -1 means use vacuum_cost_delay
#autovacuum_vacuum_cost_limit = -1 # default vacuum cost limit for
# autovacuum, -1 means use
# vacuum_cost_limit
#------------------------------------------------------------------------------
# CLIENT CONNECTION DEFAULTS
#------------------------------------------------------------------------------
# - Statement Behavior -
#client_min_messages = notice # values in order of decreasing detail:
# debug5
# debug4
# debug3
# debug2
# debug1
# log
# notice
# warning
# error
#search_path = '"$user", public' # schema names
#row_security = on
#default_tablespace = '' # a tablespace name, '' uses the default
#temp_tablespaces = '' # a list of tablespace names, '' uses
# only default tablespace
#check_function_bodies = on
#default_transaction_isolation = 'read committed'
#default_transaction_read_only = off
#default_transaction_deferrable = off
#session_replication_role = 'origin'
#statement_timeout = 0 # in milliseconds, 0 is disabled
#lock_timeout = 0 # in milliseconds, 0 is disabled
#idle_in_transaction_session_timeout = 0 # in milliseconds, 0 is disabled
#vacuum_freeze_min_age = 50000000
#vacuum_freeze_table_age = 150000000
#vacuum_multixact_freeze_min_age = 5000000
#vacuum_multixact_freeze_table_age = 150000000
#vacuum_cleanup_index_scale_factor = 0.1 # fraction of total number of tuples
# before index cleanup, 0 always performs
# index cleanup
#bytea_output = 'hex' # hex, escape
#xmlbinary = 'base64'
#xmloption = 'content'
#gin_fuzzy_search_limit = 0
#gin_pending_list_limit = 4MB
# - Locale and Formatting -
#datestyle = 'iso, mdy'
#intervalstyle = 'postgres'
#timezone = 'GMT'
#timezone_abbreviations = 'Default' # Select the set of available time zone
# abbreviations. Currently, there are
# Default
# Australia (historical usage)
# India
# You can create your own file in
# share/timezonesets/.
#extra_float_digits = 1 # min -15, max 3; any value >0 actually
# selects precise output mode
#client_encoding = sql_ascii # actually, defaults to database
# encoding
# These settings are initialized by initdb, but they can be changed.
#lc_messages = 'C' # locale for system error message
# strings
#lc_monetary = 'C' # locale for monetary formatting
#lc_numeric = 'C' # locale for number formatting
#lc_time = 'C' # locale for time formatting
# default configuration for text search
#default_text_search_config = 'pg_catalog.simple'
# - Shared Library Preloading -
#shared_preload_libraries = '' # (change requires restart)
#local_preload_libraries = ''
#session_preload_libraries = ''
#jit_provider = 'llvmjit' # JIT library to use
# - Other Defaults -
#dynamic_library_path = '$libdir'
#------------------------------------------------------------------------------
# LOCK MANAGEMENT
#------------------------------------------------------------------------------
#deadlock_timeout = 1s
#max_locks_per_transaction = 64 # min 10
# (change requires restart)
#max_pred_locks_per_transaction = 64 # min 10
# (change requires restart)
#max_pred_locks_per_relation = -2 # negative values mean
# (max_pred_locks_per_transaction
# / -max_pred_locks_per_relation) - 1
#max_pred_locks_per_page = 2 # min 0
#------------------------------------------------------------------------------
# VERSION AND PLATFORM COMPATIBILITY
#------------------------------------------------------------------------------
# - Previous PostgreSQL Versions -
#array_nulls = on
#backslash_quote = safe_encoding # on, off, or safe_encoding
#escape_string_warning = on
#lo_compat_privileges = off
#operator_precedence_warning = off
#quote_all_identifiers = off
#standard_conforming_strings = on
#synchronize_seqscans = on
# - Other Platforms and Clients -
#transform_null_equals = off
#------------------------------------------------------------------------------
# ERROR HANDLING
#------------------------------------------------------------------------------
#exit_on_error = off # terminate session on any error?
#restart_after_crash = on # reinitialize after backend crash?
#data_sync_retry = off # retry or panic on failure to fsync
# data?
# (change requires restart)
#------------------------------------------------------------------------------
# CONFIG FILE INCLUDES
#------------------------------------------------------------------------------
# These options allow settings to be loaded from files other than the
# default postgresql.conf.
#include_dir = 'conf.d' # include files ending in '.conf' from
# directory 'conf.d'
#include_if_exists = 'exists.conf' # include file only if it exists
#include = 'special.conf' # include file
#------------------------------------------------------------------------------
# CUSTOMIZED OPTIONS
#------------------------------------------------------------------------------
# Add settings for extensions hereKëtu gjithçka ka mbaruar, mund ta aktivizoni kontejnerin me komandën docker-compose up -d. Ose në një konsolë tjetër me komandën docker-compose up.
Pra, paketat i kemi instaluar, bazën e kemi aktivizuar, mbetet ta lidhen me njëri-tjetrin. Për këtë, duhet të shtojmë një skedar ormconfig.js me përmbajtjen e mëposhtme në rrënjën e projektit:
ormconfig.js
const process = require('process');

const username = process.env.POSTGRES_USER || "postgres";
const password = process.env.POSTGRES_PASSWORD || "example";

module.exports = {
  "type": "postgres",
  "host": "localhost",
  "port": 5432,
  username,
  password,
  "database": "postgres",
  "synchronize": true,
  "dropSchema": false,
  "logging": true,
  "entities": [__dirname + "/src/**/*.entity.ts", __dirname + "/dist/**/*.entity.js"],
  "migrations": ["migrations/**/*.ts"],
  "subscribers": ["subscriber/**/*.ts", "dist/subscriber/**/.js"],
  "cli": {
    "entitiesDir": "src",
    "migrationsDir": "migrations",
    "subscribersDir": "subscriber"
  }
}
Ky është ky konfigurimi që do të përdoret për cli typeorm.
Të ndalemi pak më tepër në këtë konfigurim. Në rreshtat 3 dhe 4 ne marrim emrin e përdoruesit dhe fjalëkalimin nga variablat e mjedisit. Kjo është e përshtatshme kur keni disa mjedise (dev, stage, prodhimi, etj). Në mënyrë të paracaktuar, emri i përdoruesit është postgres, fjalëkalimi është example. Pjesa e tjera e konfigurimit është e thjeshtë, prandaj do të ndalemi vetëm te parametrat më interesantë:
- synchronize — tregon nëse skema e bazës së të dhënave duhet të krijohet automatikisht kur aplikacioni nis. Kujdes me këtë opsion dhe mos e përdorni në prodhim, në të kundërt do të humbisni të dhëna. Ky opsion është i përshtatshëm gjatë zhvillimit dhe debuggimit të aplikacionit. Si një alternativë për këtë opsion, mund të përdorni komandën
schema:syncnga CLI TypeORM. - dropSchema — reseton skemën çdo herë që krijohet një lidhje. Po ashtu, si opsioni i mëparshëm, ky opsion duhet të përdoret vetëm gjatë zhvillimit dhe debuggimit të aplikacionit.
- entities — për çfarë rrugësh të kërkoni për përshkrimet e modeleve. Vini re se mbështetet kërkimi sipas patterns.
- cli.entitiesDir — direktoriumi ku zakonisht duhet të vendosen modellet, të krijuara nga CLI TypeORM.
Për të përdorur të gjitha mundësitë e TypeORM në aplikacionin tonë Nest, duhet të importojmë modul TypeOrmModule në AppModule. Pra, moduli juaj AppModule do të duket si më poshtë:
app.module.ts
import { Module } from '@nestjs/common';
import { AppController } from './app.controller';
import { AppService } from './app.service';
import { TypeOrmModule } from '@nestjs/typeorm';
import * as process from "process";

const username = process.env.POSTGRES_USER || 'postgres';
const password = process.env.POSTGRES_PASSWORD || 'example';

@Module({
  imports: [
    TypeOrmModule.forRoot({
      type: 'postgres',
      host: 'localhost',
      port: 5432,
      username,
      password,
      database: 'postgres',
      entities: [__dirname + '/**/*.entity{.ts,.js}'],
      synchronize: true,
    }),
  ],
  controllers: [AppController],
  providers: [AppService],
})
export class AppModule {}
Si e keni vënë re, në metodën forRoot po dërgohet e njëjta konfigurim për të punuar me bazën e të dhënave, si në skedarin ormconfig.ts
Përfundimi i fundit - shtoni disa punë për të punuar me TypeORM në package.json. Çështja është se CLI është shkruar në javascript dhe ekzekutohet në mjedisin nodejs. Sidoqoftë, të gjitha modelet dhe migrimet tona do të jenë të shkruara në typescript. Pra, duhet të bëjmë transpilation e migrimeve dhe modeleve tona para përdorimit të CLI. Për këtë na nevojitet paketa ts-node:
yarn add -D ts-node
Pas kësaj, shtoni komandat e nevojshme në package.json:
"typeorm": "ts-node -r tsconfig-paths/register ./node_modules/typeorm/cli.js",
"migration:generate": "yarn run typeorm migration:generate -n",
"migration:create": "yarn run typeorm migration:create -n",
"migration:run": "yarn run typeorm migration:run"
Komanda e parë, typeorm, shton një mbështjellës në formën e ts-node për të ekzekutuar cli TypeORM. Komandat e tjera janë shkurtimesh të përshtatshme, të cilat do t'i përdorni si zhvillues pothuajse çdo ditë:
migration:generate — krijimi i migrimeve në bazë të ndryshimeve në modelet tuaja.
migration:create — krijimi i një migrimi të zbrazët.
migration:run — ekzekutimi i migrimeve.
Tani, përfundimisht, ne kemi shtuar paketat e nevojshme, konfiguruar aplikacionin për të punuar me bazën si me cli ashtu edhe nga aplikacioni vetë dhe kemi nisur bazën e të dhënave. Ka ardhur koha për të shtuar logjikën në aplikacionin tonë.
Instalimi i pakteve për krijimin e CRUD
Duke përdorur vetëm Nest, mund të krijoni një API që lejon krijimin, leximin, përditësimin dhe fshirjen e një entiteti. Ky zgjidhje do të jetë maksimale fleksibël, megjithatë për disa raste mund të jetë tepër e madhe. Për shembull, nëse ju nevojitet të krijoni shpejt një prototip, shpesh mund të sakrifikoni fleksibilitetin për shkak të shpejtësisë së zhvillimit. Shumë framework-e ofrojnë funksionalitetin për gjenerimin e CRUD nga përshkrimi i modelit të të dhënave të një entiteti. Dhe Nest nuk përbën përjashtim! Ky funksionalitet ofrohet nga paketa . Mundësitë e saj janë shumë interesante:
- instalimi dhe konfigurimi të lehtë;
- pavarësia nga SGBD;
- një gjuhë e fuqishme kërkese me mundësi filtrimi, paginimi, renditjeje, ngarkimi të lidhjeve dhe entiteteve të përfshira, caching, etj.;
- paketë për formimin e kërkesave në front-end;
- përkufizimi i lehtë i metodave të kontrolluesit;
- konfigurim të vogël;
- mbështetje për dokumentacionin swagger.
Funksionaliteti është i ndarë në disa paketa:
- — paketa bazë, e cila ofron dekoratorin () për gjenerimin e rrugëve, konfigurimin dhe validimin;
- — paketa, që ofron ndërtuesin/parseluesin e kërkesave për t'u përdorur në anën e frontend;
- — paket për integrimin me TypeORM, që ofron shërbimin bazë TypeOrmCrudService me metoda CRUD për punën me entitetet në DB.
Në këtë udhëzues do të na duhen paketat jsx/crud dhe jsx/crud-typeorm. Për fillim, do t'i instalojmë ato
yarn add @nestjsx/crud class-transformer class-validatorPaketat dhe në këtë aplikacion kërkohen për përshkrimin deklarativ të rregullave të transformimit të instancave të modeleve dhe validimin e kërkesave të ardhura përkatësisht. Këto paketa janë nga një autor, kështu që ndërfaqet janë të ngjashme.
Implementimi i drejtpërdrejtë i CRUD
Si një shembull modeli do të marrim listën e përdoruesve. Përdoruesit do të kenë këto fusha: id, username, displayName, email. id — fushë auto-incrementale, email dhe username — fusha unike. E gjitha është e thjeshtë! Na mbetet të realizojmë konceptin tonë si një aplikacion Nest.
Për fillim, është e nevojshme të krijohet një modul përdoruesit, i cili do të merret me punën me përdoruesit. Do të përdorim CLI nga NestJS, dhe në drejtorinë kryesore të projektit tonë do të ekzekutojmë komandën nest g module users.
nest g module users
dmitrii@dmitrii-HP-ZBook-17-G3:~/projects/nest-rest git:(master*)$ nest g module users
KRIJO /src/users/users.module.ts (82 bytes)
PËRPUNIM /src/app.module.ts (312 bytes)
Në këtë modul do të shtojmë një dosje entitetesh, ku do të vendosen modelet e këtij moduli. Konkretisht, do të shtojmë këtu skedarin user.entity.ts me përshkrimin e modelit të përdoruesve:
user.entity.ts
import { Column, Entity, PrimaryGeneratedColumn } from 'typeorm';

@Entity()
export class User {
  @PrimaryGeneratedColumn()
  id: string;

  @Column({unique: true})
  email: string;

  @Column({unique: true})
  username: string;

  @Column({nullable: true})
  displayName: string;
}
Për të bërë që ky model "të shikohet" nga aplikacioni ynë, është e nevojshme të importohet modul UsersModule në TypeOrmModule përmbajtja e mëposhtme:
users.module.ts
import { Module } from '@nestjs/common';
import { UsersController } from './controllers/users/users.controller';
import { UsersService } from './services/users/users.service';
import { TypeOrmModule } from '@nestjs/typeorm';
import { User } from './entities/user.entity';

@Module({
  controllers: [UsersController],
  providers: [UsersService],
  imports: [
    TypeOrmModule.forFeature([User])
  ]
})
export class UsersModule {}
Të thënë ndryshe, këtu ne importojmë TypeOrmModule, ku si parametër të metodës forFeature të listojmë modelet që i përkasin këtij moduli.
Tani duhet të krijojmë entitetin përkatës në bazën e të dhënave. Për këtë qëllim përdoret mekanizmi i migrimeve. Për të krijuar një migrim bazuar në ndryshimet në modelet, duhet të ekzekutojmë komandën npm run migration:generate -- CreateUserTable:
Kreu i spojlerit
$ npm run migration:generate -- CreateUserTable
Migrimi /home/dmitrii/projects/nest-rest/migrations/1563346135367-CreateUserTable.ts është krijuar me sukses.
Përfunduar në 1.96s.
Nuk patëm nevojë të shkruajmë migrimin manualisht, gjithçka ndodhi si me magji. A nuk është kjo një mrekulli! Por ka më shumë. Le të shohim skedarin e krijuar me migrimin:
1563346135367-CreateUserTable.ts
import {MigrationInterface, QueryRunner} from "typeorm";

export class CreateUserTable1563346816726 implements MigrationInterface {

    public async up(queryRunner: QueryRunner): Promise {
        await queryRunner.query(`CREATE TABLE "user" ("id" SERIAL NOT NULL, "email" character varying NOT NULL, "username" character varying NOT NULL, "displayName" character varying, CONSTRAINT "UQ_e12875dfb3b1d92d7d7c5377e22" UNIQUE ("email"), CONSTRAINT "UQ_78a916df40e02a9deb1c4b75edb" UNIQUE ("username"), CONSTRAINT "PK_cace4a159ff9f2512dd42373760" PRIMARY KEY ("id"))`);
    }

    public async down(queryRunner: QueryRunner): Promise {
        await queryRunner.query(`DROP TABLE "user"`);
    }

}
Siç mund të vëreni, është gjeneruar automatikisht jo vetëm metoda për të ekzekutuar migrimin, por edhe metoda për ta kthyer atë. Fantastike!
Na mbetet vetëm të aplikojmë këtë migrim. Kjo bëhet me komandën e mëposhtme:
npm run migration:run.Gati, tani ndryshimet e skemës janë transferuar në bazën e të dhënave.
Më pas do të krijojmë një shërbim, i cili do të merret me punën me përdoruesit dhe do ta trashëgojmë atë nga TypeOrmCrudService. Në parametrin e konstruktorit të prindit duhet të kalojmë repositorin e entitetit të interesit, në rastin tonë User repositori.
users.service.ts
import { Injectable } from '@nestjs/common';
import { TypeOrmCrudService } from '@nestjsx/crud-typeorm';
import { User } from '../../entities/user.entity';
import { InjectRepository } from '@nestjs/typeorm';
import { Repository } from 'typeorm';

@Injectable()
export class UsersService extends TypeOrmCrudService{
  constructor(@InjectRepository(User) usersRepository: Repository){
    super(usersRepository);
  }
}
Ky shërbim do na nevojitet në kontroler. përdoruesitPër të krijuar një kontrollues, shkruani në konzol nest g controller users/controllers/users
nest g controller users/controllers/users
dmitrii@dmitrii-HP-ZBook-17-G3:~/projects/nest-rest git:(master*)$ nest g controller users/controllers/users
KRIJO /src/users/controllers/users/users.controller.spec.ts (486 bytes)
KRIJO /src/users/controllers/users/users.controller.ts (99 bytes)
PËRPUNIM /src/users/users.module.ts (188 bytes)
Do të hapim këtë kontrollues dhe do ta redaktojmë për të shtuar pak magji jsx/crud. Në klasën UsersController do të shtojmë një dekorator të këtij lloji:
@Crud({
  model: {
    type: User
  }
}) — ky është një dekorator që shton në kontrollues metodat e nevojshme për të punuar me modelin. Tipi i modelit përcaktohet në fushën model.type të konfigurimit të dekoratorit.
Hapi i dytë — është e nevojshme të implementohet ndërfaqja CrudController. Kur bashkohen, kodi i kontrolluesit duket si më poshtë:
import { Controller } from '@nestjs/common';
import { Crud, CrudController } from '@nestjsx/crud';
import { User } from '../../entities/user.entity';
import { UsersService } from '../../services/users/users.service';

@Crud({
  model: {
    type: User
  }
})
@Controller('users')
export class UsersController implements CrudController{
  constructor(public service: UsersService){}
}
Dhe është gjithçka! Tani kontrolori mbështet të gjithë setin e operacioneve me modelin! Nuk besoni? Le të provojmë aplikacionin tonë në veprim!
Krijimi i skenarit të kërkesave në TestMace
Për të testuar shërbimin tonë do të përdorim IDE për të punuar me API . Pse TestMace? Krahasuar me produkte të ngjashme, ai ka këto avantazhe:
- punë e fuqishme me variablat. Deri tani ekzistojnë disa lloje variablash, secili prej të cilëve kryen një rol të caktuar: variablat e integruar, variablat dinamikë, variablat e mjedisit. Çdo variabël i përket një nodi me mbështetje për mekanizmin e trashëgimisë;
- krijim të lehtë të skenarëve pa programim. Kështu do të flasim më poshtë;
- format i lexueshëm për njeriun, duke lejuar ruajtjen e projektit në sistemet e kontrollit të versioneve;
- autokopje, theksimi i sintaksës, theksimi i vlerave të variablave;
- mbështetje për përshkrimin e API me mundësinë e importit nga Swagger.
Le të fillojmë serverin tonë me komandën npm start dhe le të provojmë të qasemi në listën e përdoruesve. Lista e përdoruesve, sipas konfigurimit të kontrollorit tonë, mund të merret me url localhost:3000/users. Të bëjmë një kërkesë në këtë url.
Pas nisjes së TestMace mund ta shihni këtë ndërfaqe:
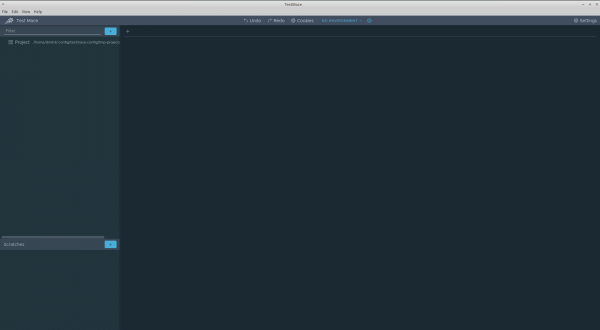
Në majën e djathtë ndodhet struktura e projekteve me nyjën rrënjësore . Le të provojmë të krijojmë kërkesën tonë të parë për të marrë listën e përdoruesve. Për këtë, do të krijojmë nd. Kjo bëhet në menunë e kontekstit të nyjës Project.
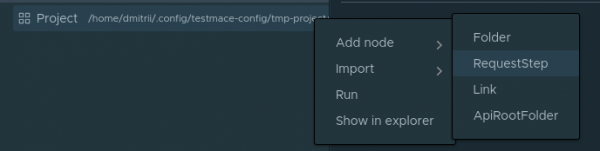
Shto nyjë -> RequestStep
Në fushën URL, ngjisim localhost:3000/users dhe ekzekutojmë kërkesën. Do të marrim statusin 200 me një masë të zbrazët në trupin e përgjigjes. Kaq e qartë, nuk kemi shtuar askënd akoma.
- Le të krijojmë një skenar që do të përfshijë hapat e mëposhtëm:
- krijimi i përdoruesit;
- kërkesa për id-në e përdoruesit të sapo krijuar;
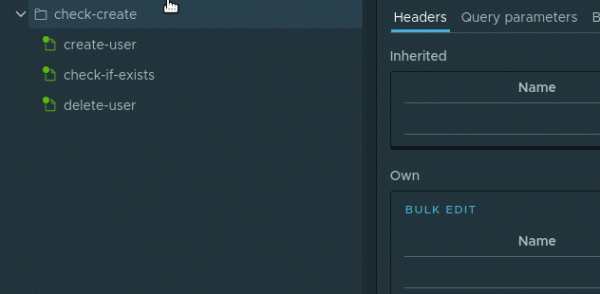
fshirja me id të përdoruesit të krijuar në hapin 1. Folder . Në esencë, kjo është thjesht një dosje, ku do të ruajmë të gjithë skenarin. Për të krijuar nyjën Folder, duhet të zgjedhimShto nyjë -> Folder . Do ta quajmë nyjëncheck-create . Do ta quajmë nyjën . Brenda nyjës krijojmë kërkesën tonë të parë për krijimin e përdoruesit. Do ta quajmë nyjën e sapokrijuarcreate-user
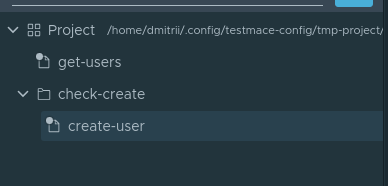
. Aktualisht, struktura e nyjëve do të duket kështu: krijojmë kërkesën tonë të parë për krijimin e përdoruesit. Do ta quajmë nyjën e sapokrijuar Tani le të kalojmë në skedën e hapur
- nyjës. Të vendosim parametrat e mëposhtëm për kërkesën:
- Lloji i kërkesës — POST
- URL — localhost:3000/users
Trupi — JSON me vlerën
{"email": "user@user.com", "displayName": "Përdorues i ri", "username": "user"}
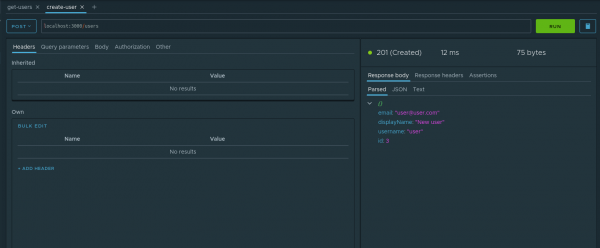
Të ekzekutojmë këtë kërkesë. Aplikacioni ynë tregon se regjistrimi është krijuar. variablave dinamikë është ideal. Le të shqyrtojmë së bashku se si funksionon. Në skedën e përgjigjes të nyjës id në menunë e kontekstit, duhet të zgjidhni opsioninCakto në variabël
- Node . Në dialogun duhet të caktojmë parametrat e mëposhtëm: . Do ta quajmë nyjën
- — në cilin nga pararendësit do të krijojmë variablën dinamike. Do të zgjidhim Emri i variablës
userId.
— emri i këtij variabli. Do ta quajmë
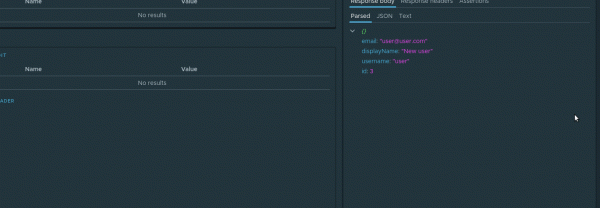
Kështu duket procesi i krijimit të një variabli dinamik: userId Tani, me çdo ekzekutim të kësaj kërkese, vlera e variablës dinamike do të përditësohet. Dhe, meqë variablat dinamikë mbështesin mekanizmin e trashëgimisë hierarkike, variabli . Do ta quajmë nyjën do të jetë i aksesueshëm në pasardhës
nën një nyje me çdo nivel thellësie. . Do ta quajmë nyjën Në kërkesën e ardhshme, ky variabël do të na nevojitet. Konkretisht, do të kërkojmë përdoruesin e sapokrijuar. Si pasardhës të nyjës do të krijojmë kërkesën me parametrin url të barabartë check-if existslocalhost:3000/users/${$dynamicVar.userId} ${variable_name} . Konstrukti i këtij lloji $dynamicVarështë marrja e vlerës së variablës. Duke qenë se kemi një variabël dinamik, për ta marrë, duhet të drejtohemi tek objekti userId , kështu përdorimi i plotë i variablit dinamik do të duket kështu${$dynamicVar.userId}.
Të ekzekutojmë kërkesën dhe të sigurohemi se të dhënat po kërkohen saktësisht.
- Mbetej një detaj i fundit — të bëjmë kërkesën për fshirje. Na nevojitet jo vetëm për të testuar funksionimin e fshirjes, por gjithashtu, si të thuash, për të pastruar pas vetes në bazën e të dhënave, sepse fushat e emailit dhe emrit të përdoruesit janë unike. Pra, në nyjën check-create krijojmë kërkesën delete-user me parametrat e mëposhtëm:
- Lloji i kërkesës — DELETE
check-if exists
URL —
E nisim. Presim. Shijojmë rezultatin) . Do ta quajmë nyjën Tani mund ta ekzekutojmë këtë skenar në çdo moment. Për të nisur skenarin, duhet të zgjidhni në menunë e kontekstit Ekzekuto.
opsionin e nyjës.
Nyjet në skenar do të ekzekutohen njëra pas tjetrës. Ky skenar mund ta ruani në projektin tuaj, duke kryer.
Përfundimi
File -> Ruaj projektin jsx/crud — mbetën të paqartë temat e mëposhtme:
- validimi dhe transformimi i personalizuar i modeleve;
- gjuha e fuqishme e kërkesave dhe përdorimi i saj i lehtë në front;
- përcaktimi dhe shtimi i metodave të reja në kontrollet crud;
- mbështetje për swagger;
- menaxhimi i caching.
Megjithatë, edhe ajo që është përshkruar në artikull është e mjaftueshme për të kuptuar se edhe një framework enterprise si NestJS ka në arsenalin e tij mjete për prototipizimin e shpejtë të aplikacioneve. Një IDE kaq e shkëlqyer si lejon mbështetje për ritmin e caktuar.
Kodi burimor i këtij artikulli, së bashku me projektin , është i disponueshëm në depo . Për të hapur projektin mjafton të ekzekutoni në aplikacion File -> Open project.
Burimi: habr.com
