

เมื่อไม่กี่วันก่อน ฉันตัดสินใจทำวิศวกรรมย้อนกลับเฟิร์มแวร์ของเราเตอร์โดยใช้ binwalk
ฉันซื้อเอง . ไม่ใช่เราเตอร์ที่ดีที่สุด แต่ก็เพียงพอสำหรับความต้องการของฉัน
ทุกครั้งที่ฉันซื้อเราเตอร์ใหม่ ฉันจะติดตั้ง . เพื่ออะไร? ตามกฎแล้ว ผู้ผลิตไม่สนใจมากนักเกี่ยวกับการสนับสนุนเราเตอร์ของตน และเมื่อเวลาผ่านไปซอฟต์แวร์ก็ล้าสมัย มีช่องโหว่ปรากฏขึ้น และโดยทั่วไป คุณจะเข้าใจแนวคิดนี้ ดังนั้นฉันชอบเฟิร์มแวร์ OpenWRT ซึ่งได้รับการสนับสนุนอย่างดีจากชุมชนโอเพ่นซอร์ส
หลังจากดาวน์โหลด OpenWRT ฉันก็เช่นกัน ภายใต้ Archer C7 ใหม่ของฉันจากเว็บไซต์อย่างเป็นทางการและตัดสินใจวิเคราะห์มัน เพื่อความสนุกสนานและพูดคุยเกี่ยวกับ binwalk เท่านั้น
บินวอล์คคืออะไร?
เป็นเครื่องมือโอเพ่นซอร์สสำหรับการวิเคราะห์ การทำวิศวกรรมย้อนกลับ และการแยกอิมเมจเฟิร์มแวร์
binwalk สร้างขึ้นในปี 2010 โดย Craig Heffner สามารถสแกนอิมเมจเฟิร์มแวร์และค้นหาไฟล์ ระบุและแยกอิมเมจระบบไฟล์ โค้ดปฏิบัติการ ไฟล์เก็บถาวรที่บีบอัด บูตโหลดเดอร์และเคอร์เนล รูปแบบไฟล์ เช่น JPEG และ PDF และอื่นๆ อีกมากมาย
คุณสามารถใช้ binwalk เพื่อทำวิศวกรรมย้อนกลับเฟิร์มแวร์เพื่อทำความเข้าใจวิธีการทำงาน ค้นหาช่องโหว่ในไฟล์ไบนารี แตกไฟล์ และค้นหาแบ็คดอร์หรือใบรับรองดิจิทัล คุณยังสามารถค้นหา opcodes สำหรับ CPU ที่แตกต่างกันจำนวนหนึ่ง
คุณสามารถแยกอิมเมจระบบไฟล์เพื่อค้นหาไฟล์รหัสผ่านเฉพาะ (passwd, shadow ฯลฯ ) และลองแยกแฮชรหัสผ่าน คุณสามารถแยกวิเคราะห์ไบนารีระหว่างไฟล์ตั้งแต่สองไฟล์ขึ้นไป คุณสามารถทำการวิเคราะห์เอนโทรปีกับข้อมูลเพื่อค้นหาข้อมูลที่บีบอัดหรือคีย์เข้ารหัสที่เข้ารหัส ทั้งหมดนี้โดยไม่จำเป็นต้องเข้าถึงซอร์สโค้ด
โดยทั่วไปมีทุกสิ่งที่คุณต้องการ :)
Binwalk ทำงานอย่างไร?
คุณสมบัติหลักของ binwalk คือการสแกนลายเซ็น Binwalk สามารถสแกนอิมเมจเฟิร์มแวร์เพื่อค้นหาไฟล์ประเภทต่างๆ และระบบไฟล์ในตัว
คุณรู้จักยูทิลิตีบรรทัดคำสั่งหรือไม่ file?
file /bin/bash
/bin/bash: ELF 64-bit LSB shared object, x86-64, version 1 (SYSV), dynamically linked, interpreter /lib64/l, for GNU/Linux 3.2.0, BuildID[sha1]=12f73d7a8e226c663034529c8dd20efec22dde54, stripped
ทีม fileดูที่ส่วนหัวของไฟล์และค้นหาลายเซ็น (หมายเลขเวทย์มนตร์) เพื่อกำหนดประเภทไฟล์ ตัวอย่างเช่น หากไฟล์ขึ้นต้นด้วยลำดับไบต์ 0x89 0x50 0x4E 0x47 0x0D 0x0A 0x1A 0x0Aมันรู้ว่าเป็นไฟล์ PNG บน มีรายการลายเซ็นไฟล์ทั่วไป
Binwalk ทำงานในลักษณะเดียวกัน แต่แทนที่จะค้นหาเฉพาะลายเซ็นที่จุดเริ่มต้นของไฟล์ binwalk จะสแกนไฟล์ทั้งหมด นอกจากนี้ binwalk ยังสามารถแตกไฟล์ที่พบในรูปภาพได้
เครื่องมือ file и binwalk ใช้ห้องสมุด libmagic เพื่อระบุลายเซ็นไฟล์ แต่ binwalk นอกจากนี้ยังรองรับรายการลายเซ็นเวทมนตร์แบบกำหนดเองสำหรับการค้นหาไฟล์บีบอัด/เก็บถาวร ส่วนหัวเฟิร์มแวร์ และเคอร์เนล Linuxรวมถึงบูตโหลดเดอร์ ระบบไฟล์ และอื่นๆ
มาสนุกกันหน่อยไหม?
การติดตั้ง binwalk
Binwalk รองรับการใช้งานบนหลายแพลตฟอร์ม รวมถึง LinuxOSX, FreeBSD และ Windows.
หากต้องการติดตั้ง binwalk เวอร์ชันล่าสุด คุณสามารถทำได้ และปฏิบัติตาม หรือ ได้จากเว็บไซต์โครงการ
Binwalk มีพารามิเตอร์ที่แตกต่างกันมากมาย:
$ binwalk

Binwalk v2.2.0
Craig Heffner, ReFirmLabs
https://github.com/ReFirmLabs/binwalk

Usage: binwalk [OPTIONS] [FILE1] [FILE2] [FILE3] ...

Signature Scan Options:
    -B, --signature              Scan target file(s) for common file signatures
    -R, --raw=<str>              Scan target file(s) for the specified sequence of bytes
    -A, --opcodes                Scan target file(s) for common executable opcode signatures
    -m, --magic=<file>           Specify a custom magic file to use
    -b, --dumb                   Disable smart signature keywords
    -I, --invalid                Show results marked as invalid
    -x, --exclude=<str>          Exclude results that match <str>
    -y, --include=<str>          Only show results that match <str>

Extraction Options:
    -e, --extract                Automatically extract known file types
    -D, --dd=<type:ext:cmd>      Extract <type> signatures, give the files an extension of <ext>, and execute <cmd>
    -M, --matryoshka             Recursively scan extracted files
    -d, --depth=<int>            Limit matryoshka recursion depth (default: 8 levels deep)
    -C, --directory=<str>        Extract files/folders to a custom directory (default: current working directory)
    -j, --size=<int>             Limit the size of each extracted file
    -n, --count=<int>            Limit the number of extracted files
    -r, --rm                     Delete carved files after extraction
    -z, --carve                  Carve data from files, but don't execute extraction utilities
    -V, --subdirs                Extract into sub-directories named by the offset

Entropy Options:
    -E, --entropy                Calculate file entropy
    -F, --fast                   Use faster, but less detailed, entropy analysis
    -J, --save                   Save plot as a PNG
    -Q, --nlegend                Omit the legend from the entropy plot graph
    -N, --nplot                  Do not generate an entropy plot graph
    -H, --high=<float>           Set the rising edge entropy trigger threshold (default: 0.95)
    -L, --low=<float>            Set the falling edge entropy trigger threshold (default: 0.85)

Binary Diffing Options:
    -W, --hexdump                Perform a hexdump / diff of a file or files
    -G, --green                  Only show lines containing bytes that are the same among all files
    -i, --red                    Only show lines containing bytes that are different among all files
    -U, --blue                   Only show lines containing bytes that are different among some files
    -u, --similar                Only display lines that are the same between all files
    -w, --terse                  Diff all files, but only display a hex dump of the first file

Raw Compression Options:
    -X, --deflate                Scan for raw deflate compression streams
    -Z, --lzma                   Scan for raw LZMA compression streams
    -P, --partial                Perform a superficial, but faster, scan
    -S, --stop                   Stop after the first result

General Options:
    -l, --length=<int>           Number of bytes to scan
    -o, --offset=<int>           Start scan at this file offset
    -O, --base=<int>             Add a base address to all printed offsets
    -K, --block=<int>            Set file block size
    -g, --swap=<int>             Reverse every n bytes before scanning
    -f, --log=<file>             Log results to file
    -c, --csv                    Log results to file in CSV format
    -t, --term                   Format output to fit the terminal window
    -q, --quiet                  Suppress output to stdout
    -v, --verbose                Enable verbose output
    -h, --help                   Show help output
    -a, --finclude=<str>         Only scan files whose names match this regex
    -p, --fexclude=<str>         Do not scan files whose names match this regex
    -s, --status=<int>           Enable the status server on the specified port
การสแกนภาพ
เริ่มต้นด้วยการค้นหาลายเซ็นไฟล์ภายในรูปภาพ (ภาพจากไซต์ ).
การรัน binwalk ด้วยพารามิเตอร์ --signature:
$ binwalk --signature --term archer-c7.bin

DECIMAL       HEXADECIMAL     DESCRIPTION
------------------------------------------------------------------------------------------
21876         0x5574          U-Boot version string, "U-Boot 1.1.4-g4480d5f9-dirty (May
                              20 2019 - 18:45:16)"
21940         0x55B4          CRC32 polynomial table, big endian
23232         0x5AC0          uImage header, header size: 64 bytes, header CRC:
                              0x386C2BD5, created: 2019-05-20 10:45:17, image size:
                              41162 bytes, Data Address: 0x80010000, Entry Point:
                              0x80010000, data CRC: 0xC9CD1E38, OS: Linux, CPU: MIPS,
                              image type: Firmware Image, compression type: lzma, image
                              name: "u-boot image"
23296         0x5B00          LZMA compressed data, properties: 0x5D, dictionary size:
                              8388608 bytes, uncompressed size: 97476 bytes
64968         0xFDC8          XML document, version: "1.0"
78448         0x13270         uImage header, header size: 64 bytes, header CRC:
                              0x78A267FF, created: 2019-07-26 07:46:14, image size:
                              1088500 bytes, Data Address: 0x80060000, Entry Point:
                              0x80060000, data CRC: 0xBB9D4F94, OS: Linux, CPU: MIPS,
                              image type: Multi-File Image, compression type: lzma,
                              image name: "MIPS OpenWrt Linux-3.3.8"
78520         0x132B8         LZMA compressed data, properties: 0x6D, dictionary size:
                              8388608 bytes, uncompressed size: 3164228 bytes
1167013       0x11CEA5        Squashfs filesystem, little endian, version 4.0,
                              compression:xz, size: 14388306 bytes, 2541 inodes,
                              blocksize: 65536 bytes, created: 2019-07-26 07:51:38
15555328      0xED5B00        gzip compressed data, from Unix, last modified: 2019-07-26
                              07:51:41
ตอนนี้เรามีข้อมูลมากมายเกี่ยวกับภาพนี้
การใช้รูปภาพ เป็น bootloader (ส่วนหัวของรูปภาพที่ 0x5AC0 และอิมเมจ bootloader ที่ถูกบีบอัดที่ 0x5B00จากข้อมูลส่วนหัวของไฟล์ uImage ที่ตำแหน่ง 0x13270 เราทราบว่าสถาปัตยกรรมของโปรเซสเซอร์คือ MIPS และเคอร์เนลคือ Linux — เวอร์ชัน 3.3.8 และอ้างอิงจากภาพที่พบที่ 0x11CEA5เราเห็นสิ่งนั้นได้ rootfs เป็นระบบไฟล์ squashfs.
ตอนนี้ให้เราแยก bootloader (U-Boot) โดยใช้คำสั่ง dd:
$ dd if=archer-c7.bin of=u-boot.bin.lzma bs=1 skip=23296 count=41162
41162+0 records in
41162+0 records out
41162 bytes (41 kB, 40 KiB) copied, 0,0939608 s, 438 kB/s
เนื่องจากรูปภาพถูกบีบอัดโดยใช้ LZMA เราจึงต้องขยายขนาด:
$ unlzma u-boot.bin.lzmaตอนนี้เรามีอิมเมจ U-Boot:
$ ls -l u-boot.bin
-rw-rw-r-- 1 sprado sprado 97476 Fev  5 08:48 u-boot.bin
วิธีการเกี่ยวกับการค้นหาค่าเริ่มต้นสำหรับ bootargs?
$ strings u-boot.bin | grep bootargs
bootargs
bootargs=console=ttyS0,115200 board=AP152 rootfstype=squashfs init=/etc/preinit mtdparts=spi0.0:128k(factory-uboot),192k(u-boot),64k(ART),1536k(uImage),14464k@0x1e0000(rootfs) mem=128M
ตัวแปรสภาพแวดล้อม U-Boot bootargs ใช้สำหรับส่งพารามิเตอร์ไปยังเคอร์เนล Linuxจากข้อมูลข้างต้น เราจึงมีความเข้าใจเกี่ยวกับหน่วยความจำแฟลชของอุปกรณ์ได้ดียิ่งขึ้น
แล้วถ้าเราลองแยกอิมเมจเคอร์เนลออกมาล่ะ? Linux?
$ dd if=archer-c7.bin of=uImage bs=1 skip=78448 count=1088572
1088572+0 records in
1088572+0 records out
1088572 bytes (1,1 MB, 1,0 MiB) copied, 1,68628 s, 646 kB/s
เราสามารถตรวจสอบได้ว่าภาพถูกแตกออกมาสำเร็จหรือไม่โดยใช้คำสั่ง file:
$ file uImage
uImage: u-boot legacy uImage, MIPS OpenWrt Linux-3.3.8, Linux/MIPS, Multi-File Image (lzma), 1088500 bytes, Fri Jul 26 07:46:14 2019, Load Address: 0x80060000, Entry Point: 0x80060000, Header CRC: 0x78A267FF, Data CRC: 0xBB9D4F94
รูปแบบไฟล์ uImage นั้นโดยพื้นฐานแล้วคืออิมเมจเคอร์เนล Linux โดยมีส่วนหัวเพิ่มเติมอยู่ด้วย เราจะลบส่วนหัวนี้ออกเพื่อให้ได้อิมเมจเคอร์เนลสุดท้าย Linux:
$ dd if=uImage of=Image.lzma bs=1 skip=72
1088500+0 records in
1088500+0 records out
1088500 bytes (1,1 MB, 1,0 MiB) copied, 1,65603 s, 657 kB/s
รูปภาพถูกบีบอัด ดังนั้นเรามาแกะมันกันดีกว่า:
$ unlzma Image.lzmaตอนนี้เรามีอิมเมจเคอร์เนลแล้ว Linux:
$ ls -la Image
-rw-rw-r-- 1 sprado sprado 3164228 Fev  5 10:51 Image
เราสามารถทำอะไรกับอิมเมจเคอร์เนลได้บ้าง? ตัวอย่างเช่น เราสามารถค้นหาสตริงในอิมเมจและหาเวอร์ชันของเคอร์เนลได้ Linux และเรียนรู้เกี่ยวกับสภาพแวดล้อมที่ใช้ในการสร้างเคอร์เนล:
$ strings Image | grep "Linux version"
Linux version 3.3.8 (leo@leo-MS-7529) (gcc version 4.6.3 20120201 (prerelease) (Linaro GCC 4.6-2012.02) ) #1 Mon May 20 18:53:02 CST 2019
แม้ว่าเฟิร์มแวร์จะถูกปล่อยออกมาเมื่อปีที่แล้ว (2019) แต่ขณะที่ฉันเขียนบทความนี้ มันยังคงใช้เวอร์ชันเคอร์เนลที่เก่ากว่า Linux (3.3.8) เผยแพร่ในปี 2012 คอมไพล์ด้วย GCC เวอร์ชันเก่ามาก (4.6) ซึ่งก็มาจากปี 2012 เช่นกัน!
(โดยประมาณ คุณยังเชื่อถือเราเตอร์ของคุณในสำนักงานและที่บ้านหรือไม่)
พร้อมออปชั่น --opcodes เรายังสามารถใช้ binwalk เพื่อค้นหาคำแนะนำของเครื่องและกำหนดสถาปัตยกรรมโปรเซสเซอร์ของรูปภาพ:
$ binwalk --opcodes Image
DECIMAL       HEXADECIMAL     DESCRIPTION
--------------------------------------------------------------------------------
2400          0x960           MIPS instructions, function epilogue
2572          0xA0C           MIPS instructions, function epilogue
2828          0xB0C           MIPS instructions, function epilogue
แล้วระบบไฟล์รูทล่ะ? แทนที่จะแยกรูปภาพด้วยตนเอง ลองใช้ตัวเลือกนี้แทน binwalk --extract:
$ binwalk --extract --quiet archer-c7.binระบบไฟล์รูทที่สมบูรณ์จะถูกแยกไปยังไดเร็กทอรีย่อย:
$ cd _archer-c7.bin.extracted/squashfs-root/

$ ls
bin  dev  etc  lib  mnt  overlay  proc  rom  root  sbin  sys  tmp  usr  var  www

$ cat etc/banner
     MM           NM                    MMMMMMM          M       M
   $MMMMM        MMMMM                MMMMMMMMMMM      MMM     MMM
  MMMMMMMM     MM MMMMM.              MMMMM:MMMMMM:   MMMM   MMMMM
MMMM= MMMMMM  MMM   MMMM       MMMMM   MMMM  MMMMMM   MMMM  MMMMM'
MMMM=  MMMMM MMMM    MM       MMMMM    MMMM    MMMM   MMMMNMMMMM
MMMM=   MMMM  MMMMM          MMMMM     MMMM    MMMM   MMMMMMMM
MMMM=   MMMM   MMMMMM       MMMMM      MMMM    MMMM   MMMMMMMMM
MMMM=   MMMM     MMMMM,    NMMMMMMMM   MMMM    MMMM   MMMMMMMMMMM
MMMM=   MMMM      MMMMMM   MMMMMMMM    MMMM    MMMM   MMMM  MMMMMM
MMMM=   MMMM   MM    MMMM    MMMM      MMMM    MMMM   MMMM    MMMM
MMMM$ ,MMMMM  MMMMM  MMMM    MMM       MMMM   MMMMM   MMMM    MMMM
  MMMMMMM:      MMMMMMM     M         MMMMMMMMMMMM  MMMMMMM MMMMMMM
    MMMMMM       MMMMN     M           MMMMMMMMM      MMMM    MMMM
     MMMM          M                    MMMMMMM        M       M
       M
 ---------------------------------------------------------------
   For those about to rock... (%C, %R)
 ---------------------------------------------------------------
ตอนนี้เราสามารถทำสิ่งต่างๆ ได้มากมาย
เราสามารถค้นหาไฟล์การกำหนดค่า แฮชรหัสผ่าน คีย์เข้ารหัส และใบรับรองดิจิทัล เราสามารถวิเคราะห์ไฟล์ไบนารี่สำหรับ และจุดอ่อน
ด้วย и เรายังสามารถเรียกใช้ (จำลอง) ไฟล์ปฏิบัติการจากรูปภาพได้:
$ ls
bin  dev  etc  lib  mnt  overlay  proc  rom  root  sbin  sys  tmp  usr  var  www

$ cp /usr/bin/qemu-mips-static .

$ sudo chroot . ./qemu-mips-static bin/busybox
BusyBox v1.19.4 (2019-05-20 18:13:49 CST) multi-call binary.
Copyright (C) 1998-2011 Erik Andersen, Rob Landley, Denys Vlasenko
and others. Licensed under GPLv2.
See source distribution for full notice.

Usage: busybox [function] [arguments]...
   or: busybox --list[-full]
   or: function [arguments]...

    BusyBox is a multi-call binary that combines many common Unix
    utilities into a single executable.  Most people will create a
    link to busybox for each function they wish to use and BusyBox
    will act like whatever it was invoked as.

Currently defined functions:
    [, [[, addgroup, adduser, arping, ash, awk, basename, cat, chgrp, chmod, chown, chroot, clear, cmp, cp, crond, crontab, cut, date, dd, delgroup, deluser, dirname, dmesg, echo, egrep, env, expr, false,
    fgrep, find, free, fsync, grep, gunzip, gzip, halt, head, hexdump, hostid, id, ifconfig, init, insmod, kill, killall, klogd, ln, lock, logger, ls, lsmod, mac_addr, md5sum, mkdir, mkfifo, mknod, mktemp,
    mount, mv, nice, passwd, pgrep, pidof, ping, ping6, pivot_root, poweroff, printf, ps, pwd, readlink, reboot, reset, rm, rmdir, rmmod, route, sed, seq, sh, sleep, sort, start-stop-daemon, strings,
    switch_root, sync, sysctl, tail, tar, tee, telnet, test, tftp, time, top, touch, tr, traceroute, true, udhcpc, umount, uname, uniq, uptime, vconfig, vi, watchdog, wc, wget, which, xargs, yes, zcat
ยอดเยี่ยม! แต่โปรดทราบว่าเวอร์ชัน BusyBox คือ 1.19.4 นี่เป็น BusyBox เวอร์ชันเก่ามากเปิดตัวในเดือนเมษายน 2012
ดังนั้น TP-Link จึงเผยแพร่อิมเมจเฟิร์มแวร์ในปี 2019 โดยใช้ซอฟต์แวร์ (GCC toolchain, เคอร์เนล, BusyBox ฯลฯ) ตั้งแต่ปี 2012!
ตอนนี้คุณเข้าใจแล้วว่าทำไมฉันถึงติดตั้ง OpenWRT บนเราเตอร์ของฉันอยู่เสมอ?
นั่นไม่ใช่ทั้งหมด
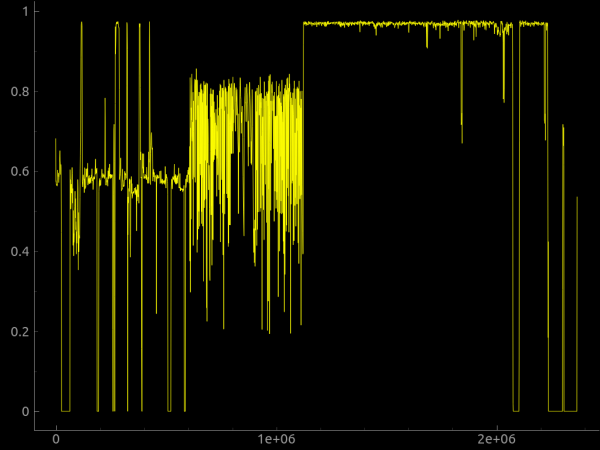
Binwalk ยังสามารถดำเนินการวิเคราะห์เอนโทรปี พิมพ์ข้อมูลเอนโทรปีดิบ และสร้างกราฟเอนโทรปีได้ โดยทั่วไปแล้ว จะสังเกตเห็นเอนโทรปีมากขึ้นเมื่อไบต์ในภาพเป็นแบบสุ่ม ซึ่งอาจหมายความว่ารูปภาพมีไฟล์ที่เข้ารหัส บีบอัด หรือสร้างความสับสน คีย์เข้ารหัสฮาร์ดคอร์เหรอ? ทำไมจะไม่ล่ะ.
เรายังสามารถใช้พารามิเตอร์ได้ --raw เพื่อค้นหาลำดับไบต์ดิบที่กำหนดเองในรูปภาพหรือพารามิเตอร์ --hexdump เพื่อทำการถ่ายโอนข้อมูลฐานสิบหกเปรียบเทียบไฟล์อินพุตตั้งแต่สองไฟล์ขึ้นไป
สามารถเพิ่มลงใน binwalk ผ่านไฟล์ลายเซ็นแบบกำหนดเองที่ระบุบนบรรทัดคำสั่งโดยใช้พารามิเตอร์ --magicหรือโดยการเพิ่มลงในไดเร็กทอรี $ HOME / .config / binwalk / magic.
คุณสามารถหาข้อมูลเพิ่มเติมเกี่ยวกับ binwalk ได้ที่ .
ส่วนขยายของ binwalk
นอกจากนี้ binwalk ซึ่งนำมาใช้เป็นโมดูล Python ที่สคริปต์ Python ใดๆ สามารถใช้ได้เพื่อทำการสแกน binwalk โดยทางโปรแกรม และยูทิลิตีบรรทัดคำสั่ง binwalk สามารถทำซ้ำได้เกือบทั้งหมดด้วยโค้ด Python เพียงสองบรรทัด!
import binwalk
binwalk.scan()
การใช้ Python API คุณสามารถสร้างได้เช่นกัน เพื่อกำหนดค่าและขยาย binwalk
ยังมีอยู่ และเวอร์ชันคลาวด์ .
แล้วทำไมคุณไม่ดาวน์โหลดอิมเมจเฟิร์มแวร์จากอินเทอร์เน็ตแล้วลองใช้ binwalk ดูล่ะ? ฉันสัญญาว่าคุณจะสนุกมาก :)
ที่มา: will.com
