

Artikulu honek egileak OpenWhisk-i buruz itzulitako ohar sorta amaitzen du. Gaur, OpenWhisk Kubernetes-en zabaltzeko prozesua azalduko dugu, aplikazioaren egungo bertsioekin funtzionatzeko doitutako komandoekin. OpenWhisk funtzioak Knative eta TektonCD erabiliz Kubernetes-en Node.js runtime-arekin nola exekutatu ere azalduko dugu.
OpenWhisk Kubernetes-en zabaltzea
Egun batzuetan zehar, OpenWhisk Kubernetes-en zabalduz esperimentu bat egin nuen, zereginetarako proba-eremu sinple eta azkar bat sortzeko. Eta Kubernetes-en berria naizenez, kalkulatzen dut egun eta erdi behar izan dudala arrakastaz inplementatzeko. Gordetegiek OpenWhisk Kubernetes-en zabaltzeko argibide oso argiak dituzte. Hona hemen Mac-erako zabaltzeko argibideak (Nik ere dena egingo dut Linux, nahiago dudalako Linux. — itzultzailearen oharra).
- Pakete kudeatzaile bat instalatzea
asdf, eta ondoren automatikoki zuzentzen dugu~/.bash_profileedo baliokidea:
$ brew install asdf
$ [ -s "/usr/local/opt/asdf/asdf.sh" ] && . /usr/local/opt/asdf/asdf.sh
$ source ~/.bash_profile[On Linux Urrats hau ez da beharrezkoa, nahiz eta garagardoa eskuragarri egon. — gutxi gorabehera. itzultzailea]
- Pluginak gehitzea
minikubeиkubelet:
$ asdf plugin-add kubectl
$ asdf plugin-add minikube[Berriz ere, urrats hau saltatzen dugu Linux. — gutxi gorabehera. itzultzailea]
- Instalatu minikube eta kubelet:
$ asdf install kubectl 1.9.0
$ asdf global kubectl 1.9.0
$ asdf install minikube 0.25.2
$ asdf global minikube 0.25.2[bertsio espezifikoak instalatuta daude, baina eskuragarri dauden azken bertsioetan dena egiaztatu dut Linux; Susmoa dut azkena segurtasunez instala dezakezula. — gutxi gorabehera. itzultzailea]
On Linux Urrats hau honela egiten da (dena ~/bin-en instalatzen da, nire PATH-ean dagoena, itzultzailearen oharra):
$ curl -L0 minikube https://storage.googleapis.com/minikube/releases/latest/minikube-linux-amd64 && chmod +x minikube && mv minikube ~/bin/
$ curl -L0 https://storage.googleapis.com/kubernetes-release/release/$(curl -s https://storage.googleapis.com/kubernetes-release/release/stable.txt)/bin/linux/amd64/kubectl && chmod +x kubectl && mv kubectl ~/bin/- Sortu minikube makina birtual bat (lehenik VirtualBox instalatu behar da):
$ minikube start --cpus 2 --memory 4096 --kubernetes-version=v1.9.0 --extra-config=apiserver.Authorization.Mode=RBAC[Dena funtzionatzen du niretzat taldearekin. minikube start , parametrorik gabe eta balio lehenetsiekin. — gutxi gorabehera. itzultzailea]
$ minikube start
  minikube v1.5.2 on Debian 8.11
  Automatically selected the 'virtualbox' driver
  Downloading VM boot image ...
    > minikube-v1.5.1.iso.sha256: 65 B / 65 B [--------------] 100.00% ? p/s 0s
    > minikube-v1.5.1.iso: 143.76 MiB / 143.76 MiB [-] 100.00% 5.63 MiB p/s 26s
  Creating virtualbox VM (CPUs=2, Memory=4096MB, Disk=20000MB) ...
  Preparing Kubernetes v1.16.2 on Docker '18.09.9' ...
  Downloading kubelet v1.16.2
  Downloading kubeadm v1.16.2
  Pulling images ...
  Launching Kubernetes ...  Waiting for: apiserver
Done! kubectl is now configured to use "minikube"- Aldatu sarea Docker-en modu promiskuora:
$ minikube ssh -- sudo ip link set docker0 promisc on- Sortu izen-espazio bat eta markatu langile-nodoa:
$ kubectl create namespace openwhisk
$ kubectl label nodes --all openwhisk-role=invoker- Biltegiaren edukia lortzen dugu eta sarrera mota gainidazten dugu mycluster.yaml fitxategian:
$ git clone https://github.com/apache/incubator-openwhisk-deploy-kube.git
$ cd incubator-openwhisk-deploy-kube/
$ cat << "EOF" > mycluster.yaml
whisk:
    ingress:
        type: NodePort
            api_host_name: 192.168.99.100
            api_host_port: 31001
nginx:
    httpsNodePort: 31001
EOF- Instalatu Helm eta erabili hura zabaltzeko:
$ brew install kubernetes-helm
$ helm init # init Helm Tiller, не нужно на Helm v3+
$ kubectl get pods -n kube-system # verify that tiller-deploy is in the running state, не нужно на helm v3+
$ kubectl create clusterrolebinding tiller-cluster-admin --clusterrole=cluster-admin --serviceaccount=kube-system:default
$ helm install ./openwhisk/helm/ --namespace=openwhisk -f mycluster.yaml[On Linux Azken bertsioekin (v3.0.1 eskuragarri zegoen) apur bat desberdina izango da. — gutxi gorabehera. itzultzailea]
$ curl -L0 https://get.helm.sh/helm-v3.0.1-linux-amd64.tar.gz | tar -xzvf - linux-amd64/helm --strip-components=1; sudo mv helm /usr/local/bin
$ kubectl create clusterrolebinding tiller-cluster-admin --clusterrole=cluster-admin --serviceaccount=kube-system:default
$ helm install ./openwhisk/helm/ --namespace=openwhisk --generate-name -f mycluster.yaml- Egiaztatu dezagun dena martxan dagoela (EGOERA = Martxan edo Amaituta):
$ kubectl get pods -n openwhisk
NAME                                                              READY   STATUS      RESTARTS   AGE
openwhisk-1576070780-alarmprovider-6868dc694-plvpf                1/1     Running     1          1d5h
openwhisk-1576070780-apigateway-8d56f4979-825hf                   1/1     Running     1          1d5h
openwhisk-1576070780-cloudantprovider-544bb46596-9scph            1/1     Running     1          1d5h
openwhisk-1576070780-controller-0                                 1/1     Running     2          1d5h
openwhisk-1576070780-couchdb-7fd7f6c7cc-42tw6                     1/1     Running     1          1d5h
openwhisk-1576070780-gen-certs-z9nsb                              0/1     Completed   0          1d5h
openwhisk-1576070780-init-couchdb-r2vmt                           0/1     Completed   0          1d5h
openwhisk-1576070780-install-packages-27dtr                       0/1     Completed   0          1d4h
openwhisk-1576070780-invoker-0                                    1/1     Running     1          1d5h
openwhisk-1576070780-kafka-0                                      1/1     Running     1          1d5h
openwhisk-1576070780-kafkaprovider-f8b4cf4fc-7z4gt                1/1     Running     1          1d5h
openwhisk-1576070780-nginx-6dbdbf69bc-5x76n                       1/1     Running     1          1d5h
openwhisk-1576070780-redis-cfd8756f4-hkrt6                        1/1     Running     1          1d5h
openwhisk-1576070780-wskadmin                                     1/1     Running     1          1d5h
openwhisk-1576070780-zookeeper-0                                  1/1     Running     1          1d5h
wskopenwhisk-1576070780-invoker-00-1-prewarm-nodejs10             1/1     Running     0          61s
wskopenwhisk-1576070780-invoker-00-2-prewarm-nodejs10             1/1     Running     0          61s
wskopenwhisk-1576070780-invoker-00-3-whisksystem-invokerhealtht 1/1 Running 0 59s- wsk lanerako konfiguratzen:
$ wsk property set --apihost 192.168.99.100:31001
$ wsk property set --auth 23bc46b1-71f6-4ed5-8c54-816aa4f8c502:123zO3xZCLrMN6v2BKK1dXYFpXlPkccOFqm12CdAsMgRU4VrNZ9lyGVCGuMDGIwP
Egiaztatzen dugu:
$ wsk -i list
Entities in namespace: default
packages
actions
triggers
rules
Arazoak eta haien irtenbideak
getsockopt: konexioa ukatuta
$ wsk -i list
error: Unable to obtain the list of entities for namespace 'default': Get http://192.168.99.100:31001/api/v1/namespaces/_/actions?limit=0&skip=0: dial tcp 192.168.99.100:31001: getsockopt: connection refused
Edukiontziak izen-espazioan daudela egiaztatzen dugu openwhisk egoeran Running, batzuetan erroreekin huts egiten duelako CreateContainerConfigError.
Deitzailea oraindik hasieratzen — Init:1/2
Exekuzio-ingurune guztiak deskargatzeak denbora asko iraun dezake. Gauzak bizkortzeko, gutxieneko zerrenda laburtu bat zehaztu dezakezu fitxategian. mycluster.yaml:
whisk:
  runtimes: "runtimes-minimal-travis.json"
Izena duen ontzia. -instalatu-paketeak- errorea huts egiten du
Bizitasun-proben denbora-mugak handitu besterik ez dago.
OpenWhisk Knative gainean instalatzea
Priti Desai IBM hodeiko kluster baten gainean instalatu da, baita minikube arrunt batean ere, Knative Build eta BuildTemplates erabiliz. Nik ere minukube gainean instalatuko dut, nola egin behar den kontuan hartuta. Gure blogean lehenago idatzi dut honi buruz, software bertsio berrienak erabiliz. Knative Build eta BuildTemplates ofizialki zaharkituta daudenez, gomendatutako ordezkoa erabiliko dut, Tekton Pipelines. Artikuluaren gainerakoa Tekton Pipelines dokumentazioa irakurri ondoren idatzi dut, baina Pritiren ideietan oinarrituta dago. Artikulu honek Docker erregistro baterako sarbidea beharko du; jatorrizko egileak bezala, DockerHub erabiliko dut.
$ curl -L0 https://github.com/solo-io/gloo/releases/download/v1.2.10/glooctl-linux-amd64; chmod +x glooctl-linux-amd64; mv glooctl-linux-amd64 ~/bin
$ glooctl install knative
$ kubectl get pods -n knative-serving
NAME                              READY   STATUS    RESTARTS   AGE
activator-77fc555665-rvrst        1/1     Running   0          2m23s
autoscaler-5c98b7c9b6-x8hh4       1/1     Running   0          2m21s
autoscaler-hpa-5cfd4f6845-w87kq   1/1     Running   0          2m22s
controller-7fd74c8f67-tprm8       1/1     Running   0          2m19s
webhook-74847bb77c-txr2g          1/1     Running   0          2m17s
$ kubectl get pods -n gloo-system
NAME                                      READY   STATUS    RESTARTS   AGE
discovery-859d7fbc9c-8xhvh                1/1     Running   0          51s
gloo-545886d9c6-85mwt                     1/1     Running   0          51s
ingress-67d4996d75-lkkmw                  1/1     Running   0          50s
knative-external-proxy-767dfd656c-wwv2z   1/1     Running   0          50s
knative-internal-proxy-6fdddcc6b5-7vqd8   1/1     Running   0          51s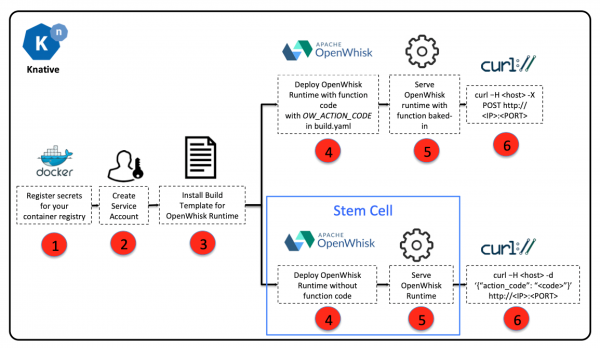
OpenWhisk eraikitzea eta exekutatzea Knative-n
- Edukia lortzea. :
$ git clone https://github.com/tektoncd/catalog/
$ cd catalog/openwhisk- Erregistroko sarbide-datuak ingurune-aldagai gisa ezartzen ditugu eta Kubernetes sekretu gisa gordetzen ditugu:
$ export DOCKER_USERNAME=<your docker hub username>
$ export DOCKER_PASSWORD=<your docker hub password>
$ sed -e 's/${DOCKER_USERNAME}/'"$DOCKER_USERNAME"'/' -e 's/${DOCKER_PASSWORD}/'"$DOCKER_PASSWORD"'/' docker-secret.yaml.tmpl > docker-secret.yaml
$ kubectl apply -f docker-secret.yaml
Egiaztatzen dugu:
$ kubectl get secret
NAME                    TYPE                                  DATA      AGE
dockerhub-user-pass kubernetes.io/basic-auth 2 21s- Sortu kontu bat inguruneak eraikitzeko:
$ kubectl apply -f service-account.yamlEgiaztatzen dugu:
$ kubectl get serviceaccount/openwhisk-runtime-builder
NAME                        SECRETS   AGE
openwhisk-runtime-builder 2 31m- Sortu zeregin bat OpenWhisk-erako irudi bat sortzeko
$ kubectl apply -f openwhisk.yaml
task.tekton.dev/openwhisk created- Irudia eraikitzeko zeregina abiarazten dugu (NodeJS adibide gisa erabiliz):
Sortu taskrun.yaml fitxategi bat eduki honekin:
# Git Pipeline Resource for OpenWhisk NodeJS Runtime
apiVersion: tekton.dev/v1alpha1
kind: PipelineResource
metadata:
    name: openwhisk-nodejs-runtime-git
spec:
    type: git
    params:
        - name: revision
          value: master
        - name: url
          value: https://github.com/apache/openwhisk-runtime-nodejs.git
---

# Image Pipeline Resource for OpenWhisk NodeJS Sample Application
apiVersion: tekton.dev/v1alpha1
kind: PipelineResource
metadata:
    name: openwhisk-nodejs-helloworld-image
spec:
    type: image
    params:
        - name: url
          value: docker.io/${DOCKER_USERNAME}/openwhisk-nodejs-helloworld
---

# Task Run to build NodeJS image with the action source
apiVersion: tekton.dev/v1alpha1
kind: TaskRun
metadata:
    name: openwhisk-nodejs-helloworld
spec:
    serviceAccountName: openwhisk-runtime-builder
    taskRef:
        name: openwhisk
    inputs:
        resources:
            - name: runtime-git
              resourceRef:
                name: openwhisk-nodejs-runtime-git
        params:
            - name: DOCKERFILE
              value: "./runtime-git/core/nodejs10Action/knative/Dockerfile"
            - name: OW_ACTION_NAME
              value: "nodejs-helloworld"
            - name: OW_ACTION_CODE
              value: "function main() {return {payload: 'Hello World!'};}"
            - name: OW_PROJECT_URL
              value: ""
    outputs:
        resources:
            - name: runtime-image
              resourceRef:
                name: openwhisk-nodejs-helloworld-image
---
Fitxategi honetarako uneko datuak aplikatzen ditugu:
$ sed 's/${DOCKER_USERNAME}/'"$DOCKER_USERNAME"'/' -i taskrun.yamlAplikatzen dugu:
$ kubectl apply -f taskrun.yaml
pipelineresource.tekton.dev/openwhisk-nodejs-runtime-git created
pipelineresource.tekton.dev/openwhisk-nodejs-helloworld-image created
taskrun.tekton.dev/openwhisk-nodejs-helloworld created
Eragiketa egiaztatzeko pod-aren izena berreskuratu eta bere egoera ikusi behar da. Urrats bakoitzaren exekuzio-erregistroa ere ikus dezakezu, adibidez:
$ kubectl get taskrun
NAME                          SUCCEEDED   REASON      STARTTIME   COMPLETIONTIME
openwhisk-nodejs-helloworld   True        Succeeded   5m15s       44s
$ kubectl get pod openwhisk-nodejs-helloworld-pod-4640d3
NAME                                     READY   STATUS      RESTARTS   AGE
openwhisk-nodejs-helloworld-pod-4640d3   0/6     Completed   0          5m20s
$ kubectl logs openwhisk-nodejs-helloworld-pod-4640d3 -c step-git-source-openwhisk-nodejs-runtime-git-r8vhr
{"level":"info","ts":1576532931.5880227,"logger":"fallback-logger","caller":"logging/config.go:69","msg":"Fetch GitHub commit ID from kodata failed: open /var/run/ko/refs/heads/master: no such file or directory"}
{"level":"info","ts":1576532936.538926,"logger":"fallback-logger","caller":"git/git.go:81","msg":"Successfully cloned https://github.com/apache/openwhisk-runtime-nodejs.git @ master in path /workspace/runtime-git"}
{"level":"warn","ts":1576532936.5395331,"logger":"fallback-logger","caller":"git/git.go:128","msg":"Unexpected error: creating symlink: symlink /tekton/home/.ssh /root/.ssh: file exists"}
{"level":"info","ts":1576532936.8202565,"logger":"fallback-logger","caller":"git/git.go:109","msg":"Successfully initialized and updated submodules in path /workspace/runtime-git"}
Amaitutakoan, Erregistroan irudi bat izango dugu, kn utilitatea erabiliz zabaldu daitekeena, Knative zerbitzuekin lan egiteko diseinatua, adibidez:
kn service create nodejs-helloworld --image docker.io/${DOCKER_USERNAME}/openwhisk-nodejs-helloworld
Service 'nodejs-helloworld' successfully created in namespace 'default'.
Waiting for service 'nodejs-helloworld' to become ready ... OK

Service URL:
http://nodejs-helloworld.default.example.com
Gloo erabiltzen ari bazara, honela egiaztatu dezakezu bere funtzionaltasuna:
$ curl -H "Host: nodejs-helloworld.default.example.com" -X POST $(glooctl proxy url --name knative-external-proxy)
{"OK":true}
$ curl -H "Host: nodejs-helloworld.default.example.com" -X POST $(glooctl proxy url --name knative-external-proxy)
{"payload":"Hello World!"}
Serieko beste artikulu batzuk
Iturria: www.habr.com
