

Introduction
Optimizing office infrastructure and deploying new jobs is a major challenge for companies of all types and sizes. The best option for a new project is to rent resources in the cloud and purchase licenses that can be used both from the provider and in your own data center. One solution for such a scenario is , which allows you to create a platform for collaboration and corporate communications of the enterprise both in the cloud environment and on its own infrastructure.

The solution is designed for offices of any size and has two main deployment scenarios: a single-server setup for up to 3000 mailboxes and low fault tolerance requirements, while a multi-server setup supports reliable and responsive operation for tens or hundreds of thousands of mailboxes. In all cases, users access email, documents, and messages through a single web interface from any desktop, no need to install or configure additional software, or through mobile apps for iOS and AndroidYou can use the familiar Outlook and Thunderbird clients.
To deploy the project, partner Zextras − I chose Yandex.Cloud, because its architecture is similar to AWS and there is support for S3 compatible storage, which will reduce the cost of storing large amounts of mail, messages, and documents and increase the fault tolerance of the solution.
In the Yandex.Cloud environment, single-server installation uses basic tools for managing virtual machines and virtual network management capabilities . For multi-server installation, in addition to the indicated tools, it is necessary to use technologies , if necessary (depending on the scale of the system) - also , and network balancer .
S3 compatible object storage can be used in both installation options, and can also be connected to systems deployed on-premise for economical and fault-tolerant storage of mail server data in Yandex.Cloud.
For a single-server installation, depending on the number of users and / or mailboxes, it is required: for the main server 4-12 vCPU, 8-64 GB vRAM (specific vCPU and vRAM values depend on the number of mailboxes and actual load), at least 80 GB of disk space for the operating system and applications, as well as additional disk space for storing mail, indexes, logs, etc., depending on the number and average size of mailboxes and which can dynamically change during system operation; for auxiliary Docs servers: 2-4 vCPUs, 2-16 GB vRAM, 16 GB of disk space (specific resource values and number of servers depend on the actual load); additionally, a TURN/STUN server may be required (its need as a separate server and resources depend on the actual load). For multi-server installations, the number and purpose of role-based virtual machines and the resources allocated to them are determined individually depending on the user's requirements.
Purpose of the article
Description of deployment in the Yandex.Cloud environment of Zextras Suite products based on the Zimbra mail server in the single-server installation option. The resulting installation can be used in a productive environment (experienced users can make the necessary settings and add resources).
The Zextras Suite/Zimbra system includes:
- Zimbra - corporate email with the ability to share mailboxes, calendars and contact lists (address books).
- Zextras Docs - built-in office suite based on LibreOffice online for creating and collaborating with documents, spreadsheets, presentations.
- Zextras Drive - an individual file storage that allows you to edit, store and share files and folders with other users.
- Zextras Team – messenger with support for audio and video conferencing. Versions are available of Team Basic, which allows only 1:1 communication, and Team Pro, which supports multi-user conferences, channels, screen sharing, file sharing, and other features.
- Zextras Mobile – support for mobile devices via Exchange ActiveSync to synchronize mail with mobile devices with MDM (Mobile Device Management) management features. Allows you to use Microsoft Outlook as your email client.
- Zextras Admin – implementation of multi-tenant system administration with delegation of administrators for managing client groups and service classes.
- Zextras Backup -reservation and restoration of data of a full cycle in real time
- Zextras Powerstore — a hierarchical storage of mail system objects with support for data processing classes, with the ability to store data locally or in cloud storages of the S3 architecture, including Yandex Object Storage.
Upon completion of the installation, the user receives a system running in the Yandex.Cloud environment.
Terms and conditions
- Disk space allocation for mailboxes, indexes, and other types of data is not described, since Zextras Powerstore supports various types of storage. The type and size of storages depend on the tasks and parameters of the system. If necessary, this can be done later in the process of transferring the described installation to a productive one.
- To simplify installation, the use of an administrator-managed DNS server for resolving internal (non-public) domain names is not considered; a standard Yandex.Cloud DNS server is used. When used in a productive environment, it is recommended to use a DNS server, which may already be in the corporate infrastructure.
- It is assumed that you are using an account in Yandex.Cloud with default settings (in particular, when you log in to the "Console" of the service, there is only a directory (in the "Available clouds" list under the name default). Users familiar with working in Yandex.Cloud, may, at their discretion, create a separate directory for the test bench, or use an existing one.
- The user must have a public DNS zone to which they must have administrative access.
- The user must have access to the directory in the Yandex.Cloud "Console" with at least the "editor" role (the "Cloud Owner" has all the necessary rights by default, there are manuals for granting access to other users to the cloud: , , )
- This article does not cover the installation of custom X.509 certificates used to secure network communications through TLS mechanisms. At the end of the installation, self-signed certificates will be used, which allows you to use browsers to access the installed system. They usually display a notification that the server does not have a verified certificate, but allow you to continue working. Before installation of certificates verified by client devices (signed by public and/or corporate certification authorities), applications for mobile devices may not work with the installed system. Therefore, the installation of these certificates in a productive environment is necessary, and is performed after the test is completed in accordance with corporate security policies.
Description of the installation process of the Zextras / Zimbra system in the "single-server" option
1. Preliminary preparation
Before starting the installation, you must ensure:
a) Making changes to the public DNS zone (creating an A-record for the Zimbra server and an MX-record for the accepted mail domain).
b) Setting up a virtual network infrastructure in Yandex.Cloud.
At the same time, after making changes to the DNS zone, it takes some time for these changes to propagate, but, on the other hand, you cannot create an A-record without knowing the IP address associated with it.
Therefore, actions are performed in the following sequence:
1. Reserve a public IP address in Yandex.Cloud
1.1 In the "Yandex.Cloud Console" (if necessary, selecting a directory in "available clouds"), go to the Virtual Private Cloud section, subsection IP addresses, then click the "Reserve address" button, select your preferred accessibility zone (or agree with the proposed value; this availability zone should subsequently be used for all subsequent actions in Yandex.Cloud, if the appropriate forms allow you to select an availability zone), in the dialog box that opens, if you wish, you can, but not necessarily, select the "DDoS Protection" option, and click the "Reserve" button (see also ).
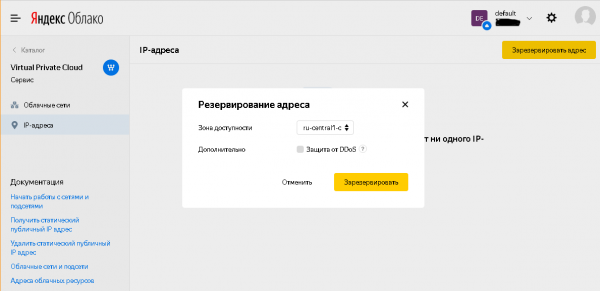
After closing the dialog, a system-allocated static IP address will be available in the list of IP addresses, which can be copied and used in the next step.

1.2 In the "forward" DNS zone, make an A record for the Zimbra server pointing to the previously allocated IP address, an A record for the TURN server pointing to the same IP address, and an MX record for the accepted mail domain. In our example, these will be mail.testmail.svzcloud.ru (Zimbra server), turn.testmail.svzcloud.ru (TURN server), and testmail.svzcloud.ru (mail domain), respectively.
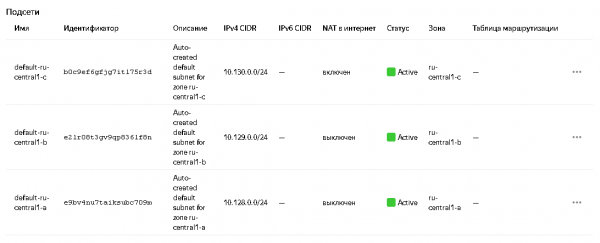
1.3 In Yandex.Cloud, in the selected availability zone for the subnet that will be used to deploy virtual machines, enable NAT to the Internet.
To do this, in the Virtual Private Cloud section, the Cloud Networks subsection, select the appropriate cloud network (by default, only the default network is available there), select the appropriate availability zone in it, and select the Enable NAT on the Internet item in its settings.
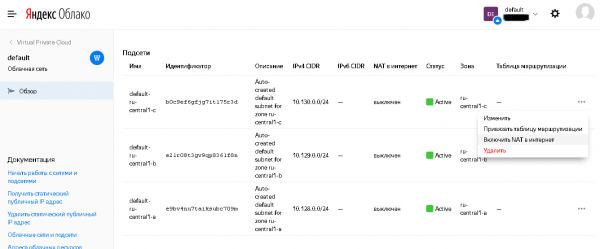
The status will change in the list of subnets:
See documentation for details: и .
2. Create virtual machines
2.1. Creating a virtual machine for Zimbra
Use your abilities in the following order:
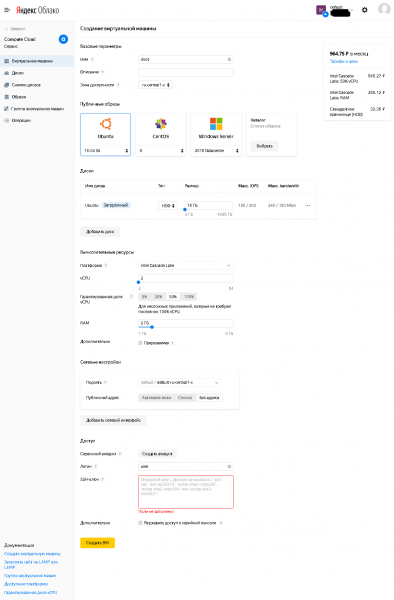
2.1.1 In the Yandex.Cloud Console, go to the Compute Cloud section, subsection "Virtual Machines", click the "Create VM" button (for more information about creating a VM, see ).
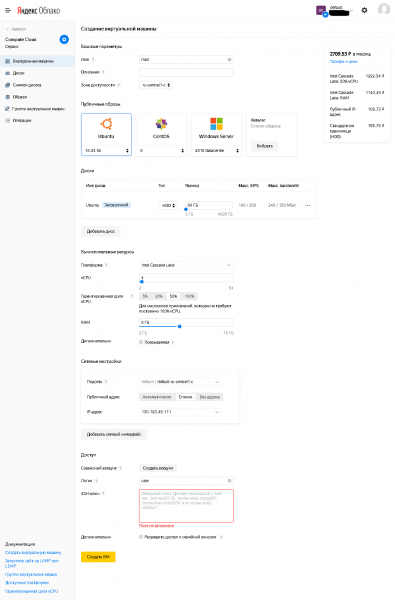
2.1.2 There you need to set:
- Name - optional (according to the format supported by Yandex.Cloud)
- Availability Zone - must match the one previously selected for the virtual network.
- In "Public Images" select Ubuntu 18.04 lts
- In the disks, install a bootable disk with a size of at least 80GB. For test purposes, the HDD type is sufficient (and also for productive use, provided that some types of data are placed on SSD disks). If necessary, additional disks can be added after the VM is created.
In "computing resources" set:
- vCPU: at least 4.
- Guaranteed share of vCPU: at least 50% for the duration of the steps described in the article, after the installation is completed, if necessary, it can be reduced.
- RAM: 8GB recommended.
- Subnet: Select the subnet for which Internet NAT was enabled during the pre-provisioning phase.
- Public address: select from the list the IP address previously used to create an A-record in DNS.
- User: at your discretion, but different from the root user and system accounts Linux.
- Be sure to set a public (open) SSH key.
→
См. также Appendix 1. Creating SSH keys in openssh and putty and converting keys from putty format to openssh.
2.1.3 After completing the settings, click "Create VM".
2.2. Creating a Virtual Machine for Zextras Docs
Use your abilities in the following order:
2.2.1 In the Yandex.Cloud Console, go to the Compute Cloud section, subsection "Virtual Machines", click the "Create VM" button (for more information about creating a VM, see ).
2.2.2 There you need to set:
- Name - optional (according to the format supported by Yandex.Cloud)
- Availability Zone - must match the one previously selected for the virtual network.
- In "Public Images" select Ubuntu 18.04 lts
- In the disks, install a bootable disk with a size of at least 80GB. For test purposes, the HDD type is sufficient (and also for productive use, provided that some types of data are placed on SSD disks). If necessary, additional disks can be added after the VM is created.
In "computing resources" set:
- vCPU: at least 2.
- Guaranteed share of vCPU: at least 50% for the duration of the steps described in the article, after the installation is completed, if necessary, it can be reduced.
- RAM: at least 2GB.
- Subnet: Select the subnet for which Internet NAT was enabled during the pre-provisioning phase.
- Public address: no address (this machine does not require access from the Internet, only outgoing access from this machine to the Internet, which is provided by the "NAT to the Internet" option of the subnet used).
- User: at your discretion, but different from the root user and system accounts Linux.
- Be sure to set a public (public) SSH key, you can use the same one as for the Zimbra server, you can generate a separate key pair, because the private key for the Zextras Docs server will need to be placed on the Zimbra server disk.
See also Appendix 1. Creating SSH keys in openssh and putty and converting keys from putty format to openssh.
2.2.3 After completing the settings, click "Create VM".
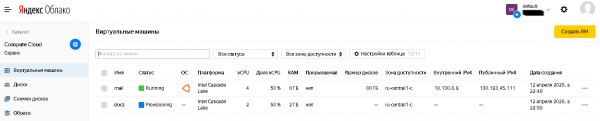
2.3 The created virtual machines will be available in the list of virtual machines, which displays, in particular, their status and used IP addresses, both public and internal. Information about IP addresses will be required in later installation steps.
3. Preparing the Zimbra server for installation
3.1 Installing updates
You need to log in to the Zimbra server at its public IP address using your preferred ssh client using the private (private, private) ssh key and using the username specified when creating the virtual machine.
After logging in, run the following commands:
sudo apt update
sudo apt upgrade
(when executing the last command, answer “y” when asked if you are sure that the proposed list of updates is installed)
After installing the updates, you can (but not necessarily) run the command:
sudo apt autoremoveAnd at the end of the step, run the command
sudo shutdown –r now3.2 Additional installation of applications
You need to install an NTP client to synchronize the system time and the screen application with the following command:
sudo apt install ntp screen(when executing the last command, answer "y" when asked if you are sure you installed the supplied list of packages)
You can also install additional utilities for the convenience of the administrator. For example, Midnight Commander can be installed with the command:
sudo apt install mc3.3. Changing the system configuration
3.3.1 In file /etc/cloud/cloud.cfg.d/95-yandex-cloud.cfg change parameter value manage_etc_hosts c true + false.
Note: the editor to modify this file must be run as root, for example, “sudo vi /etc/cloud/cloud.cfg.d/95-yandex-cloud.cfg” or, if the mc package is installed, you can use the command “sudo mcedit /etc/cloud/cloud.cfg.d/95-yandex-cloud.cfg»
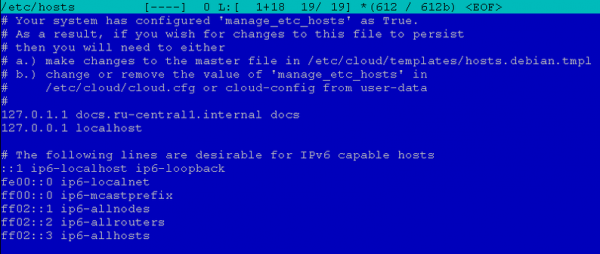
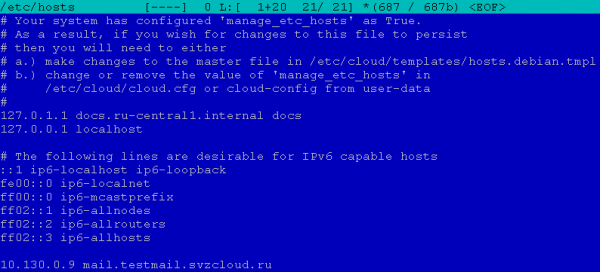
3.3.2 Edit / Etc / hosts as follows, replacing in the line defining the FQDN of the host, the address from 127.0.0.1 to the internal IP address of this server, and the name from the fully qualified name in the .internal zone to the public name of the server specified earlier in the A-record of the DNS zone, and the corresponding by changing the short hostname in this way (if it differs from the short hostname from the public DNS A-record).
For example, in our case, the hosts file looked like:

After editing, it took the form:
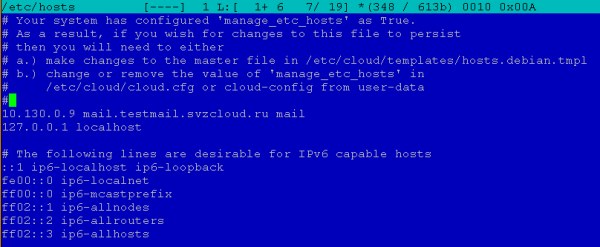
Note: the editor to modify this file must be run as root, for example, “sudo vi / etc / hosts” or, if the mc package is installed, you can use the command “sudo mcedit /etc/hosts»
3.4 Set user password
This is necessary because the firewall will be configured in the future, and in case of any problems with it, if the user has a password, it will be possible to log into the virtual machine using the serial console from the Yandex.Cloud web console and disable the firewall and/or fix the error. When creating a virtual machine, the user does not have a password, and therefore access is only possible via SSH using key authentication.
To set a password, run the command:
sudo passwd <имя пользователя>For example, in our case it will be the command “sudo passwd user".
4. Installing Zimbra and Zextras Suite
4.1. Download distributions of Zimbra and Zextras Suite
4.1.1 Downloading the Zimbra distribution
Use your abilities in the following order:
1) Go browser to URL and fill out the form. You will receive an email with links to download Zimbra for different operating systems.
2) Select the current version of the distribution for the platform Ubuntu 18.04 LTS and copy the link
3) Download the Zimbra distribution to the Zimbra server and extract it. To do this, in an ssh session on the zimbra server, run the commands
cd ~
mkdir zimbra
cd zimbra
wget <url, скопированный на предыдущем шаге>
tar –zxf <имя скачанного файла>
(in our example it is “tar –zxf zcs-9.0.0_OSE_UBUNTU18_latest-zextras.tgz")
4.1.2 Downloading the Zextras Suite distribution
Use your abilities in the following order:
1) Go browser to URL
2) Fill out the form by entering the required data and click the “DOWNLOAD NOW” button
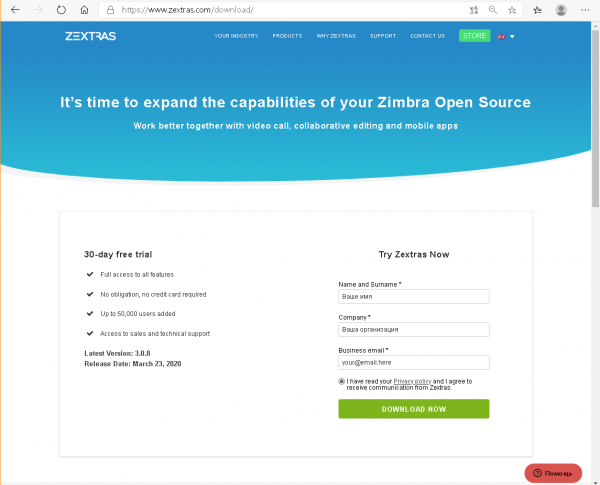
3) The download page will open
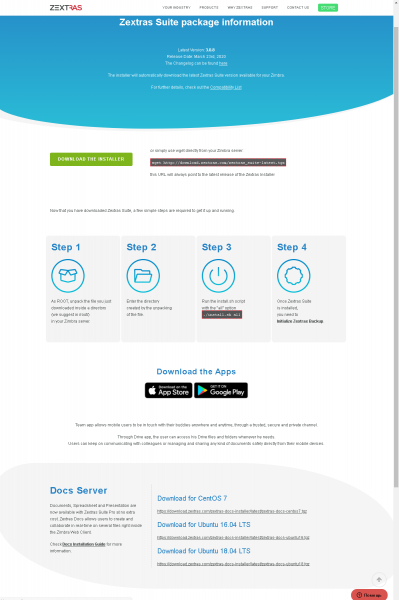
There are two URLs that interest us: one at the top of the page for Zextras Suite itself, which we will need now, and the other at the bottom in the Docs Server block for Ubuntu 18.04 LTS, which will be needed later to install Zextras Docs on VM for Docs.
4) Download the Zextras Suite distribution to the Zimbra server and unzip it. To do this, in an ssh session on the zimbra server, run the commands
cd ~
mkdir zimbra
cd zimbra
(if the current directory has not changed after the previous step, the commands above can be omitted)
wget http://download.zextras.com/zextras_suite-latest.tgz
tar –zxf zextras_suite-latest.tgz
4.2. Installing Zimbra
Sequencing
1) Go to the directory where the files were unpacked in step 4.1.1 (can be viewed with the ls command, being in the ~/zimbra directory).
In our example, this would be:
cd ~/zimbra/zcs-9.0.0_OSE_UBUNTU18_latest-zextras/zimbra-installer2) Run the Zimbra installation with the command
sudo ./install.sh3) Answering installer questions
You can answer the installer's questions with “y” (corresponds to “yes”), “n” (corresponds to “no”), or leave the installer's sentence unchanged (it suggests options by displaying them in square brackets, for example, “[Y]” or “ [N]".
Do you agree with the terms of the software license agreement? - Yes.
Use Zimbra's package repository? - default (yes).
"Install zimbra-ldap?","Install zimbra-logger?","Install zimbra-mta?” is the default (yes).
Install zimbra-dnscache? – no (by default, the operating system has its own caching DNS server, so this package will have a conflict with it due to the ports used).
Install zimbra-snmp? - optionally, you can leave the default option (yes), you can not install this package. In our example, the default option is left.
"Install zimbra-store?","Install zimbra-apache?","Install zimbra-spell?","Install zimbra-memcached?","Install zimbra-proxy?” is the default (yes).
Install zimbra-snmp? – no (the package is not actually supported and is functionally replaced by Zextras Drive).
Install zimbra-imapd? - default (none).
Install zimbra-chat? – no (functionally replaced by Zextras Team)
After that, the installer will ask whether to continue the installation?
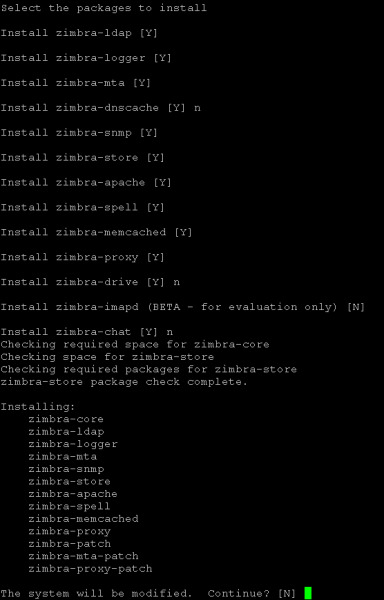
We answer “yes” if we can continue, otherwise we answer “no” and get the opportunity to change the answers to previously asked questions.
After agreeing to continue, the installer will install the packages.
4.) Answering the questions of the primary configurator
4.1) Because our example differs between the DNS name of the mail server (A-record name) and the accepted mail domain name (MX-record name), the configurator displays a warning and prompts you to set the accepted mail domain name. We agree with his proposal and enter the name of the MX record. In our example, it looks like this:

Note: You can also set the accepted mail domain other than the server name if there is an MX record of the same name for the server name.
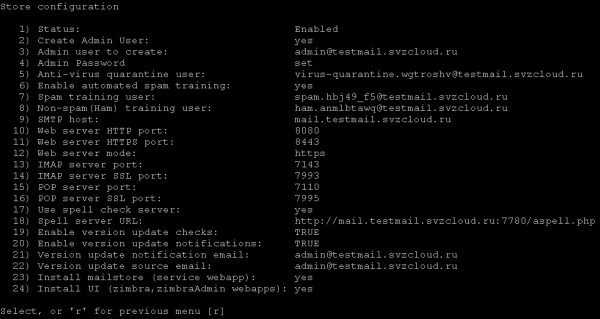
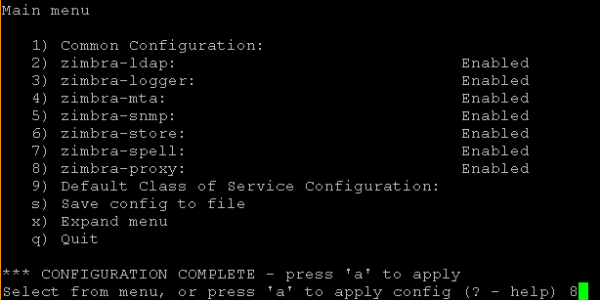
4.2) The configurator displays the main menu.
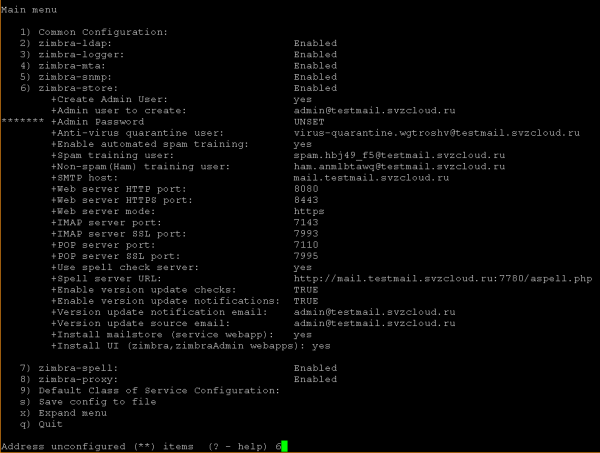
We need to set the Zimbra administrator password (menu item 6 in our example), without which the installation cannot continue, and change the zimbra-proxy setting (menu item 8 in our example; if necessary, this setting can be changed after installation).
4.3) Changing zimbra-store settings
In the configurator prompt, enter the menu item number and press Enter. We get into the storage settings menu:
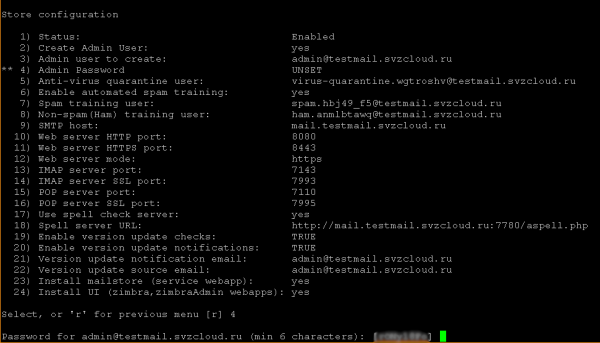
where in the configurator prompt we enter the number of the Admin Password menu item (in our example 4), press Enter, after which the configurator offers a randomly generated password that you can agree with (remembering it) or enter your own. In both cases, at the end, you must press Enter, after which the marker for waiting for information from the user will be removed from the “Admin Password” item:
We return to the previous menu (we agree with the configurator's proposal).
4.4) Changing zimbra-proxy settings
By analogy with the previous step, in the main menu, select the number of the “zimbra-proxy” item and enter it in the configurator prompt.
In the Proxy configuration menu that opens, select the number of the “Proxy server mode” item and enter it in the configurator prompt.
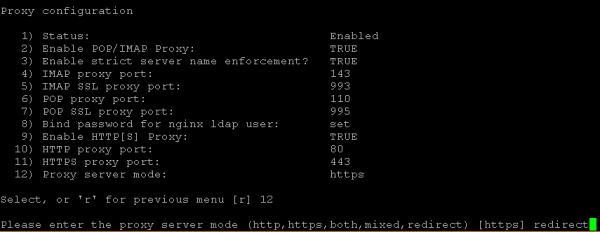
The configurator will prompt you to select one of the modes, enter “redirect” in its prompt and press Enter.
Then we return to the main menu (we agree with the configurator's proposal).
4.5) Running Configuration
To run the configuration, enter "a" at the configurator prompt. After that, he will ask whether to save the entered configuration to a file (which can be used for re-installation) - you can agree with the default offer, if saving is done - he will ask in which file to save the configuration (you can also agree with the default offer or enter your own file name).
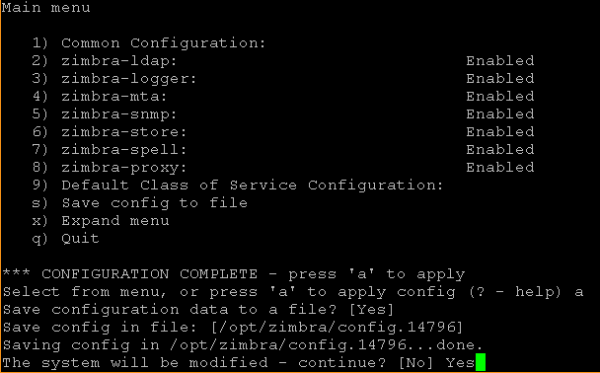
At this stage, you can still refuse to continue and make changes to the configuration, agreeing with the default answer to the question "The system will be modified - continue?".
To start the installation, you must answer “Yes” to this question, after which the configurator will apply the previously entered settings for some time.
4.6) Completing the Zimbra Installation
Before completing, the installer will ask if Zimbra should be notified that the installation has been completed? You can either accept the default offer or refuse (by answering “No”) the notification.
After that, the installer will perform the final operations for some more time and will display a notification about the completion of the system configuration with a suggestion to press any key to exit the installer.

4.3. Installation of Zextras Suite
Learn more about installing Zextras Suite here. .
Use your abilities in the following order:
1) Go to the directory where the files were unpacked in step 4.1.2 (can be viewed with the ls command, being in the ~/zimbra directory).
In our example, this would be:
cd ~/zimbra/zextras_suite2) Run the installation of Zextras Suite with the command
sudo ./install.sh all3) Answering installer questions
The principle of the installer is similar to the work of the Zimbra installer, except for the lack of a configurator. You can answer the installer's questions with “y” (corresponds to “yes”), “n” (corresponds to “no”), or leave the installer's sentence unchanged (it suggests options by displaying them in square brackets, for example, “[Y]” or “ [N]".
To start the installation process, you must consistently answer “yes” to the following questions:
Do you agree with the terms of the software license agreement?
Do you wish for Zextras Suite to automatically download, install and upgrade the ZAL Library?
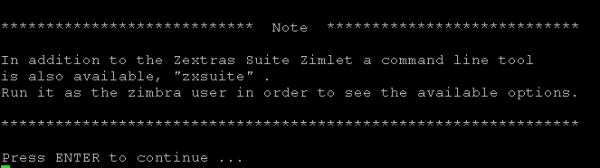
After that, a notification will be displayed asking you to press Enter to continue:
After pressing Enter, the installation process will begin, sometimes interrupted by questions, to which, however, we answer with agreement with the default proposals (“yes”), namely:
Zextras Suite Core will now be installed. Proceed?
Do you wish to stop the Zimbra Web Application (mailbox)?
The Zextras Suite Zimlet will now be installed. Proceed?
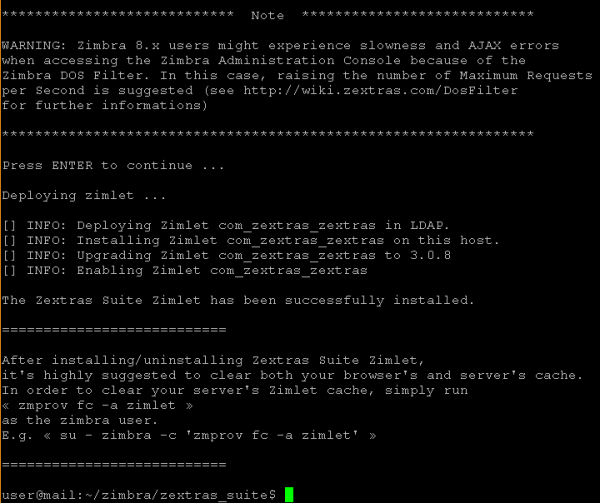
Before the final part of the installation begins, you will be prompted to configure the DOS filter and prompt you to press Enter to continue. After pressing Enter, the final part of the installation begins, at the end a final notification is displayed and the installer is completed.
4.4. Initial tuning of the configuration and definition of LDAP configuration parameters
1) All subsequent actions are performed under the zimbra user. To do this, you need to run the command
sudo su - zimbra2) We change the DOS filter setting with the command
zmprov mcf zimbraHttpDosFilterMaxRequestsPerSec 1503) To install the Zextras Docs, you will need information about some of the Zimbra configuration options. To do this, you can run the command:
zmlocalconfig –s | grep ldapIn our example, the following information will be displayed:
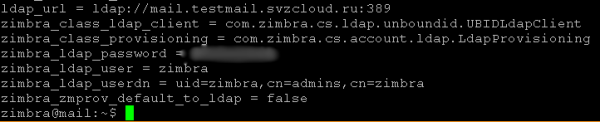
For further use, you will need ldap_url, zimbra_ldap_password (and zimbra_ldap_userdn, although the Zextras Docs installer usually makes correct guesses about the LDAP username).
4) Log out as user zimbra by running the command
logout
5. Preparing the Docs Server for Installation
5.1. Upload SSH private key to Zimbra server and login to server Docs
It is necessary to place on the Zimbra server the private key of the SSH key pair, the public key of which was used in step 2.2.2 p.2.2 when creating the Docs virtual machine. It can be uploaded to the server via SSH (for example, via sftp) or pasted via the clipboard (if the capabilities of the SSH client used and its runtime environment allow).
We consider that the private key is placed in the ~/.ssh/docs.key file and the user used to log into the Zimbra server is its owner (if this user uploaded/created this file, he automatically became its owner).
You need to run the command once:
chmod 600 ~/.ssh/docs.keyIn the future, to enter the Docs server, you must perform the following sequence of actions:
1) Login to Zimbra server
2) Execute command
ssh -i ~/.ssh/docs.key user@<внутренний ip-адрес сервера Docs>Where the value <internal ip-address of the Docs server> can be found in the "Yandex.Cloud Console", for example, as shown in paragraph 2.3.
5.2. Installing updates
After logging into the Docs server, run the commands similar to those for the Zimbra server:
sudo apt update
sudo apt upgrade
(when executing the last command, answer “y” when asked if you are sure that the proposed list of updates is installed)
After installing the updates, you can (but not necessarily) run the command:
sudo apt autoremoveAnd at the end of the step, run the command
sudo shutdown –r now5.3. Additional installation of applications
You need to install an NTP client to synchronize the system time and the screen application, similarly to the same action for the Zimbra server, with the following command:
sudo apt install ntp screen(when executing the last command, answer "y" when asked if you are sure you installed the supplied list of packages)
You can also install additional utilities for the convenience of the administrator. For example, Midnight Commander can be installed with the command:
sudo apt install mc5.4. Changing the system configuration
5.4.1. In the /etc/cloud/cloud.cfg.d/95-yandex-cloud.cfg file, just as for the Zimbra server, change the value of the manage_etc_hosts parameter from true to false.
Note: the editor to modify this file must be run as root, for example, “sudo vi /etc/cloud/cloud.cfg.d/95-yandex-cloud.cfg” or, if the mc package is installed, you can use the command “sudo mcedit /etc/cloud/cloud.cfg.d/95-yandex-cloud.cfg»
5.4.2. Edit /etc/hosts by adding the public FQDN of the Zimbra server, but with the internal IP address assigned by Yandex.Cloud. If you have an administrator-managed internal DNS server used by virtual machines (for example, in a production environment), and is able to resolve the public FQDN of the Zimbra server to the internal IP address when it is requested from the internal network (for requests from the Internet, the FQDN of the Zimbra server must be resolved to the public IP address) address, and the TURN server must always be resolved by a public IP address, including when accessed from internal addresses), this operation is not required.
For example, in our case, the hosts file looked like:
After editing, it took the form:
Note: the editor to modify this file must be run as root, for example, “sudo vi / etc / hosts” or, if the mc package is installed, you can use the command “sudo mcedit /etc/hosts»
6. Installing Zextras Docs
6.1. Log in to the Docs server
The procedure for entering the Docs server is described in clause 5.1.
6.2. Downloading the Zextras Docs Distribution
Use your abilities in the following order:
1) From the page from which the Zextras Suite distribution was downloaded in section 4.1.2. Downloading the Zextras Suite distribution (in step 3), copy the URL for assembling Docs for Ubuntu 18.04 LTS (if it was not copied earlier).
2) Download the Zextras Suite distribution to the Zimbra server and unzip it. To do this, in an ssh session on the zimbra server, run the commands
cd ~
mkdir zimbra
cd zimbra
wget <URL со страницы скачивания>
(in our case, the command "wget ")
tar –zxf <имя скачанного файла>(in our case, the command “tar –zxf zextras-docs-” is executedubuntu18.tgz»)
6.3. Installing Zextras Docs
For more information about installing and configuring the Zextras Docs, see. .
Use your abilities in the following order:
1) Go to the directory where the files were unpacked in step 4.1.1 (can be viewed with the ls command, being in the ~/zimbra directory).
In our example, this would be:
cd ~/zimbra/zextras-docs-installer2) Run the installation of Zextras Docs with the command
sudo ./install.sh3) Answering installer questions
You can answer the installer's questions with “y” (corresponds to “yes”), “n” (corresponds to “no”), or leave the installer's sentence unchanged (it suggests options by displaying them in square brackets, for example, “[Y]” or “ [N]”).
System will be modified, would you like to proceed? - accept the default option ("yes").
After that, the installation of dependencies will begin: the installer will show which packages it wants to install and ask for confirmation to install them. In all cases, we agree with the default proposals.
For example, he might ask "python2.7 not found. Would you like to install it?","python-ldap not found. Would you like to install it?" etc.
After installing all the necessary packages, the installer asks for consent to install Zextras Docs:
Would you like to install Zextras DOCS? - accept the default option ("yes").
After that, for some time, the packages are installed, in fact, Zextras Docs and the transition to the questions of the configurator.
4) Answering configuration questions
The configurator requests configuration parameters one by one, in response, the values obtained at step 3 in clause 4.4 are entered. Initial tuning of the configuration and definition of LDAP configuration parameters.
In our example, the settings look like:

5) Completing the installation of Zextras Docs
After answering the configurator's questions, the installer completes the local Docs configuration and registers the installed service on the main Zimbra server installed earlier.
For a single-server installation, this is usually sufficient, but in some cases (if the documents will not open in Docs in the web client on the Drive tab), you may need to perform an action that is mandatory for a multi-server installation - in our example, on the main Zimbra server, you will need to execute from under user Zimbra commands /opt/zimbra/libexec/zmproxyconfgen и zmproxyctl restart.
7. Initial setup of Zimbra and Zextras Suite (except Team)
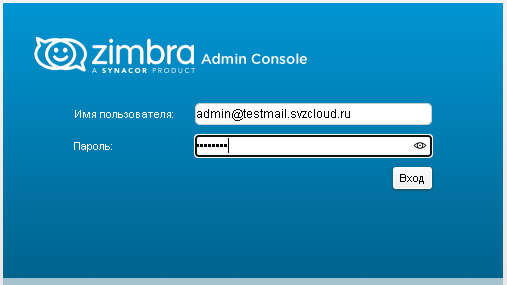
7.1. Initial login to the admin console
Login in browser using URL: https:// :7071
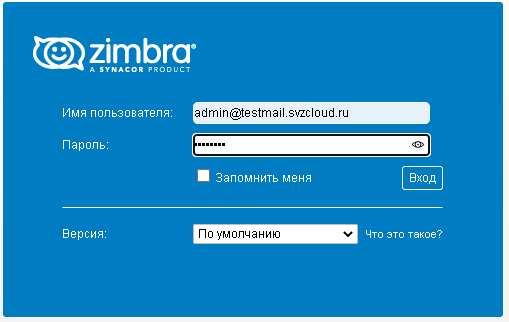
Optionally, you can log in to the web client using the URL: https://
When logging in, browsers show an insecure connection warning due to the inability to verify the certificate. It is necessary to respond to the browser with consent to go to the site despite this warning. This is due to the fact that after installation, a self-signed X.509 certificate is used for TLS connections, which can later be (in productive use - necessary) replaced with a commercial certificate or another certificate recognized by the browsers used.
In the authentication form, enter the username in the format admin@<your accepted email domain> and the Zimbra administrator password that was set during the installation of the Zimbra server in step 4.3 in section 4.2.
In our example, it looks like this:
Admin Console:
Web client:
Note 1. If you do not specify an accepted mail domain when logging into the admin console or web client, users will be authenticated against the mail domain created when the Zimbra server was installed. After installation, this is the only accepted mail domain that exists on this server, but additional mail domains may be added during operation of the system, and then explicitly specifying the domain in the user name will make a difference.
Note 2. When you sign in to the web client, your browser may ask you for permission to display notifications from the site. You must agree to receive notifications from this site.
Note 3. After logging into the admin console, you may be notified that there are messages to the administrator, usually a reminder to set up Zextras Backup and/or to purchase a Zextras license before the default trial license expires. These actions can be performed later, and therefore messages available at the time of entry can be ignored and / or marked as read in the Zextras menu: Zextras Alert.
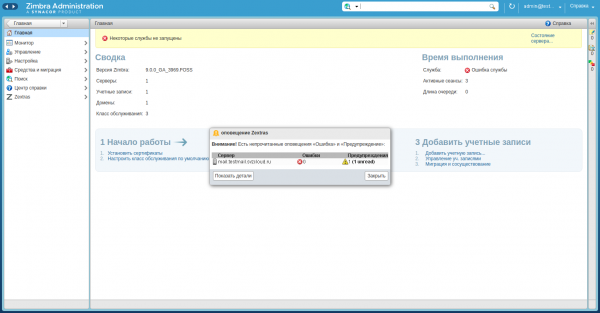
Note 4. Of particular note, in the server status monitor, the status of the Docs service is displayed as "not available" even though Docs in the web client is working correctly:
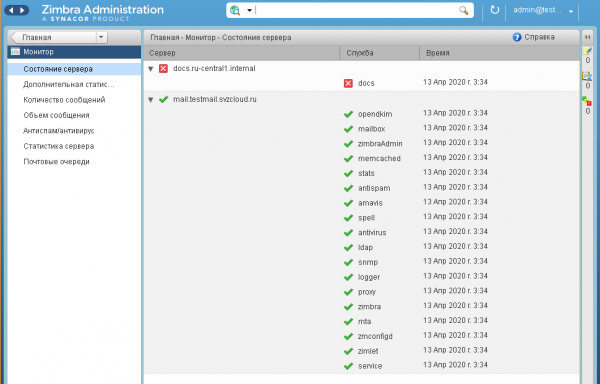
This is a feature of the trial version and can only be fixed after purchasing a license and contacting support.
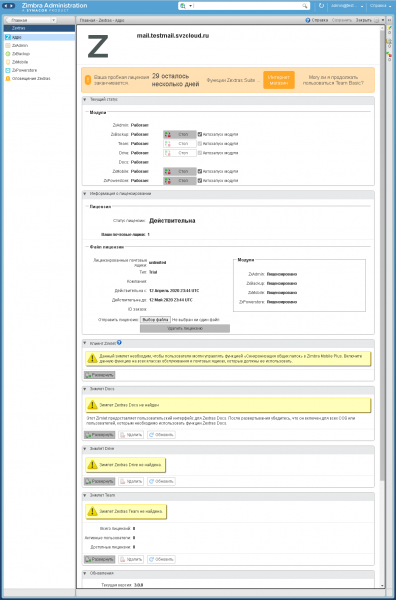
7.2. Deploying Zextras Suite Components
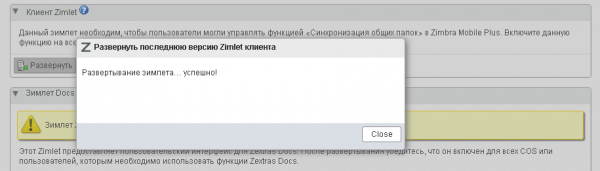
In the Zextras: Core menu, you must click on the "Expand" button for all the zimlets that you intend to use.
When deploying zimlets, a dialog is displayed with the result of an operation of the following form:
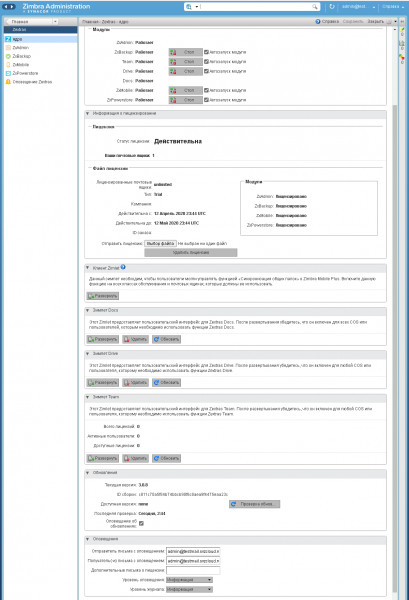
In our example, all Zextras Suite zimlets are deployed, after which the Zextras: Core form will take the following form:
7.3. Change access settings
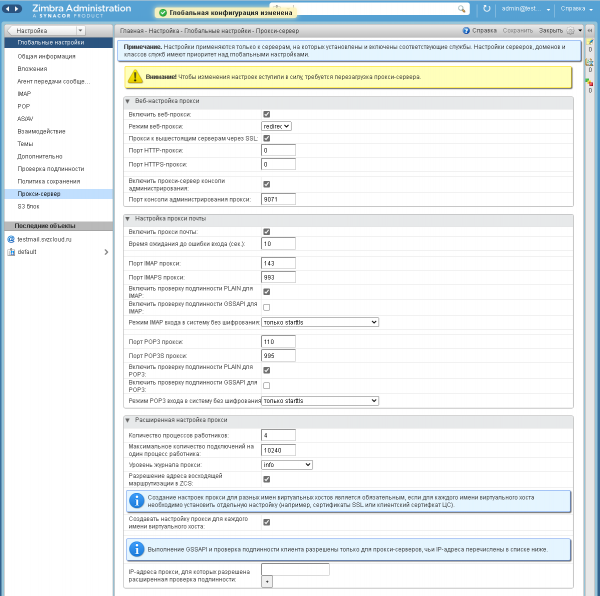
7.3.1. Changing global settings
In the Settings menu: Global settings, submenu Proxy server, change the following settings:
Web proxy mode: redirect
Enable the administration console proxy server: check the box.
Then, in the upper right part of the form, click on "Save".
In our example, after the changes made, the form looks like this:
7.3.2. Changes to the main Zimbra server settings
In the Settings menu: Servers: <name of the main Zimbra server>, submenu Proxy server, change the following settings:
Web proxy mode: click on the "Reset to default value" button (in this case, the value itself will not change, since it was already set during installation). Enable the proxy server of the administration console: check that the checkbox is checked (the default value should have been applied, if not, you can click the "Reset to default value" button and/or set it manually). Then, in the upper right part of the form, click on "Save".
In our example, after the changes made, the form looks like this:
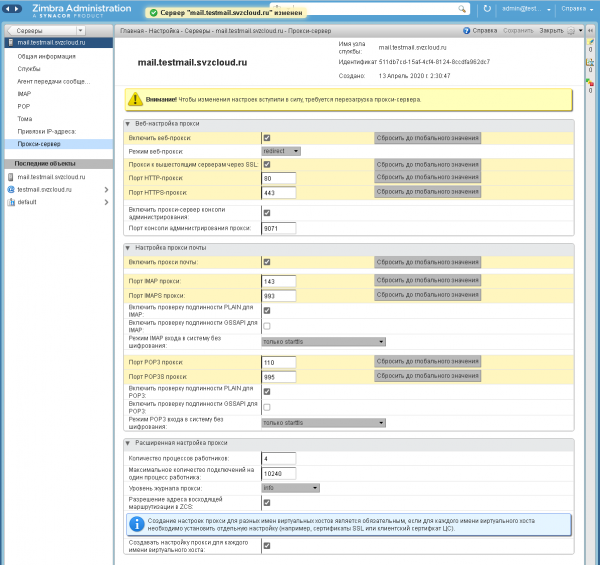
Note: (may need to restart if login on this port doesn't work)
7.4. New login to admin console
Log in to the admin console in a browser using the URL: https:// :9071
In the future, use this URL to log in
Note: for a single-server installation, the change made in the previous step is usually sufficient, but in some cases (if the server page is not displayed when entering the specified URL), you may need to perform an action that is mandatory for a multi-server installation - in our example, on the main Zimbra server you will need to execute commands from under the Zimbra user /opt/zimbra/libexec/zmproxyconfgen и zmproxyctl restart.
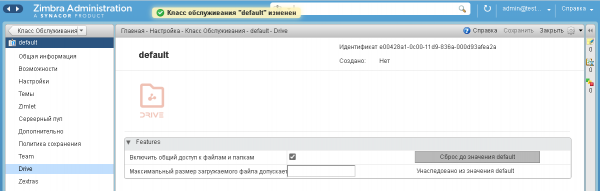
7.5. Default COS Editing
From the Setup: Class of Service menu, select the COS named "default".
In the "Opportunities" submenu, clear the checkbox for the "Portfolio" function, and then click on "Save" in the upper right part of the form.
In our example, after setting up the form looks like this:

It is also recommended to put a checkbox in the Drive submenu for the “Enable file and folder sharing” setting, and then click on “Save” in the upper right part of the form.
In our example, after setting up the form looks like this:
In a test environment in the same service class, you can enable Team Pro functions by enabling the checkbox with the same name in the Team submenu, after which the settings form will take the following form:
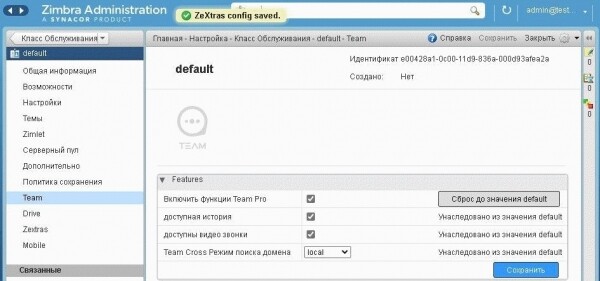
With Team Pro features disabled, only Team Basic features will be available to users.
Please note that Zextras Team Pro is licensed independently from Zextras Suite, which allows you to purchase it for fewer mailboxes than Zextras Suite itself; Team Basic features are included in the Zextras Suite license. Therefore, when used in a production environment, it may be necessary to create a separate class of service for Team Pro users that will enable the appropriate functionality.
7.6. Firewall setup
Required for the main Zimbra server:
a) Allow Internet access to ssh, http/https, imap/imaps, pop3/pop3s, smtp ports (main port and additional ports for use by email clients) and administration console port.
b) Allow all connections from the internal network (for which NAT to the Internet was enabled in step 1.3 in step 1).
For the Zextras Docs server, you do not need to configure a firewall, because. it is not accessible from the Internet.
To do this, you must perform the following sequence of actions:
1) Go to the text console of the main Zimbra server. When logging in via SSH, it is necessary to execute the “screen” command in order to avoid interrupting the execution of commands when the connection with the server is temporarily lost due to changes in the firewall settings.
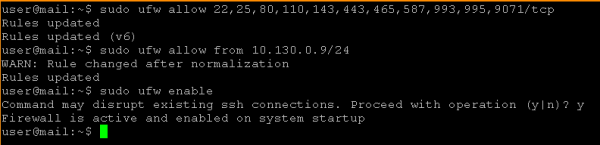
2) Run commands
sudo ufw allow 22,25,80,110,143,443,465,587,993,995,9071/tcp
sudo ufw allow from <адрес_вашей_сети>/<длина CIDR маски>
sudo ufw enable
In our example, it looks like this:
7.7. Checking Access to the Web Client and the Admin Console
To monitor the firewall's performance, you can go to the browser at the following URLs
Admin console: https:// :9071
Web client: http:// (will automatically redirect to https:// )
At the same time, using the alternative URL https:// :7071 admin console should not open.
The web client in our example looks like this:
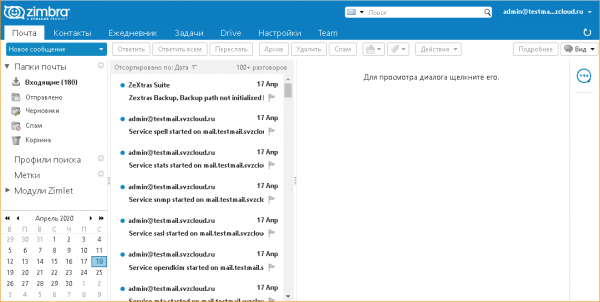
Note. When you sign in to the web client, your browser may ask you for permission to display notifications from the site. You must agree to receive notifications from this site.
8. Ensuring the operation of audio and video conferencing in Zextras Team
8.1. Overview
The following actions are not required if all Zextras Team clients communicate with each other without using NAT (at the same time, interaction with the Zimbra server itself can be carried out using NAT, i.e. the absence of NAT between clients is important), or if only text is used messenger.
To ensure the interaction of clients in the mode of audio and video conferencing:
a) You must install or use an existing TURN server.
b) Because the TURN server usually also has the functionality of a STUN server, it is recommended to use it in this capacity too (as an alternative, public STUN servers can be used, but the STUN functionality alone is usually not enough).
In a productive environment, due to the potentially high load, it is recommended to move the TURN server to a separate virtual machine. For testing and/or light load, the TURN server can be co-located with the main Zimbra server.
In our example, we will install the TURN server on the main Zimbra server. Installing TURN on a standalone server is similar, with the difference that the steps related to installing and configuring the TURN software are performed on the TURN server, while the steps to configure the Zimbra server to use this server are performed on the main Zimbra server.
8.2. Installing the TURN server
After logging in via SSH to the main Zimbra server, execute the command
sudo apt install resiprocate-turn-server8.3. Setting up the TURN server
Note. The editor to modify all the following configuration files must be run as root, for example, “sudo vi /etc/reTurn/reTurnServer.config” or, if the mc package is installed, you can use the command “sudo mcedit /etc/reTurn/reTurnServer.config»
Simplified user creation
To simplify the creation and debugging of a test connection to the TURN server, we will disable the use of hashed passwords in the user base of the TURN server. In a productive environment, it is recommended to use hashed passwords; in this case, generation of password hashes for them must be performed in accordance with the instructions contained in the /etc/reTurn/reTurnServer.config and /etc/reTurn/users.txt files.
Use your abilities in the following order:
1) Edit /etc/reTurn/reTurnServer.config file
Change the value of the "UserDatabaseHashedPasswords" parameter from "true" to "false".
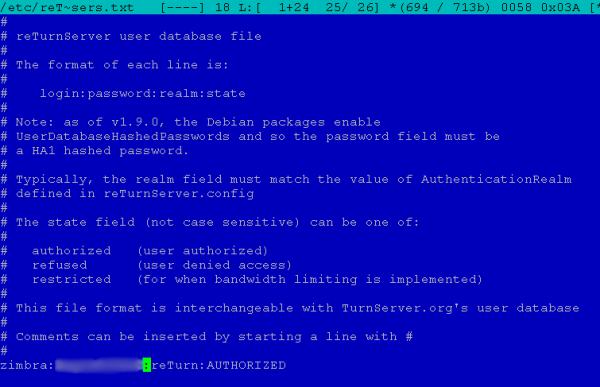
2) Edit /etc/reTurn/users.txt file
Set the username, password, realm (arbitrary, not used when setting up a Zimbra connection) in it and set the account status to “AUTHORIZED”.
In our example, the file initially looked like:
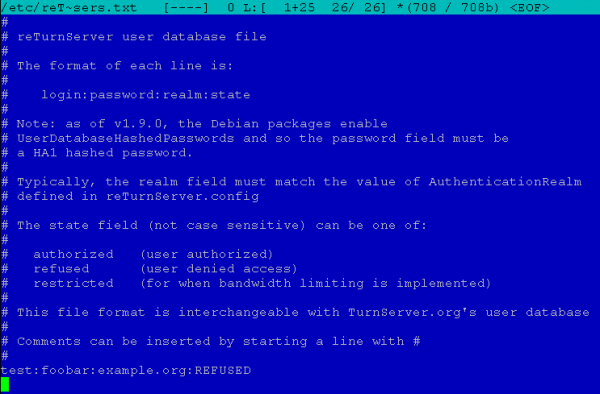
After editing it looked like this:
3) Applying a configuration
Execute command
sudo systemctl restart resiprocate-turn-server8.4. Firewall configuration for the TURN server
At this stage, additional firewall rules are installed that are necessary for the operation of the TURN server. You must allow access to the primary port on which the server accepts requests and to the dynamic range of ports used by the server to organize media streams.
The ports are specified in the /etc/reTurn/reTurnServer.config file, in our case it is:

и
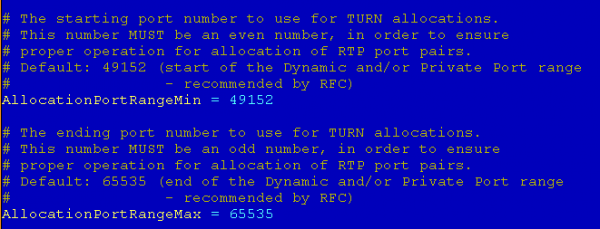
To install firewall rules, you need to run the commands
sudo ufw allow 3478,49152:65535/udp
sudo ufw allow 3478,49152:65535/tcp
8.5. Configuring the use of the TURN server in Zimbra
For configuration, the FQDN of the TURN server created in step 1.2, p.1 is used, and which should be resolved by DNS servers with the same public IP address for both requests from the Internet and requests from internal addresses.
View the current "zxsuite team iceServer get" connection setup running under the zimbra user.
For more information about setting up the use of the TURN server, see the section "Installing Zextras Team to use the TURN server" in .
To configure, you need to run the following commands on the Zimbra server:
sudo su - zimbra
zxsuite team iceServer add stun:<FQDN вашего сервера TURN>:3478?transport=udp
zxsuite team iceServer add turn:<FQDN вашего сервера TURN>:3478?transport=udp credential <пароль> username <имя пользователя>
zxsuite team iceServer add stun:<FQDN вашего сервера TURN>:3478?transport=tcp
zxsuite team iceServer add turn:<FQDN вашего сервера TURN>:3478?transport=tcp credential <пароль> username <имя пользователя>
zxsuite team iceServer add stun:<FQDN вашего сервера TURN>:3478
logout
As <username> and <password>, the username and password values are used, respectively, specified at step 2 in clause 8.3.
In our example, it looks like this:

9. Allowing mail to pass through the SMTP protocol
In accordance with , in Yandex.Cloud, outgoing traffic to TCP port 25 to the Internet and to Yandex Compute Cloud virtual machines is always blocked when accessed via a public IP address. This will not prevent you from checking if mail is received on an accepted mail domain from a different mail server, but it will prevent mail from being sent outside of the Zimbra server.
The documentation states that Yandex.Cloud can open TCP port 25 upon request from support if you follow , and reserves the right to block the port again in case of violation of the rules. To open the port, you need to contact Yandex.Cloud support.
application
Creating SSH keys in openssh and putty and converting keys from putty format to openssh
1. Creating Key Pairs for SSH
В Windows Using Putty: Run the puttygen.exe command and click the “Generate” button.
В Linux: execute command
ssh-keygen2. Convert keys from putty to openssh format
В Windows:
Use your abilities in the following order:
- Run puttygen.exe.
- Load the private key in ppk format using the menu item File → Load private key.
- Enter the code (passphrase) if it is required for this key.
- The public key in OpenSSH format is displayed in puttygen with "Public key for pasting into OpenSSH authorized_keys file field"
- To export the private key to the OpenSSH format, select Conversions → Export OpenSSH key from the main menu
- Save the private key to a new file.
В Linux
1. Install the PuTTY tool package:
в Ubuntu:
sudo apt-get install putty-toolsв Debian-similar distributions:
apt-get install putty-toolsin RPM-based distributions based on yum (CentOS and others):
yum install putty2. To convert the private key, run the following command:
puttygen <key.ppk> -O private-openssh -o <key_openssh>3. To generate a public key (if necessary):
puttygen <key.ppk> -O public-openssh -o <key_openssh.pub>Experience the Power of Effective Results
After installation in accordance with the recommendations, the user receives a Zimbra mail server configured in the Yandex.Cloud infrastructure with the Zextras extension for corporate communications and document collaboration. The settings are made with certain restrictions for the test environment, but it is not difficult to switch the installation to production mode and add options for using the Yandex.Cloud object storage and others. For questions about deploying and using the solution, please contact Zextras partner - or representatives .
For all questions related to Zextras Suite, you can contact the Representative of Zextras Ekaterina Triandafilidi by e-mail katerina@zextras.com
Source: habr.com
